Difference between revisions of "Quick Start"
(Fixed acronym usage to be consistent and more correct. The page is now using the more common and accepted format Term (T)) |
|||
| Line 11: | Line 11: | ||
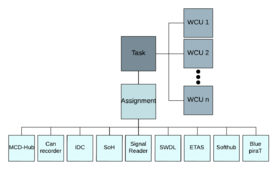
[[File:Illustration2.png|thumb|Figure 2: This figure shows how a task, assignment and WCU correlates. As you see the task is connected with an unspecified amount of WCUs where the task will execute. The task is also connected to one of the nine assignment as its that assignment that the task will be running.|277x277px]]The basic concept of the WICE portal functionality is to run and observe so called tasks. A task is an assignment (MCD-Hub, IDC, Canrecorder, SoH, SignalReader, SWDL, ETAS, Softhub or Blue piraT) to update or collect measurment from one or many cars. Tasks are run and observable when a user starts a task via the WICE portal on a set of Wireless Communication Units (WCUs) located in a set of cars. The portal then dowloads the tasks assignment to the WCUs when their cars ignition is turned off. Each WCU then runs the tasks assignment on its car. The user can then see the tasks result on each WCU as the tasks assignment will get different results depending on which WCU it ran on. This is because of that a task gives the same assignment to all WCUs but as different WCUs are located in different cars doing different stuff it will collect different data. To recap and illustrate how this works you can look at figure 1 and 2 explaining how this correlates. | [[File:Illustration2.png|thumb|Figure 2: This figure shows how a task, assignment and WCU correlates. As you see the task is connected with an unspecified amount of WCUs where the task will execute. The task is also connected to one of the nine assignment as its that assignment that the task will be running.|277x277px]]The basic concept of the WICE portal functionality is to run and observe so called tasks. A task is an assignment (MCD-Hub, IDC, Canrecorder, SoH, SignalReader, SWDL, ETAS, Softhub or Blue piraT) to update or collect measurment from one or many cars. Tasks are run and observable when a user starts a task via the WICE portal on a set of Wireless Communication Units (WCUs) located in a set of cars. The portal then dowloads the tasks assignment to the WCUs when their cars ignition is turned off. Each WCU then runs the tasks assignment on its car. The user can then see the tasks result on each WCU as the tasks assignment will get different results depending on which WCU it ran on. This is because of that a task gives the same assignment to all WCUs but as different WCUs are located in different cars doing different stuff it will collect different data. To recap and illustrate how this works you can look at figure 1 and 2 explaining how this correlates. | ||
==A Simple Scenario== | ==A Simple Scenario== | ||
Now that we have gone through the concept of the WICE portal we will now give a more conrecte exampel. Lets say you want to create a task with a Statement of Health (SoH) assignment where you collect the cars voltage and mileage. To do this you need to log in to the WICE portal with your WICE login (username and password). You can see the login screen in figure 3 and if you have trouble logging in you can se The_Portal_User_View#Login. | |||
# | |||
When | Now that you are logged in you create a new task by clicking the "New Task" button at the bottom of the screen. When pressing the button a dialog will be shown with one tab for each assignment. To make the task a SoH task you click the SoH tab where the options for creating one will be shown. There you will at the top see six different checkboxes with different measurements SoH can collect. Check the boxes for voltage and mileage and scroll down to click "Add reasources". Here it will come up a window where we will search and add WCUs. You can search for a WCU by different criterea and when you have found the WCU(s) you wanted and have dragged them to the bottom box with the selected WCUs you press "Done". Now it should look like it does in figure x and you can now press ok to start the task. We dont need to fill the other boxes as we dont need a description, notification about status via email or schedule(sparsely used). That was a quick instruction on how to create a new task but you can read more detailed about how to create every sort of task at The_User_Portal_View#. | ||
When the task is done it will have generated results. You can see them searching the WCU(s) you used in the tasks tab (on the home screen). When you have found the WCU and your assignment you can select it and press the "Get Result Files" in the bottom left corner. then you will get a window where you can search among the resultfiles. Do note that this window shows all result files on the WCU so its not only your result files. When you have selected a file you will get the option to get(download), plot the rout for and view the file. Theres more information about the search tab and viewing results in The_User_Portal_View#Tasks_Tab | |||
=== Get result files === | === Get result files === | ||
Revision as of 13:59, 3 July 2017
This chapter takes you on a tour to quickly get acquainted with the WICE Portal to see how it works.
As the WICE Portal is a web based tool there is no need to install any software on your computer. All you need is a web browser, such as Internet Explorer, which has Javascript enabled. Using the WICE Portal you can for example: See which assignments are running in which car. Check up on each assignment's respective status. Get result files from tasks. And much more.
In this quick start you will first be introduced to the basic model, and how it is supposed to work. Once the basics has been covered a simple scenario will be presented. This scenario will show how a task you have created is sent to a car and then started. How to download the data generated by a task for further analysis will also be covered.
Basic Conceptual Model
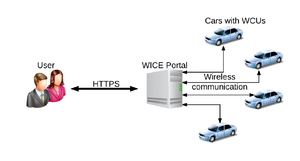
The basic concept of the WICE portal functionality is to run and observe so called tasks. A task is an assignment (MCD-Hub, IDC, Canrecorder, SoH, SignalReader, SWDL, ETAS, Softhub or Blue piraT) to update or collect measurment from one or many cars. Tasks are run and observable when a user starts a task via the WICE portal on a set of Wireless Communication Units (WCUs) located in a set of cars. The portal then dowloads the tasks assignment to the WCUs when their cars ignition is turned off. Each WCU then runs the tasks assignment on its car. The user can then see the tasks result on each WCU as the tasks assignment will get different results depending on which WCU it ran on. This is because of that a task gives the same assignment to all WCUs but as different WCUs are located in different cars doing different stuff it will collect different data. To recap and illustrate how this works you can look at figure 1 and 2 explaining how this correlates.
A Simple Scenario
Now that we have gone through the concept of the WICE portal we will now give a more conrecte exampel. Lets say you want to create a task with a Statement of Health (SoH) assignment where you collect the cars voltage and mileage. To do this you need to log in to the WICE portal with your WICE login (username and password). You can see the login screen in figure 3 and if you have trouble logging in you can se The_Portal_User_View#Login.
Now that you are logged in you create a new task by clicking the "New Task" button at the bottom of the screen. When pressing the button a dialog will be shown with one tab for each assignment. To make the task a SoH task you click the SoH tab where the options for creating one will be shown. There you will at the top see six different checkboxes with different measurements SoH can collect. Check the boxes for voltage and mileage and scroll down to click "Add reasources". Here it will come up a window where we will search and add WCUs. You can search for a WCU by different criterea and when you have found the WCU(s) you wanted and have dragged them to the bottom box with the selected WCUs you press "Done". Now it should look like it does in figure x and you can now press ok to start the task. We dont need to fill the other boxes as we dont need a description, notification about status via email or schedule(sparsely used). That was a quick instruction on how to create a new task but you can read more detailed about how to create every sort of task at The_User_Portal_View#.
When the task is done it will have generated results. You can see them searching the WCU(s) you used in the tasks tab (on the home screen). When you have found the WCU and your assignment you can select it and press the "Get Result Files" in the bottom left corner. then you will get a window where you can search among the resultfiles. Do note that this window shows all result files on the WCU so its not only your result files. When you have selected a file you will get the option to get(download), plot the rout for and view the file. Theres more information about the search tab and viewing results in The_User_Portal_View#Tasks_Tab
Get result files
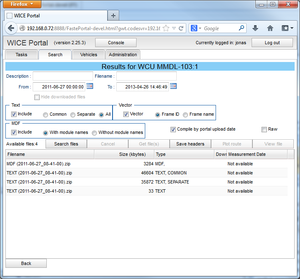
When there is any result data generated from an assignment the “Get Result Files” button will be enabled. When clicking that button a dialog will appear. What you get here is basically a set of search terms to use to search through your result files on the portal for this particular task and WCU. When hovering the pointer over the search area you will get the number of files that match your search terms as a tool tip.
By pressing the “List Files” button you will get an opportunity to download result files to your local computer. See Figure 10 below. By default the “Compile by upload date” check box is checked. The idea behind this is that each set of results is grouped into sets of files which corresponds to a particular upload of result files. Each such upload can be huge with several thousands of files. Picking individual files is tedious and mostly you are interested with all of the files of a particular type that was uploaded. The “Compile by upload date” then simply means that one row in the table means one such upload of files. To download result files, select the files you are interested in and click “Get File(s)”. After that a file save dialog will open and you can choose where to save the file. All the files you have selected will be downloaded as a zip-file.
If the file you have selected is of a human readable type, the button “View file” will be enabled. By clicking that button the file is opened in your browser and you can look through it. Another way to open the file is to double click on the file entry. When your program has collected enough data for you you can stop it by clicking the “Stop Assignment” button. A message will be sent to the WCU telling it that the current assignment should be stopped. This concludes this section where we have walked through a simple and rather basic scenario where a task was created and a hub assignment program generated some data that could be later retrieved.
In the The Portal User View section a thorough explanation of the user's view will be presented.


