Difference between revisions of "Plot Route"
(Fixed headers) |
(Drive cycles and measurement markers) |
||
| Line 6: | Line 6: | ||
== Usage == | == Usage == | ||
[[File:Plot-route-toolbar.png|frame]] | |||
=== Car information === | === Car information === | ||
| Line 16: | Line 17: | ||
If you are having any trouble locating the data in the map you can utilize the "'''Fit all'''"-button. This button ensures that all position data is visible on the map by zooming out and panning to an appropriate location. | If you are having any trouble locating the data in the map you can utilize the "'''Fit all'''"-button. This button ensures that all position data is visible on the map by zooming out and panning to an appropriate location. | ||
Also in the controls panel is the option to hide/show measurement markers. | |||
== Visualization of drive cycles and signal reader measurements == | |||
=== Drive cycles === | |||
If the plot route tool detects that there was a significant time difference between two reported positions, then it will assume that they are part of different "drive cycles". This is visualized in the map by giving different drive cycles different colors. However, if there are too many drive cycles available then two drive cycles may receive the same color. | |||
=== Signal reader measurements === | |||
Measurements are visualized on the map using markers. These markers are positioned where the measurement started. You can click the measurement markers to jump straight to the [[Preview data|preview tool]] where you can preview signal data from that specific measurement. | |||
Revision as of 11:03, 20 December 2019
How to access this tool
If you are interested in seeing where the car was driven while making measurements you can use the “Plot route” tool. This tool can be accessed either by selecting and then right-clicking a task in the tasks panel. You can also access the tool from the bottom menu in both the tasks and vehicles panel.
How it works
An important detail to note is that plot route is a tool that operates using the data of a specific car. The tool will check which car you have selected. It will then aggregate the GPS-data of all the WCUs that has been installed in the car during the specified time period. This is the data that is plotted.
Usage
Car information
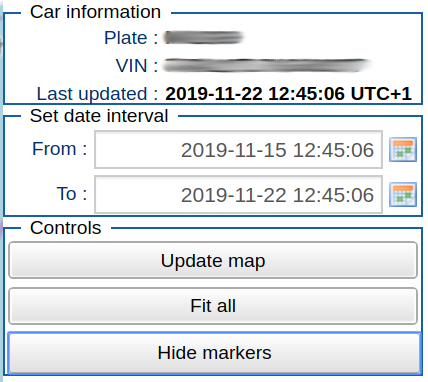
On the top right of the screen the "Car Information" panel displays the plate number, VIN and when the cars latest known GPS update occured.
Set date interval
In the side-menu to the right there is a "Set date interval" form. You can use this form to select an interval within which you wish you know where the car has been. This interval has a maximum length of one month, and is by default set to the last known GPS update date. If you wish to change the interval, simply enter the date interval of your choice and click "update map".
Viewing the data
If you are having any trouble locating the data in the map you can utilize the "Fit all"-button. This button ensures that all position data is visible on the map by zooming out and panning to an appropriate location.
Also in the controls panel is the option to hide/show measurement markers.
Visualization of drive cycles and signal reader measurements
Drive cycles
If the plot route tool detects that there was a significant time difference between two reported positions, then it will assume that they are part of different "drive cycles". This is visualized in the map by giving different drive cycles different colors. However, if there are too many drive cycles available then two drive cycles may receive the same color.
Signal reader measurements
Measurements are visualized on the map using markers. These markers are positioned where the measurement started. You can click the measurement markers to jump straight to the preview tool where you can preview signal data from that specific measurement.
