Difference between revisions of "Timeline"
Alkitjohan (talk | contribs) |
Robin.karhu (talk | contribs) (assignment->task) |
||
| (One intermediate revision by one other user not shown) | |||
| Line 8: | Line 8: | ||
The WCU is selected by clicking on it in the grid and the search for the latest measurements will automatically start. If the WCU has any measurements, the default options are to search for the date for the latest measurement and one month back in time. The results of selecting the WCU '04-1B-94-00-09-EA' can be seen in illustration 'Latest measurements for a WCU'. | The WCU is selected by clicking on it in the grid and the search for the latest measurements will automatically start. If the WCU has any measurements, the default options are to search for the date for the latest measurement and one month back in time. The results of selecting the WCU '04-1B-94-00-09-EA' can be seen in illustration 'Latest measurements for a WCU'. | ||
In this example the WCU only had measurements of | In this example the WCU only had measurements of task type 'Signal reader' for the latest month but as can be seen in the options, the defaults are to search for every available task type. | ||
=== Go to Timeline via Vehicles === | === Go to Timeline via Vehicles === | ||
| Line 15: | Line 15: | ||
=== Go to Timeline via Tasks === | === Go to Timeline via Tasks === | ||
[[File:Timeline5.png|thumb|Timeline for a particular | [[File:Timeline5.png|thumb|Timeline for a particular task]] | ||
The third way the Timeline can be accessed is via the [[Tasks Tab]]. A row for a particular | The third way the Timeline can be accessed is via the [[Tasks Tab]]. A row for a particular task and WCU is here selected and the context menu has the same 'Go to Timeline' option as illustrated in 'Go to Timeline from Vehicles'. When the timeline is populated via Tasks the selected options is different than when its populated via the ways described above. As can be seen in 'Timeline for a particular task' the subtitle of the timeline says 'Displaying measurements for program type: Signal reader and task ID: 7475'. This describes that the selected task in the Tasks tab was a Signal reader task and its task ID is 7475. | ||
In the Options section, only the 'Signal reader' | In the Options section, only the 'Signal reader' task type is selected. This means that if the WCU has other types of tasks running during the period which the Signal reader task was run, these measurements will not be visible. | ||
The third difference is that all measurements for the | The third difference is that all measurements for the task will initially be visible. This means that there is no 'latest month' constraint as described in [[Timeline#Search for a WCU inside the Timeline tab|Search for a WCU inside the Timeline tab]] and the 'From' and 'To' fields in Options simply describes the first and last measurement date of all measurements for the current task. | ||
=== Accessing measurements === | === Accessing measurements === | ||
| Line 31: | Line 31: | ||
[[File:Timeline6.png|thumb|Selected measurement]] | [[File:Timeline6.png|thumb|Selected measurement]] | ||
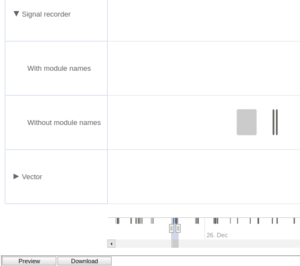
When at least one measurement is selected, the buttons 'Preview' and 'Download' appears below the timeline. See illuistration 'Selected measurement'. Depending on the type of the selected measurement(s) the preview button might be disabled. The functionality of the preview button is the same as when selecting a measurement result file in the [[Tasks Tab#Get result files]] and clicking Preview there. A Signal reader measurement will take you to the [[Preview data]] view, a Video measurement of type webm/mp4 will play the video and a text measurement will simply display the measurement data as text. | When at least one measurement is selected, the buttons 'Preview' and 'Download' appears below the timeline. See illuistration 'Selected measurement'. Depending on the type of the selected measurement(s) the preview button might be disabled. The functionality of the preview button is the same as when selecting a measurement result file in the [[Tasks Tab#Get result files]] and clicking Preview there. A Signal reader measurement will take you to the [[Preview data]] view, a Video measurement of type webm/mp4 will play the video and a text measurement will simply display the measurement data as text. | ||
=== Options === | |||
As described in the sections above the Options section are either for selecting the WCU to show the timeline for or to narrow down the search constraints used when fetching the measurements for the selected WCU. The current options can be saved and reapplied by using the 'Save/Apply Options' icons in the bottom the Options section. These work in the same way as for the [[Tasks Tab|Tasks]] and [[Vehicles]] tabs. The options can also be reset to defauls by clicking the 'Reset' icon. | |||
Below the options for narrowing down the measurement results there are three check boxes which controls how the timeline chart behaves when the user interacts with the chart or doing changes to the constraints in the options section. More information about each check box can be found by hovering the check box. | |||
Latest revision as of 13:19, 26 November 2021
The Timeline tab provides a way of displaying measurements over time for a WCU. The tab can be populated in three different ways, either by clicking the 'Timeline' tab in the tab selector at the top of the portal view or by right-clicking a WCU in the Tasks or Vehicles tab and choose 'Go to Timeline'. The three different ways are described in their own sections below.
Search for a WCU inside the Timeline tab
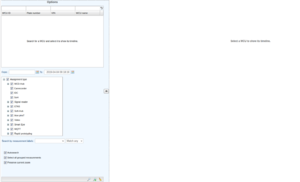
When accessing the Timeline tab by clicking the tab the view illustrated by 'Empty timeline' shows up. To show the timeline for a WCU, search for the desired WCU in the Options section to left in the view.
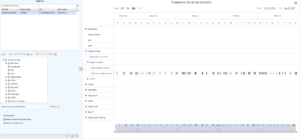
The WCU is selected by clicking on it in the grid and the search for the latest measurements will automatically start. If the WCU has any measurements, the default options are to search for the date for the latest measurement and one month back in time. The results of selecting the WCU '04-1B-94-00-09-EA' can be seen in illustration 'Latest measurements for a WCU'.
In this example the WCU only had measurements of task type 'Signal reader' for the latest month but as can be seen in the options, the defaults are to search for every available task type.
Go to Timeline via Vehicles
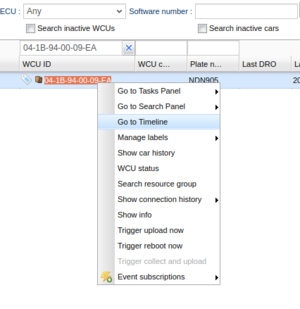
The Timeline tab can also be accessed via the Vehicles tab by simple right-click a WCU and choose 'Go to Timeline' as can be seen in 'Go to Timeline from Vehicles'. This will populate the Timeline in the exact same way as when selecting the WCU in the Options section inside the Timeline tab.
Go to Timeline via Tasks
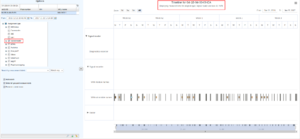
The third way the Timeline can be accessed is via the Tasks Tab. A row for a particular task and WCU is here selected and the context menu has the same 'Go to Timeline' option as illustrated in 'Go to Timeline from Vehicles'. When the timeline is populated via Tasks the selected options is different than when its populated via the ways described above. As can be seen in 'Timeline for a particular task' the subtitle of the timeline says 'Displaying measurements for program type: Signal reader and task ID: 7475'. This describes that the selected task in the Tasks tab was a Signal reader task and its task ID is 7475.
In the Options section, only the 'Signal reader' task type is selected. This means that if the WCU has other types of tasks running during the period which the Signal reader task was run, these measurements will not be visible.
The third difference is that all measurements for the task will initially be visible. This means that there is no 'latest month' constraint as described in Search for a WCU inside the Timeline tab and the 'From' and 'To' fields in Options simply describes the first and last measurement date of all measurements for the current task.
Accessing measurements
When the timeline is populated by using one of the ways described above one or many measurements can be downloaded or previewed by selecting them in the chart.
Measurements can be selected in three different ways:
- Click on a measurement. When a measurement is selected and another measurement is clicked, the first measurement is deselected.
- Click on measurements when holding Ctrl or Shift. In this way, multiple measurements can be selected.
- Holding Shift and drag selected measurements. When holding Shift, the zooming in the chart is disabled and all measurements inside the drawn rectangle will be selected. This is typically useful when many measurements needs to be selected in a fast way.
When at least one measurement is selected, the buttons 'Preview' and 'Download' appears below the timeline. See illuistration 'Selected measurement'. Depending on the type of the selected measurement(s) the preview button might be disabled. The functionality of the preview button is the same as when selecting a measurement result file in the Tasks Tab#Get result files and clicking Preview there. A Signal reader measurement will take you to the Preview data view, a Video measurement of type webm/mp4 will play the video and a text measurement will simply display the measurement data as text.
Options
As described in the sections above the Options section are either for selecting the WCU to show the timeline for or to narrow down the search constraints used when fetching the measurements for the selected WCU. The current options can be saved and reapplied by using the 'Save/Apply Options' icons in the bottom the Options section. These work in the same way as for the Tasks and Vehicles tabs. The options can also be reset to defauls by clicking the 'Reset' icon.
Below the options for narrowing down the measurement results there are three check boxes which controls how the timeline chart behaves when the user interacts with the chart or doing changes to the constraints in the options section. More information about each check box can be found by hovering the check box.
