The Portal Administrator View
An administrator can do everything a user can do and more. In addition to the user, an administrator can create and modify users and stop assignments for any task. These new functions will be explained in the next 3 chapters. We will start with the search tab where two more buttons are visible. Next is the vehicles tab. Lastly is the administration tab with 5 sub tabs consisting of: the connect tab, the archives tab the GDS/SDDB files tab, the resource groups tab and the users tab.
The Search Tab
In addition to the functionality for an ordinary user, an administrator have one more button present. An administrator can send a stop command to any WCU. The new button can be seen in Illustration 32. Also, the administrator can search and view any user's task.
The Vehicles Tab
An administrator can do quite a many things in this view. Illustration 33 shows an example of this view. The table header along with the buttons “Edit Description” and “Get Log Files” are explained in the page for Vehicles.
At the bottom you have a set of buttons to aid in handling the WCUs. To add a new WCU to the portal, the “New” buttons opens up a dialog for that. The “Get Log Files” button fetches log files for the selected WCU from the portal.
The New WCU Dialog
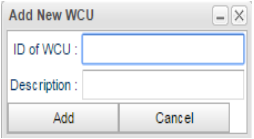
There are two ways that a WCU can enter the portal. The first is if you click the “New WCU” button and the second is the first time a WCU connects to the portal it registers itself. Ideally you will never have to add a WCU to the portal but just as a safety step you have the opportunity to add it yourself. When clicking the “New WCU” button the dialog in Illustration 34 opens up. You must enter the ID of the WCU as this is a unique identifier and you will be notified if the ID is already present on the portal. The description is optional but may be handy to remember which WCU it is.
Edit the WCU Configuration
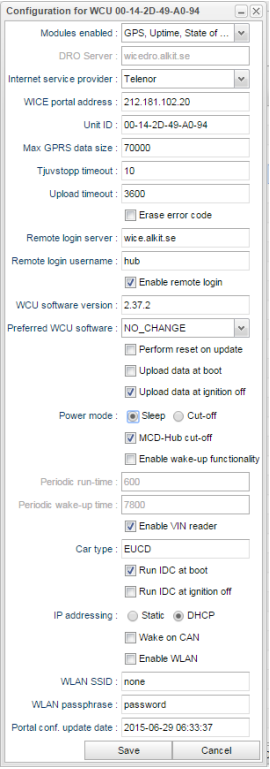
You can edit the configuration of the WCU from the portal. Simply click on Edit Configuration to open up the dialog in Illustration 35. Not all fields are editable but they are present as they convey information. The fields that are not editable are “WICE portal address”, “Unit ID”, “WCU software version” and “Portal conf. Update date” which conveys the date when the current version of the WCU configuration was set into play. Depending on the version of the WCU software not all configuration parameters will be available.
The set of check boxes for the different modules that are present is four and are at the top. Check or uncheck these to tell the WCU if they are present or not. Doing so will speed up the boot process. “DRO Server” sets which server to contact for DRO readouts. If “DRO” is checked, DRO readouts are allowed. “Internet service provider” can switch which SIM card to use. “WICE portal address” says which server to contact for fetching new assignments, configurations, upload data etc. “Max GPRS size” says what is the upper limit of how much data to send home over the GPRS link. If the data size is larger than the limit the WCU will wait until a local network connection can be established before the data will be transferred. The limit is set in kbytes. “Tjuvstopp timeout” tells the WCU how many seconds it should wait after the ignition is turned off before it tries to contact the WICE portal. “Upload timeout” is the maximum number of seconds the WCU should upload data before stopping. “Erase error code” will erase the car's error code the next time a DRO is made. “Remote login server” is the remote login server to use. “Enable remote login” must be turned on in order to remotely login to the WCU through the proxy above. As an increased security measure one can set´the user name to be used for authentication. “WCU software version” tells which version of the software that is currently running on the WCU.
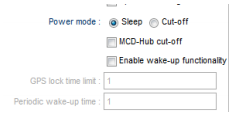
“Perform reset on update” removes all data on the WCU when installing a new WCU software. The two “Upload data at boot” and “Upload data at ignition off” tells the WCU when it should try to upload data to the portal. One of these should be set, if not, data will never be uploaded to the portal. “Power mode” has two settings, Sleep and cut-off. In cut-off, as indicated above, the MCD-Hub is not powered up on boot, nor is the WCU woken up at regular intervals to report battery voltage, GPS position etc. In the other mode, sleep, some more settings are visible as shown in Illustration 36 above. You can once again select the MCD-Hub to remain unpowered. In addition, you may enable the WCUs wake-up functionality. This function is simply made up of a cycle time called “Periodic wake-up time” and the corresponding “Periodic run-time” which indicates for how long I should be awake before going to sleep. The committo platform has some limits on the two settings and those are: minimum time to set between wake-ups is 10 minutes and the maximum time is 12 hours.
Lastly is “Enable VIN reader”. By unchecking this the VIN reader is not run on boot. As a short-cut you see which car type the WCU is currently connected to. If you click the entry you can edit that cars configuration through the dialog that opens which can be found in The Edit Car Dialog, Next is the options at which time to run the IDC module. It can be done at boot or at ignition off or both or none. Remember though that not selecting any of these will make the IDC never to run. In SPA type of cars you must select how the IP addressing is done. If you select “static” you must also set which IP address the WCU should use. The “Wake on CAN” option means what it says, should the WCU wake up if it senses any traffic on the CAN interface. The last three options deals with WLAN. These are, for now, only useable on the MX4 type of WCU which has a WLAN interface.
The Edit Car Dialog
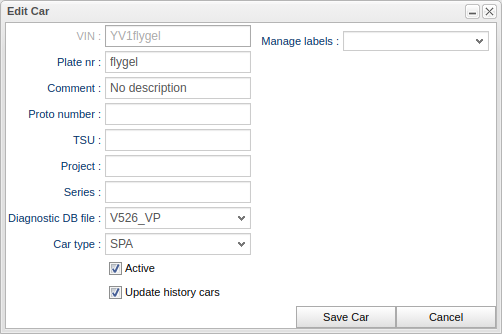
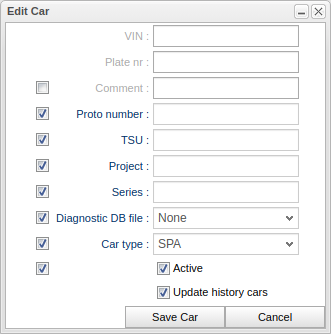
To edit the information about a car, press the “Edit Car” button. The dialog in Illustration 37 opens up. The entry you can not edit is the VIN entry. If you need to edit that you must instead create a new car. In order for the portal to be able to translate error codes into a human readable format, you must choose a diagnostic DB file to be used. It is important to select the correct one as the diagnostic error codes read out might be translated incorrectly or more probable, not at all. It is also important to select the right type of car using “Car type”. This controls the number of CAN buses and speeds and the number of Ethernet networks, if any, in the car. The “Active” check box controls whether the car should show up in tables and searches in general concerning cars. A car can never be removed as it has probably been involved in measurements but to recall an inactivated car you must actively select to view inactivated cars.
It is possible to update several cars at once by selecting multiple cars and then press the “Edit Car” button. By doing this you can selectively make changes to attributes of all the selected cars at once. To do this, the dialog is extended as one can be seen in Illustration 38 below.
Upload a Car Import File
It is possible to import a file that describes a set of cars. It can consist of both new cars and cars already in the database but that might need to be updated with new information.
A car import file consists of a comma separated file where each line describes a car. The first line of the file must look as follows:
VIN,regNr,description,project,protoNumber,tsu,series
There are seven attributes currently. When uploading the file you have a choice of modifying existing cars on the portal. If you do not check this box and there are cars that already exists, the import will fail.
Resource Groups
As described above in Vehicles#Resource Groups, you can define a set of resource groups in order to easily handle large groups of resources collectively. An example is if you have 100 WCUs in such a resource group and you would like to edit the configuration for all WCUs. Instead of having to open the configuration for each individual WCU, you simply open the configuration for the resource group, do your edits and when you press save, the configuration will be saved to all WCUs in one go. The resource groups are created in another panel which will be described later.
To add resources to a resource group you start by selecting the resources you are interested to add to a resource group. Resources already added to a resource group will render the corresponding add button disabled.
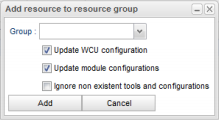
When you are satisfied with your selection you press either the button “Add WCU(s) to resource group” or “Add car(s) to resource group”. Pressing any of those buttons will show the dialog to the left. The group box will list the available groups. If you know the name of the resource group you can type the and as you type the box will show names that fit what you type.
The three check boxes requires a deeper discussion of what the mean. Assume you have a resource group that has been used for some time. A new WCU enters the portal and you would like to add that WCU to your group. A common situation is that you would like that WCU to be configured that same way as the rest of the WCUs in the resource group. This is accomplished by checking “Update WCU configuration”. If this requires an update of the WCUs software it will automatically be taken care of. Also, a WCU comes configured with a set of modules. Usually you will probably want to update the module configurations as well but in case you wish not to, simply uncheck that check box. There are also situations where there are no module configurations for some modules and if you press “Add” you will be prompted about that. If you for some reason do care about that you can check the “Ignore non existent tools and configurations” check box.
Modules for the WCU
A WCU can have a number of modules attached. This makes it possible to add new peripherals to the WCU for handling various tasks in acquiring measured data from a car. The six types of modules are:
- MCD-Hub
- Canrecorder
- GPS
- IDC (Internal Diagnostic Client)
- Uptime
- State of Health
- Signal Reader
- RFE (Road Friction Estimation)
To deal with each tool's configuration a new view is presented below. To open this view, press the button “Modules” as shown in Illustration 33 on #The Vehicles Tab. In the illustration above there are a set of tools present. Each type is grouped on the left side using a stack panel. Select the connected MCD-Hubs by selecting the MCD-Hub stack and select (click) the Canrecorder stack to see the canrecorders connected a so fourth.
Configure the MCD-Hub Module
The configuration for the MCD-Hub has only two settings. The first is the MCD-Hubs IP address and the second is the preferred firmware version. The other two configuration settings shown in Illustration 40 is “MCD-Hub firmware version” which shows the current version used by the hub and the second is “Last configuration update date” which states when the MCD-Hubs current configuration was brought into action. When you are done with your configuration you save it by pressing the “Save” button. If you for any reason need to reload the configuration, press the “Reload” button.


