Difference between revisions of "Video module"
(Created page with "For video.") |
|||
| (3 intermediate revisions by the same user not shown) | |||
| Line 1: | Line 1: | ||
For video. | Configuring the video module consists of setting up both the recording resolutions and frame rate, the corresponding settings for monitoring and how many video sources there are. Currently, there is support for up to 4 video sources. For a more general discussion of video in WICE, turn to [[WICE video]]. | ||
[[File:Skärmavbild 2019-06-19 kl. 17.06.03.png|thumb|Video configuration]] | |||
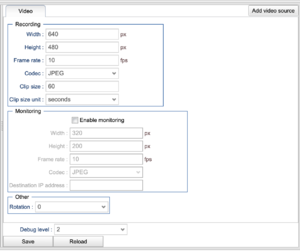
Below we will discuss the different settings offered for this module. On the right hand side is a screen shot showing the settings for one video source. There are three groups, recording, monitoring and other. The recording group deals with the video that is recorded and saved locally on the WCU. | |||
=== Recording group === | |||
You can select the width, height, frame rate, codec, clip size and the clip size unit. The width, height and frame rate are pretty strait forward. Make sure to select valid combinations of width and height (which are?). These are usually dictated by the video source so make sure to know what source is used. The same goes for the frame rate (does wvideo do its best to try to find the nearest frame rate or resolution that works?). | |||
Codecs currently supported are jpeg and VP8. VP8 makes a much better job of compressing the video than jpeg and is also better supported by various players. | |||
As video files can grow rather large, a set of settings exist that is ment to produce manageable sized video files that can be uploaded in chunks that are put together once they reach the portal. The possible settings for the clip size is simply a number and you select the unit using clip size unit. Available units are seconds and bytes. | |||
=== Monitoring group === | |||
The settings for the monitoring group are basically the same as the recording group above. However, make sure not to set these settings too high, i.e. too a high resolution and frame rate as this is sent in real time over the network and video can consume quite some bandwidth. Typically do not set the resolution above 640 x 320 with a frame rate of 25 frames a second, at least not when using jpeg. If using higher resolutions and/or frame rates, make sure to use VP8. | |||
An important setting for monitoring is the destination IP address. Make sure that the address used has a so called reflector running. If this is not known, contact an administrator as they can help you with this setting. | |||
=== Other group === | |||
Some video sources may be mounted in such a way that the image is rotated in some way. To automatically rotate the video in order to be displayed correctly, use this setting. | |||
Latest revision as of 17:34, 19 June 2019
Configuring the video module consists of setting up both the recording resolutions and frame rate, the corresponding settings for monitoring and how many video sources there are. Currently, there is support for up to 4 video sources. For a more general discussion of video in WICE, turn to WICE video.
Below we will discuss the different settings offered for this module. On the right hand side is a screen shot showing the settings for one video source. There are three groups, recording, monitoring and other. The recording group deals with the video that is recorded and saved locally on the WCU.
Recording group
You can select the width, height, frame rate, codec, clip size and the clip size unit. The width, height and frame rate are pretty strait forward. Make sure to select valid combinations of width and height (which are?). These are usually dictated by the video source so make sure to know what source is used. The same goes for the frame rate (does wvideo do its best to try to find the nearest frame rate or resolution that works?).
Codecs currently supported are jpeg and VP8. VP8 makes a much better job of compressing the video than jpeg and is also better supported by various players.
As video files can grow rather large, a set of settings exist that is ment to produce manageable sized video files that can be uploaded in chunks that are put together once they reach the portal. The possible settings for the clip size is simply a number and you select the unit using clip size unit. Available units are seconds and bytes.
Monitoring group
The settings for the monitoring group are basically the same as the recording group above. However, make sure not to set these settings too high, i.e. too a high resolution and frame rate as this is sent in real time over the network and video can consume quite some bandwidth. Typically do not set the resolution above 640 x 320 with a frame rate of 25 frames a second, at least not when using jpeg. If using higher resolutions and/or frame rates, make sure to use VP8.
An important setting for monitoring is the destination IP address. Make sure that the address used has a so called reflector running. If this is not known, contact an administrator as they can help you with this setting.
Other group
Some video sources may be mounted in such a way that the image is rotated in some way. To automatically rotate the video in order to be displayed correctly, use this setting.
