Difference between revisions of "Roles and permissions"
| Line 18: | Line 18: | ||
# Select what kind of permission you want. There are a number of different permissions, seven for WCUs and one to give permission to all assignments (the assignment permission can not be modified). The permissions for WCUs are: | # Select what kind of permission you want. There are a number of different permissions, seven for WCUs and one to give permission to all assignments (the assignment permission can not be modified). The permissions for WCUs are: | ||
## '''Task'''. Controls if a user is permitted to create/see tasks of a specific type on a WCU. More what this means is discussed below in "Permission to specific tasks" | ## '''Task'''. Controls if a user is permitted to create/see tasks of a specific type on a WCU. More what this means is discussed below in "[https://wiki.alkit.se/wice270/index.php?title=Roles_and_permissions#Permission_for_specific_tasks Permission to specific tasks]" | ||
## '''Assignment Creator'''. This permission handles access to creating/editing/viewing assignments in the tab Assignment (see [[Signal Reader Assignment Wizard|signal reader]] and [[Area5 Assignment Wizard|Area5]]). Having a read-permission means that you can see a list of assignments but you cannot go ahead and edit or create them. A write-permission on the other hand makes you eligible to edit and create assignments. Currently, the permission is only relevant for signal reader and Area5. | ## '''Assignment Creator'''. This permission handles access to creating/editing/viewing assignments in the tab Assignment (see [[Signal Reader Assignment Wizard|signal reader]] and [[Area5 Assignment Wizard|Area5]]). Having a read-permission means that you can see a list of assignments but you cannot go ahead and edit or create them. A write-permission on the other hand makes you eligible to edit and create assignments. Currently, the permission is only relevant for signal reader and Area5. | ||
## '''Configuration.''' This permission controls whether you are allowed to work with a WCU's configuration. | ## '''Configuration.''' This permission controls whether you are allowed to work with a WCU's configuration. | ||
Revision as of 09:39, 26 November 2021
In order to restrict access to resources and functions in the portal, there is a framework using roles and permissions. Permissions are given on a set of resources. These permissions are grouped into roles, and roles are then attached to one or several users to be granted specific permissions.
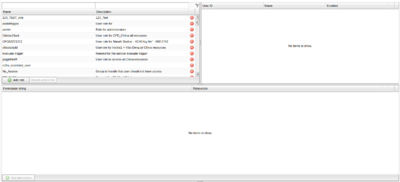
The “Edit roles and permission” dialog can be seen in Figure "Edit Roles and Permissions Dialog". It consists of three tables. The top left table holds a list of the roles, the top right holds the user(s) for the selected role and the bottom one hold the selected role's permissions. Their size is adjustable and you can minimize them by clicking on the line between them.
You add a new role by pressing the button “Add role” and delete a role along with its permissions by pressing the red button next to it. When making a role you add a description and unique name. To edit an already existing role, double click the entry you wish to edit.
When you select a role in the top left table, the lower table shows that specific role's permissions and the upper right table shows which users have that role. The permissions table consists of two columns, a string that is the actual permission and the set of resources that apply to that permission.
Creating and editing roles and permissions
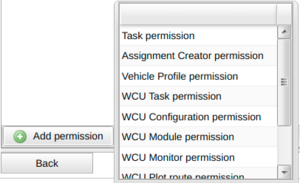
To create a new permission press the “Add permission” button. It opens the following interaction depicted in Figure "Creating New Permission".
- Select what kind of permission you want. There are a number of different permissions, seven for WCUs and one to give permission to all assignments (the assignment permission can not be modified). The permissions for WCUs are:
- Task. Controls if a user is permitted to create/see tasks of a specific type on a WCU. More what this means is discussed below in "Permission to specific tasks"
- Assignment Creator. This permission handles access to creating/editing/viewing assignments in the tab Assignment (see signal reader and Area5). Having a read-permission means that you can see a list of assignments but you cannot go ahead and edit or create them. A write-permission on the other hand makes you eligible to edit and create assignments. Currently, the permission is only relevant for signal reader and Area5.
- Configuration. This permission controls whether you are allowed to work with a WCU's configuration.
- Module. The permission controls the access to individual module configurations on a WCU. An example of a module is Signal reader.
- Monitor. An assignment can have a monitor function to report data in real time. In order to see the real time data the user must have this permission.
- Plot route. To see a historic GPS track of a WCU a user must have this permission.
- Position. Allows a user to see a WCU's current position.
- Shelving. Allows a user to handle any shelving, unshelving and refurbishing of a WCU.
- View. This permission applies to the Vehicles tab. It has to do with whether you are allowed to list a WCU in the table. Selecting this subtype makes the subtype type part unnecessary and therefore, it is removed if you choose this resource type.
- Choosing if the permission should be a read and/or write permission. One of these have to be selected or you will not be able to save changes.
- Selecting which resources that apply to the permission. The selection is made using the two tables you see in Figure "Editing Assignment Permissions". To select a resource, which can be a resource group, you enter the name of the resource in the left table filter area. As you type, the table is automatically filled with resources matching the criteria. If a resource is part of a resource group the icon to the left is shown. If you hold the mouse over the resource name you will see which resource group it is part of. If you instead see the icon shown to the left, the resource is a resource group. Holding the mouse over the entry will show you which resources are part of the resource group. To select a resource, drag it over to the right table or select the resource and then press the right-arrow. To deselect a resource, drag it to the left table or press the left-arrow. There is a “Select all” option. It selects all current and future resources to which this permission should be applied.
- Set what type of assignments the permission applies to. It is automatically set to have all selected but you can unselect all and selecting other assignments. This option is only available on the assignment, monitor and module permission. It corresponds to the set of available modules for a WCU.
When you are done press "Save changes" or "Reset changes" if you want to revert the changes. You can always edit the permission by selecting it in the table. The dialog described above will show and you can make your changes, except that you can not change what type of assignment it is.
Assignment creator permission
This permission concerns the signal reader assignment editor. If you give the user a read permission they can look at already created assignments. If you give a user the write permission they will also be able to create and delete assignments.
Vehicle profile permission
With this permission you can delegate to individual users the possibility to view vehicle profiles if given the read permission. This makes the tab visible in the GUI but all buttons concerning editing/adding/removing are disabled. If a user has the write permission as well, the user will be able to edit/add and remove vehicle profiles.
Selecting resources using uploaded file
As described above, you can select resources in the select resources widget. In addition to this, you can upload a file containing the vehicles or WCUs that you would like to apply to a permission or a set of permissions. By pressing the button called 'Import vehicle file' you will be presented with a dialog where you can upload a file containing multiple vehicles or WCUs. You can either upload an excel file or a CSV type of text file. What is important is that there is a header column saying what type of identifiers can be found in the file. Identifiers currently supported are: vin, plate or wcu. An example content of file (CSV):
wcu
04-1B-35-98
90-80-AA
Just by changing the heading to plate or vin you should reference such identifiers in the file. The dialog also presents the option to ignore resources not found and apply the changes for those found. The default is however to do nothing if any of the resources are not found. The checkbox 'Ignore unconnected vehicles' is only applicable if you have plate or vin identifiers.
If you have selected a permission in the permission table, the resources in the file will be applied to only the selected permission. If you have selected a role in the top leftmost table, the resources in the file will be applied to all permissions of the role.
Changing a users roles and permissions
You can change a user's roles under in the edit user dialog if you press the button "Edit user roles". The edit user dialog then gets extended as two boxes appear, a left one with available roles and a right one with current roles. In the left one you can search the role(s) you want and drag them to the right box or press the button pointing right. With the two buttons at the bottom corner(the paper and clipboard ones) you can copy the names of the roles and also insert the names of roles to add them.
You can also change a users permission to view tasks in the tasks tab. By right-clicking the permission(s) you want to change permissions one and going to "Permission" you will get the options "Show who can see assignment" and "Add who can see assignment". "Show who can see assignment" will open a window with a left and a right box where the left contains users without permission to view the assignment and the right contains users who have permission. By moving users from the left to right and vice versa you can give or remove someones permission. You can also press the clipboard the the right bottom to copy the users who have permissions or add users by writing their name within parentheses. Users in the right box can be unselectable and that is if they have a role giving them the permission to view that assignment the only way to remove that is to remove that role from them. "Add who can see assignment" works the same way as "Show who can see assignment" except that the right box does not show users with permission so you can not remove permissions, this is so that with add you can add permissions for many assignments at the same time as the show can not show users from many assignments.
You can also edit a users role by searching for user(s) and right clicking on them to get a window with different options. There are five different options where the three first can be used on multiple users at the same time while the bottom two can not.
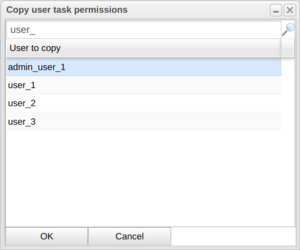
- "Add user assignment permissions to this user" will open the dialog shown in Figure "Copy User Assignment Permissions Dialog". With this button you take a users assignment permissions and add them to the selected user(s). You do this by searching and selecting a user and then pressing "OK".
- "Replace user assignment permissions with user" will open a similar dialog to the one in Figure "Copy User Assignment Permissions Dialog". This button i much like the one before except that instead of adding permissions to the current this replaces the permissions that the selected user(s) have. Here you also search the user whose permissions you want to replace the select them and press "OK".
- "Copy user roles to this user" will open a similar dialog to Figure "Copy User Assignment Permissions Dialog". This button instead of replacing permissions replace selected user(s) roles with the roles of a user who you chose. Search the user whose roles you want to copy for replacement and press "OK".
- "Give this user permission to all assignments on Car" is quite self explanatory and is to give assignment permission on one or many cars. The dialog will look like the dialog in Figure "Give Permission on Car Dialog". In the left box you select cars and move them to the right to give permission on them, you can also as you see below the left box select a file with cars to easily select a set of cars. Then you select which types of assignments it should give permission to (leaving this empty will not give any permissions). You can also check the checkbox "Reset user permission" to replace the roles of the selected user instead of adding new to the current ones.
- "Give this user permission to all assignments on WCU" is identical to the previous button except that it applies to WCUs instead of Cars.
Permission for specific tasks
The above text discuss permissions as they are found from the User panel. There are also a set of "implicit" permissions created when a new assignment is created, based on the assignment type permission discussed above. Let us elaborate a bit on this to make it clear what it means. The use case is as follows; a user has a read assignment permission on a WCU (wcu:assignment:soh:read:awcu). A new state-of-health assignment is created on the WCU awcu while the user has this permission. Regardless of who created the assignment, the user will now be able to list this assignment in the Tasks panel and download any data produced. Later, as time goes by, the WCU is no longer used in the particular project and an administrator removes the permission wcu:assignment:soh:read:awcu from the user. When new assignments are created on this WCU our user above will not be able to see the new assignments created in the Tasks panel. However, the user will be able to see the previous assignment, i.e. when the user had the correct permission. Thus, this solution enables users to retain the permission to see historical assignments, let us call this a historical assignment permission. This type of permission cannot be seen in the permission panel. To see who has access to which historical assignment you must turn to the Task panel.
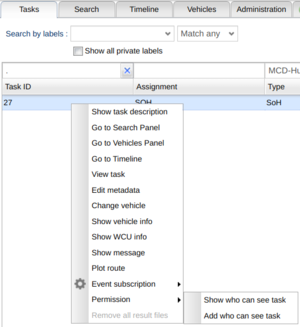
As an administrator you have the possibility to both see and modify who has access to individual assignments. There are two options presented if you right-click an assignment in the Tasks panel. To the right you see the two choices available. The top choice is only available if you have selected a single row in the table. The bottom one is always available, also if electing multiple rows.
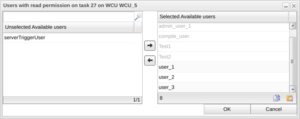
By selecting the top selection you will be presented with a dialog where on the left hand side you have all available users that do not have the permission to see the assignment. On the right hand side you have the users that have the permission to do so. On the right hand side you might see that some users are grayed. Those users have the assignment permission, not to be confused with the WCU assignment permission, described above. Also, the users visible are enabled, disabled users will not be displayed.
To give a user the permission to see the assignment, simply move the user from the left side to the right side. This is accomplished by selecting one or more users and then click the right-arrow. Conversely, to remove a user from the permission select the users from the right side and click the left-arrow. At the top of the left side you can search for users by typing and as you go the users will be filtered to match what you type.
To the right you see that the username 'm2m' has been filtered for and there are three such users present that are enabled and do not yet have the permission to see the assignment.
The bottom selection from above 'Add who can see assignment' will not list who already has access to the assignment, but rather just list all users available regardless whether they already have permission or not to the assignment.
You can also give a user permission to all running assignments on WCUs whose assignment types that user has access to. See here (The portal administrator view) under the section "5.6.1 The new user dialog" for more information.
