|
|
| (45 intermediate revisions by 4 users not shown) |
| Line 1: |
Line 1: |
| This chapter takes you on a tour to quickly get acquainted with the WICE Portal to see how it works. | | This chapter takes you on a tour to quickly get acquainted with the WICE Portal to see how it works. |
|
| |
|
| As the WICE Portal is a web based tool there is no need to install any software on your computer. All you need is a web browser, such as Internet Explorer, which has Javascript enabled. Using the WICE Portal you can for example: See which assignments are running in which car. Check up on each assignment's respective status. Get result files from tasks. And much more. | | As the WICE Portal is a web based tool there is no need to install any software on your computer. All you need is a web browser, such as Internet Explorer, which has Javascript enabled. Using the WICE Portal you can for example see which measurement assignments are running, check each assignment's respective status, get result files from measurement tasks, and much more. |
|
| |
|
| In this quick start you will first be introduced to the basic model, and how it is supposed to work. Once the basics has been covered a simple scenario will be presented. This scenario will show how a task you have created is sent to a car and then started. How to download the data generated by a task for further analysis will also be covered. | | In this quick start you will first be introduced to the basic model, and how it is supposed to work. Once the basics have been covered a simple scenario will be presented. This scenario will show how a task you have created is sent to a vehicle and then started. How to access the data generated by a task will also be covered. |
|
| |
|
| __TOC__ | | __TOC__ |
|
| |
|
| ==Basic Conceptual Model== | | ==Basic Conceptual Model== |
| [[File:Illustration1.png|alt=|thumb|Figure 1: Conceptual model of you, the portal and cars running assignments.]] | | [[File:Illustration1.png|alt=|thumb|Figure 1: This image shows how you the user, the WICE portal and the vehicles in the field are connected. As you see here you as the user access the WCUs and their vehicles through the portal.]][[File:Illustration2.png|thumb|Figure 2: This figure shows how a task, assignment and WCU correlates. As you see the task is connected with an unspecified amount of WCUs where the task will execute. The task is also connected to one of the nine assignment as its that assignment that the task will be running.|277x277px]]The basic functionality of the WICE portal is to manage so called ''tasks''. A task is an assignment to perform a specific action, typically collect measurement data from one or more vehicles. Tasks are created in the WICE portal and connected to a number of Wireless Communication Units (WCUs), which are in-vehicle units connected to the vehicles' internal communication buses. After a task has been created, the assignment is downloaded by each of the defined vehicles when ignition is turned on. Each WCU then runs the task's assignment, typically producing output in the shape of measurement data files, which are uploaded to the WICE portal. The user can then see the task's result on each WCU as the task's assignment will get different results depending on which WCU it ran on. To recap and illustrate how this works you can look at figure 1 and 2 explaining how this correlates. |
| To introduce the concept of the WICE Portals intended functionality, see Figure 1 below. There are three parts involved here:
| | [[File:A Simple Scenario.png|thumb|Figure 3: This is how a task can look when it is ready to be created.]] |
| # You, the user.
| |
| # The WICE Portal.
| |
| # A set of cars.
| |
| Users can add tasks to specific cars using the WICE Portal. Once the ignition is turned off the car will download the tasks assigned to it, and also upload results from previously completed tasks. Once the task is in place in the car the user will be able to see that the new task is running on the portal as well as review result files. To be precise, each car is configured with a Wireless Communication Unit (WCU) which handles the communication between the car and the portal. In reality, this is the device you “talk” to through the portal.
| |
| | |
| ====== Example: ======
| |
| ''A user adds a task to a specific car using the WICE Portal. Now the task needs to be downloaded to the car. Each time the ignition is turned off the car contacts the portal to see if there are any new tasks to download and also uploads any result files to the portal. Thus, the recently added task is downloaded to the car once the ignition is turned off. When the user later logs in he/she can see that the new task is running in the car as well as see that there are new result files for the task.'' | |
| | |
| This is the basic model of how it works and what you can do. Next we will go through a concrete scenario. Screenshots from the portal are provided to make it easier to follow.
| |
| | |
| ==Terminology==
| |
| [[File:Illustration2.png|thumb|Figure 2: In the middle is the task which is the connecting entity. Below are the set of different assignment programs available. To the left there is a set of WCUs where the assignment program is downloaded to each WCU. The progression of the assignment program is probably different for each WCU and are therefore treated individually.|277x277px]]On the top level there are tasks. A task has a single user attached to it, which is the user that created the task. This cannot be changed. Also, each task is associated with only one assignment of each type (MCD-Hub, IDC, Canrecorder, SOH, SignalReader). However, a task can be associated with any number of WCUs. A WCU (Wireless Communication Unit) is the actual hardware that is installed into each car. The rationale behind this is that each WCU runs the same assignment for a task. Fortunately, each WCU running an assignment can be manipulated individually. This is quite natural as the progression for the assignment depends on each WCU or car. Figure 2 illustrates this further.<br> | |
|
| |
|
| ==A Simple Scenario== | | ==A Simple Scenario== |
| [[File:Illustration3.png|thumb|Figure 3: Login screen.]]
| | Now that we have gone through the concept of the WICE portal we will give a more concrete example. Let's say you want to create a task with a State of Health (SoH) assignment where you collect the mileage and battery voltage of a connected vehicle. To do this you need to [[The Portal User View#Login|log in]] to the WICE portal with your WICE login (username and password). |
| Assume that you have a task you would like to be run in a car to collect interesting data to analyze. In short, the steps are:
| |
| #Log on to the WICE Portal
| |
| #Add a new assignment to a car
| |
| #Log out of the portal
| |
| #Give the assignment some time to gerenate data, then log in again and see how the assignment is doing
| |
| #Download result data generated from the assignment
| |
| | |
| When surfing to the portal you will see the screen in Figure 3. It is a simple screen with the possibility to enter a username and a password. Press the login button or enter to log in. If you have not yet received a user name and password, contact your local WICE portal administrator or responsible contact to get a user name and password.
| |
| | |
| If turned on, you may have to enter a one time password when logging in. This enhances the security by providing something called two-factor authentication. The one time password is typically generated from an app in your smart phone. There is also a program for a desktop computer to generate the one time password. For Android, iPhone and Blackberry you can download an app called “Google Authenticator” to generate these one time passwords for you. An internet connection is not needed in order to generate the passwords. To log in to an account you need to enter your login, ordinary password and the current 6 digits generated by the app. A new 6 digit number is generated each 30 seconds.
| |
| To simplify logins from the same computer, typically the one at work, you can tick the check box “Remember me”. If you tick this before you hit the login button when using the one time password, you will be remembered by the portal for the next 30 days. The next time you login from the computer you only have to enter your password. When the 30 days have passed you will once again have to enter a one time password to login. [[File:New_task_button.png|thumb|Figure 4: New task button]]
| |
| To create a new task, press the "New task" button which you can see in illustration "New task button". When pressing the button a dialog will be shown as depicted in Figure 5. There are nine tabs in this dialog: MCD-Hub, Canrecorder, IDC, SoH, SignalReader, SWDL, ETAS, SoftHub and blue piraT. Figure 5 handles the MCD-Hub tab.
| |
| [[File:Illustration5.png|Figure 5: The New Task dialog.|right|400x400px]]
| |
| | |
| ===MCD-Hub===
| |
| MCD-Hub assignments are used to collect data using the MCD-Hub flight recorder.
| |
| This assignment tab has seven areas(as shown in figure.x) with one funktion each that is used accordingly:
| |
| | |
| 1. Selecting which MCD-Hub assignment file to use. Press "Bläddra"/"Browse" to bring up the file selection where you select the .hub file to use.
| |
| | |
| 2. Choose which formats to convert to when result files are uploaded to the portal from a WCU.
| |
| | |
| 3. Write a descriptive text for the assignment. (optional)
| |
| | |
| 4. Choose if you want to be notified by email if the assignment fails to start. if you havnt filled in an email adress you will get oppurtunity when pressing ok. (optional)
| |
| | |
| 5. Assign owner and the period of validity to the assignment. This is filled automatically and is optionally changed.
| |
| | |
| 6. This option is under construction, do not use except for special cases.
| |
| | |
| 7. Start searching and selecting a WCU by pressing add resources at the bottom left of the screen. There you will get a pop up with 2 boxes, the upper one for searching cars and the bottom one for selected cars. In the top one you can search WCU units with ten different parameters by writing a value and pressing search or ENTER. to select a WCU you drag it from the top to the bottom box so that it appears in the bottom one.
| |
| | |
| After you press Ok and make the transfer there will be a pop-up telling you "Transfer ok!" if the transfer and checks went well, otherwise there will be a pop-up showing you an error cause.
| |
| | |
| ===CAN-recorder===
| |
| [[File:Illustration6.png|thumb|Figure 6: Starting a new task for the canrecorder.]]
| |
| Canrecorder is a measurement module that allows CAN frames to be captured and logged. This assignment has 4 functions described in figure 6 and below:
| |
| | |
| 1. Turning on or off CAN frame pass through filter. If you choose to have the filter on you must specify which CAN bus or CAN buses you wish to record. If you do not have the filter on you should not specify a CAN bus.
| |
| | |
| 2. Choose if you want to record with the high speed CAN bus and/or the low speed can bus.
| |
| | |
| 3. Specify which CAN buses you want to record by entering their ID and then pressing enter. This should only be done if the CAN frame passthrough filter is turned on.
| |
| | |
| 4. Select how much time to record before and after the trigger.
| |
| | |
| ===IDC===
| |
| IDC (for Internal Diagnostic Client) is a measurement module that allows a sequence of diagnostic requests to be sent and responses recorded.
| |
| The sequence of diagnostic requests are uploaded to the portal as a text file (usually ending with ".seq").
| |
| | |
| ===SoH===
| |
| [[File:Illustration7.png|353x353px|Figure 7: SoH tab|thumb]]
| |
| The SoH(State of Health) assignment collects specific status information from vechiles. You select which information you want the assignment to collect by filling in one or more of the six boxes shown in figre 7. In order for SoH data to be correctly interpreted, relevant description files (SDDB/GDS) for the vehicles executing the SoH assignment must have been defined. To add a SDDB/GDS file to a vehicle, see [[The_Portal_Administrator_View#The_Edit_Car_Dialog]].The six different options are:
| |
| * Mileage
| |
| * Voltage
| |
| * Read ECU software numbers
| |
| * Read ECU DTC:s
| |
| * Read OBD-II PIDs
| |
| * App Diagnotstic Db Part Num
| |
| | |
| ===Signal Reader===
| |
| [[File:Illustration8.png|thumb|Figure 8: Signal reader assignment.]]
| |
| The fifth tab is the Signal Reader tab. Signal Reader is a measurement module that allows monitoring and logging of CAN-bus signals, as well as diagnostics data. It takes a HAF file as input (a text version of a hub file) and performs more or less the same kind of measurements as the MCD-Hub. However, using the Signal Reader there is also an opportunity to monitor a set of signals in real time. To accomplish this you first select a haf file and then you press the button “Monitor signals”. This adds a new graphical element where you can select which signals should be monitored in real time by dragging the name from the left container to the right container, see Figure 8 below. When you are done you press the OK button. The monitored signals can later be viewed through the vehicles tab ([[Vehicles#Show_the_WCU_Position]]) and pressing the “Show Position” button.
| |
| | |
| From version 2.41 haf files can under some circumstances (by name) automatically map the CAN buses correctly depending on the given name in the WCU configuration. If such a mapping cannot be automatically made, the user can make the mapping manually. Read more about this in [[I/O configurations]] and [[Mappings]].
| |
| | |
| From version 2.42 it is possible to copy the selected signals as text (and for example store them locally in a text file). Signals can also be pasted as text where the pasted signal names will be matched against the list of unselected signals. These features are accessed by clicking on the two icons in the bottom right corner of the "Selected signals" widget.
| |
| | |
| '''<big>SWDL</big>'''
| |
| | |
| '''<big>ETAS</big>'''
| |
| | |
| '''<big>SoftHub</big>'''
| |
| | |
| '''<big>Blue piraT</big>'''
| |
| | |
| === Get result files ===
| |
| [[File:Illustration10.png|thumb|Figure 9: The Get result files dialog.]]
| |
| When there is any result data generated from an assignment the “Get Result Files” button will be enabled. When clicking that button a dialog will appear. What you get here is basically a set of search terms to use to search through your result files on the portal for this particular task and WCU. When hovering the pointer over the search area you will get the number of files that match your search terms as a tool tip.
| |
| | |
| By pressing the “List Files” button you will get an opportunity to download result files to your local computer. See Figure 10 below. By default the “Compile by upload date” check box is checked. The idea behind this is that each set of results is grouped into sets of files which corresponds to a particular upload of result files. Each such upload can be huge with several thousands of files. Picking individual files is tedious and mostly you are interested with all of the files of a particular type that was uploaded. The “Compile by upload date” then simply means that one row in the table means one such upload of files.
| |
| To download result files, select the files you are interested in and click “Get File(s)”. After that a file save dialog will open and you can choose where to save the file. All the files you have selected will be downloaded as a zip-file.
| |
|
| |
|
| If the file you have selected is of a human readable type, the button “View file” will be enabled. By clicking that button the file is opened in your browser and you can look through it. Another way to open the file is to double click on the file entry.
| | Now that you are logged in you create a new task by clicking the "New Task" button at the bottom of the screen. When pressing the button a dialog will be shown with one tab for each type of assignment. To make the task a SoH task you click the SoH tab where the options for creating one will be shown. There you will at the top see six different checkboxes with different data items that SoH can collect. Check the boxes for voltage and mileage and scroll down to click "Add resources". A window will appear where we can search and add WCUs. You can search for a WCU by different criterea and when you have found the WCU(s) you wanted and have dragged them to the bottom box with the selected WCUs you press "Done". Now it should look like it does in figure 3 and you can now press "OK" to start the task. We don't need to fill the other boxes as we don't need a description, notification about status via email or schedule. That was a quick instruction on how to create a new task but you can read more detailed about how to create every sort of task at [[The Portal User View#Creating a Task|Creating a Task]]. |
| When your program has collected enough data for you you can stop it by clicking the “Stop Assignment” button. A message will be sent to the WCU telling it that the current assignment should be stopped.
| |
| This concludes this section where we have walked through a simple and rather basic scenario where a task was created and a hub assignment program generated some data that could be later retrieved.
| |
|
| |
|
| In the [[The Portal User View]] section a thorough explanation of the user's view will be presented.
| | When the task is done it will have generated results. You can find them by searching for the WCU(s) you used in the Tasks tab (on the home screen). When you have found the WCU and your assignment you can select it and press the "Get Result Files" in the bottom left corner. This will open a panel where you can search among the result files. When you have selected a file you gain access to multiple options. You can download the files (get files), plot the GPS data of the vehicle (plot route), preview the data files, or study the log files. There is more information about the Tasks tab and viewing results in [[The Portal User View#Tasks Tab|Tasks Tab]]. |
This chapter takes you on a tour to quickly get acquainted with the WICE Portal to see how it works.
As the WICE Portal is a web based tool there is no need to install any software on your computer. All you need is a web browser, such as Internet Explorer, which has Javascript enabled. Using the WICE Portal you can for example see which measurement assignments are running, check each assignment's respective status, get result files from measurement tasks, and much more.
In this quick start you will first be introduced to the basic model, and how it is supposed to work. Once the basics have been covered a simple scenario will be presented. This scenario will show how a task you have created is sent to a vehicle and then started. How to access the data generated by a task will also be covered.
Basic Conceptual Model
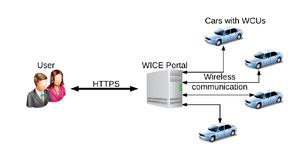
Figure 1: This image shows how you the user, the WICE portal and the vehicles in the field are connected. As you see here you as the user access the WCUs and their vehicles through the portal.
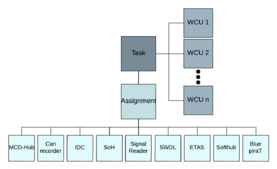
Figure 2: This figure shows how a task, assignment and WCU correlates. As you see the task is connected with an unspecified amount of WCUs where the task will execute. The task is also connected to one of the nine assignment as its that assignment that the task will be running.
The basic functionality of the WICE portal is to manage so called tasks. A task is an assignment to perform a specific action, typically collect measurement data from one or more vehicles. Tasks are created in the WICE portal and connected to a number of Wireless Communication Units (WCUs), which are in-vehicle units connected to the vehicles' internal communication buses. After a task has been created, the assignment is downloaded by each of the defined vehicles when ignition is turned on. Each WCU then runs the task's assignment, typically producing output in the shape of measurement data files, which are uploaded to the WICE portal. The user can then see the task's result on each WCU as the task's assignment will get different results depending on which WCU it ran on. To recap and illustrate how this works you can look at figure 1 and 2 explaining how this correlates.
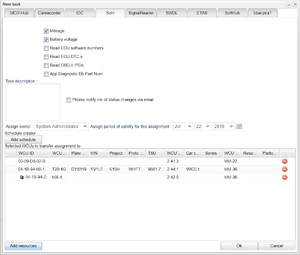
Figure 3: This is how a task can look when it is ready to be created.
A Simple Scenario
Now that we have gone through the concept of the WICE portal we will give a more concrete example. Let's say you want to create a task with a State of Health (SoH) assignment where you collect the mileage and battery voltage of a connected vehicle. To do this you need to log in to the WICE portal with your WICE login (username and password).
Now that you are logged in you create a new task by clicking the "New Task" button at the bottom of the screen. When pressing the button a dialog will be shown with one tab for each type of assignment. To make the task a SoH task you click the SoH tab where the options for creating one will be shown. There you will at the top see six different checkboxes with different data items that SoH can collect. Check the boxes for voltage and mileage and scroll down to click "Add resources". A window will appear where we can search and add WCUs. You can search for a WCU by different criterea and when you have found the WCU(s) you wanted and have dragged them to the bottom box with the selected WCUs you press "Done". Now it should look like it does in figure 3 and you can now press "OK" to start the task. We don't need to fill the other boxes as we don't need a description, notification about status via email or schedule. That was a quick instruction on how to create a new task but you can read more detailed about how to create every sort of task at Creating a Task.
When the task is done it will have generated results. You can find them by searching for the WCU(s) you used in the Tasks tab (on the home screen). When you have found the WCU and your assignment you can select it and press the "Get Result Files" in the bottom left corner. This will open a panel where you can search among the result files. When you have selected a file you gain access to multiple options. You can download the files (get files), plot the GPS data of the vehicle (plot route), preview the data files, or study the log files. There is more information about the Tasks tab and viewing results in Tasks Tab.


