Difference between revisions of "Save View and Search Expressions"
Alkitjohan (talk | contribs) m (Removed protection from "Save View and Search Expressions") |
|||
| (29 intermediate revisions by 3 users not shown) | |||
| Line 1: | Line 1: | ||
<includeonly>= Save | <includeonly>= Save View and Search Expressions =</includeonly> | ||
The icons presented below, found for instance in the bottom right corner in the "Tasks" and "Vehicles"-tabs, can be used to save and load panel views and search expressions. A view is in this sense defined as the set of visible panel columns and a search expression is the values entered into the columns fields. | |||
<br> | <br> | ||
[[File: | [[File:Screenshot from 2021-04-08 19-08-31.png|left|View and Search Expression]] | ||
<br clear="all"> | <br clear="all"> | ||
Functionality of these icons from left is as follows: | |||
# Adjust column width to fit inside the window. | |||
# The binoculars is used to load a saved view. Right click to load a default view. | |||
# The binoculars with an add sign is used to save the current view. Right click for create a default view (requires administrator access rights) | |||
# The magnifying glass is used to load a saved search expression | |||
# The magnifying glass with and add sign is used to save the currently entered search expression | |||
# The sweep icon is used to clear the current search expression | |||
== Manage Save & Load View == | |||
Views are useful for saving the layout for later. A view containing the order, which to hide and show, and the width of the columns. There are 2 sets of views: | |||
* '''User specific:''' Views for each user that only that person can manage and see. | |||
* '''Default views for new user:''' Views that are common for all users. This can be applied for everyone but only admins can manage them. | |||
=== Save view, user specific: === | |||
# Make sure you have manage the layout the way you want it to be saved: | |||
#* Hide and show: Right click on one of the column headers, then select column. | |||
#* Change order: Drag each column to the desired location. | |||
#* Width: Drag on the column right edge to the desired width. | |||
# Click on the binoculars-icon with an add sign. Icon number 3 from the left. | |||
# A new window will open above the icon:[[File:SaveViewUser.png|none|thumb]] | |||
# Settings available in this window: | |||
#* '''New view (name)''': Enter the name you want to call the view. If you want to override an existing view you can tab on the existing view and this window will be filled with the same name. If you are about to override there will be a confirmation window to prevent mistakes. | |||
#* '''Fit to window''': Setting can be managed for the new view and already saved view. To change this on an already saved view you click on the icon with horizontal arrows. For the new view use the checkbox. | |||
#** '''Checked''': The view will automatically change the width of the columns to fit inside the window and will only remember the ratio. This works best if you often change window size and resolution on screen. | |||
#** '''Unchecked''': The view remembers the width of each column and will apply the same regardless of window size. | |||
#* '''Mark as default''': To mark a view as default, click on the pin icon. This setting can only be applied to already saved views. You can only mark one view as default and will automatically be removed from the view that was default. A view mark as default will automatically be applied when entering the panel. | |||
#* '''Remove a view:''' Click on the red icon to the right for removing an existing view. '''This action can not be undone!''' | |||
# After all settings are set, click on the "Save view" button to save the view. | |||
=== Load view, user specific: === | |||
# To load an already saved view, click on the binoculars icon without an add sign. Icon number 2 from left. | |||
# A new window will open above the icon:[[File:ApplyView.png|none|thumb|337x337px]] | |||
# Settings available in this window: | |||
#* '''Fit to window''': To change this on an already saved view you click on the icon with horizontal arrows. | |||
#** '''Checked''': The view will automatically change the width of the columns to fit inside the window and will only remember the ratio. This works best if you often change window size and resolution on screen. | |||
#** '''Unchecked''': The view remembers the width of each column and will apply the same regardless of window size. | |||
#* '''Mark as default''': To mark a view as default, click on the pin icon. You can only mark one view as default and will automatically be removed from the view that was default. A view mark as default will automatically be applied when entering the panel. | |||
#* '''Remove a view:''' Click on the red icon to the right for removing an existing view. '''This action can not be undone!''' | |||
# Select the view you want to apply and then click on "Apply view" button. | |||
=== '''Default views for new users:''' === | |||
Views for new users require admin access to manage but can be applied for all users. To save, load or delete are the same steps as for "user specific" but the window is reached by right clicking on the icon. "Default views for new users" are copied when a new user is created to the "user specific" views. The change that is done in "Default view for new user" does not affect old users' "user specific" views. | |||
* '''Right click on load view''' (Icon number 2 from left)''':''' A context menu will show with alternatives: | |||
** '''Apply default view for new user:''' Entering a load window where all views that have been saved for new users is available. | |||
* '''Right click on save view''' (Icon number 3 from left): A context menu will show (if you have admin access) with alternatives: | |||
** '''Save current view for new user:''' This will save the current layout to the "Default views for new users" with name: "Default" and mark it as default. | |||
** '''Save view for new user:''' Entering a window for save/manage views to "Default views for new users". | |||
== Save Search Expression == | == Save Search Expression == | ||
Start with adding one or more search expressions in the search fields | Start with adding one or more search expressions in the search fields using the magnifying glass icon with an add sign. To save an expression, use the button to right marked in red and a new window will popup as you can see in Figure "Save Search Expression". Type a name for the expression, e.g. "My first expression" and press "Save search". | ||
To save an expression, use the button to right marked in red and a new window will popup as you can see in Figure "Save Search Expression". | |||
Type a name for the expression, e.g. "My first expression" and press "Save search". | |||
<gallery widths="300" heights="300" mode="nolines"> | <gallery widths="300" heights="300" mode="nolines"> | ||
File:Save search expressions2.png | File:Save search expressions2.png|Save Search Expression | ||
File:Save search expressions3.png | File:Save search expressions3.png|Load Search Expression | ||
File:Pair search and view icon.png|Pair Search and View - Icon | |||
</gallery> | </gallery> | ||
<br clear="all"> | <br clear="all"> | ||
To apply a saved expression, click the magnifying glass icon and select it in the list, see Figure "Load Search Expression". When "Apply search" is pressed the expression is entered into the visible columns. If the expression entail a term where the corresponding column is not currently visible, this column is shown. In this view it is also possible to delete saved expressions by simply clicking the delete icon right to the save title. It is also possible to preview the expression by hovering the tile. | |||
It is also possible to pair a view to the saved search expression. This can be achieved in two ways, one of which is to clicking the pin icon hovered in Figure "Pair Search and View - Icon" for the search expression in question, thus resulting in the additional window with radio button selection presented in Figure "Pair Search and View - Window". The other is to press the button "Select Search Views" and to use the pop up dialog visible in Figure "Pair Search and View - Dialog" where the view is selected from the drop down menu. | |||
<gallery widths="300" heights="300" mode="nolines" style="vertical-align:bottom"> | |||
File:Pair search and view window.png|Pair Search and View - Window | |||
File:Pair search and view dialog.png|Pair Search and View - Dialog | |||
</gallery> | |||
<br clear="all">The main difference between the two ways is that in the dialog it is possible to administer the view connections for several search expressions simultaneously. It is possible to select from all the currently saved view and the "NONE"-option. The latter meaning that the view will be unchanged when the search expression is applied, except for the case when the expression entails a column which is not currently visible. If the search expression is paired with a view that does not include all columns found in the expression this column is shown anyway. | |||
== Applied view when entering a table == | |||
When entering Tasks-, User-, ECU List- or Vehicles panel the view that will be applied is depending on this priority: | |||
# There exists a user specific view, that is marked as default, this one will be applied. | |||
# There exist user specific views, but no one is marked as default, the first view that was created for this user will be applied. | |||
# There are no user specific views and there is a view in “Default views for new user” table that is marked as default, this one will be applied. | |||
# If there is no table which satisfies paragraphs 1 to 3 following columns will be applied: | |||
Vehicles Panel: | |||
* WCU ID | |||
* VIN | |||
* WCU comment | |||
* WCU version | |||
* Connected | |||
* Resource group | |||
* Active alarms | |||
Tasks Panel | |||
* Task ID | |||
* Assignment | |||
* Type | |||
* WCU ID | |||
* Status | |||
* Task creator | |||
* Creation date | |||
* Resource group | |||
User Panel: | |||
* All columns are showed. | |||
ECU List: | |||
* All columns are showed. | |||
Latest revision as of 14:32, 17 May 2022
The icons presented below, found for instance in the bottom right corner in the "Tasks" and "Vehicles"-tabs, can be used to save and load panel views and search expressions. A view is in this sense defined as the set of visible panel columns and a search expression is the values entered into the columns fields.
Functionality of these icons from left is as follows:
- Adjust column width to fit inside the window.
- The binoculars is used to load a saved view. Right click to load a default view.
- The binoculars with an add sign is used to save the current view. Right click for create a default view (requires administrator access rights)
- The magnifying glass is used to load a saved search expression
- The magnifying glass with and add sign is used to save the currently entered search expression
- The sweep icon is used to clear the current search expression
Manage Save & Load View
Views are useful for saving the layout for later. A view containing the order, which to hide and show, and the width of the columns. There are 2 sets of views:
- User specific: Views for each user that only that person can manage and see.
- Default views for new user: Views that are common for all users. This can be applied for everyone but only admins can manage them.
Save view, user specific:
- Make sure you have manage the layout the way you want it to be saved:
- Hide and show: Right click on one of the column headers, then select column.
- Change order: Drag each column to the desired location.
- Width: Drag on the column right edge to the desired width.
- Click on the binoculars-icon with an add sign. Icon number 3 from the left.
- A new window will open above the icon:
- Settings available in this window:
- New view (name): Enter the name you want to call the view. If you want to override an existing view you can tab on the existing view and this window will be filled with the same name. If you are about to override there will be a confirmation window to prevent mistakes.
- Fit to window: Setting can be managed for the new view and already saved view. To change this on an already saved view you click on the icon with horizontal arrows. For the new view use the checkbox.
- Checked: The view will automatically change the width of the columns to fit inside the window and will only remember the ratio. This works best if you often change window size and resolution on screen.
- Unchecked: The view remembers the width of each column and will apply the same regardless of window size.
- Mark as default: To mark a view as default, click on the pin icon. This setting can only be applied to already saved views. You can only mark one view as default and will automatically be removed from the view that was default. A view mark as default will automatically be applied when entering the panel.
- Remove a view: Click on the red icon to the right for removing an existing view. This action can not be undone!
- After all settings are set, click on the "Save view" button to save the view.

Load view, user specific:
- To load an already saved view, click on the binoculars icon without an add sign. Icon number 2 from left.
- A new window will open above the icon:
- Settings available in this window:
- Fit to window: To change this on an already saved view you click on the icon with horizontal arrows.
- Checked: The view will automatically change the width of the columns to fit inside the window and will only remember the ratio. This works best if you often change window size and resolution on screen.
- Unchecked: The view remembers the width of each column and will apply the same regardless of window size.
- Mark as default: To mark a view as default, click on the pin icon. You can only mark one view as default and will automatically be removed from the view that was default. A view mark as default will automatically be applied when entering the panel.
- Remove a view: Click on the red icon to the right for removing an existing view. This action can not be undone!
- Fit to window: To change this on an already saved view you click on the icon with horizontal arrows.
- Select the view you want to apply and then click on "Apply view" button.

Default views for new users:
Views for new users require admin access to manage but can be applied for all users. To save, load or delete are the same steps as for "user specific" but the window is reached by right clicking on the icon. "Default views for new users" are copied when a new user is created to the "user specific" views. The change that is done in "Default view for new user" does not affect old users' "user specific" views.
- Right click on load view (Icon number 2 from left): A context menu will show with alternatives:
- Apply default view for new user: Entering a load window where all views that have been saved for new users is available.
- Right click on save view (Icon number 3 from left): A context menu will show (if you have admin access) with alternatives:
- Save current view for new user: This will save the current layout to the "Default views for new users" with name: "Default" and mark it as default.
- Save view for new user: Entering a window for save/manage views to "Default views for new users".
Save Search Expression
Start with adding one or more search expressions in the search fields using the magnifying glass icon with an add sign. To save an expression, use the button to right marked in red and a new window will popup as you can see in Figure "Save Search Expression". Type a name for the expression, e.g. "My first expression" and press "Save search".
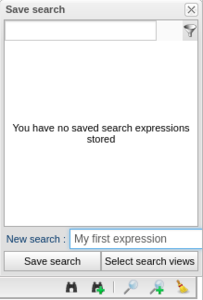
Save Search Expression
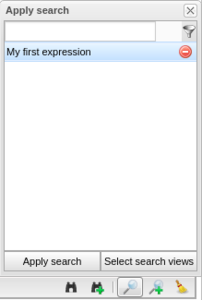
Load Search Expression
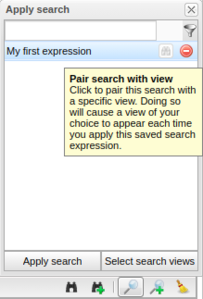
Pair Search and View - Icon


To apply a saved expression, click the magnifying glass icon and select it in the list, see Figure "Load Search Expression". When "Apply search" is pressed the expression is entered into the visible columns. If the expression entail a term where the corresponding column is not currently visible, this column is shown. In this view it is also possible to delete saved expressions by simply clicking the delete icon right to the save title. It is also possible to preview the expression by hovering the tile.
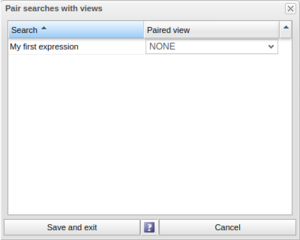
It is also possible to pair a view to the saved search expression. This can be achieved in two ways, one of which is to clicking the pin icon hovered in Figure "Pair Search and View - Icon" for the search expression in question, thus resulting in the additional window with radio button selection presented in Figure "Pair Search and View - Window". The other is to press the button "Select Search Views" and to use the pop up dialog visible in Figure "Pair Search and View - Dialog" where the view is selected from the drop down menu.
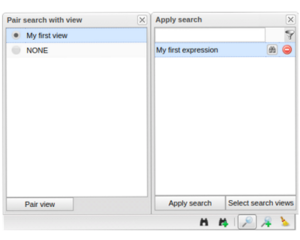
Pair Search and View - Window
Pair Search and View - Dialog


The main difference between the two ways is that in the dialog it is possible to administer the view connections for several search expressions simultaneously. It is possible to select from all the currently saved view and the "NONE"-option. The latter meaning that the view will be unchanged when the search expression is applied, except for the case when the expression entails a column which is not currently visible. If the search expression is paired with a view that does not include all columns found in the expression this column is shown anyway.
Applied view when entering a table
When entering Tasks-, User-, ECU List- or Vehicles panel the view that will be applied is depending on this priority:
- There exists a user specific view, that is marked as default, this one will be applied.
- There exist user specific views, but no one is marked as default, the first view that was created for this user will be applied.
- There are no user specific views and there is a view in “Default views for new user” table that is marked as default, this one will be applied.
- If there is no table which satisfies paragraphs 1 to 3 following columns will be applied:
Vehicles Panel:
- WCU ID
- VIN
- WCU comment
- WCU version
- Connected
- Resource group
- Active alarms
Tasks Panel
- Task ID
- Assignment
- Type
- WCU ID
- Status
- Task creator
- Creation date
- Resource group
User Panel:
- All columns are showed.
ECU List:
- All columns are showed.