Difference between revisions of "Labels"
| (31 intermediate revisions by 5 users not shown) | |||
| Line 2: | Line 2: | ||
== Add labels to resources == | == Add labels to resources == | ||
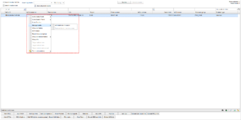
Labels can currently be added to WCUs, | Labels can currently be added to WCUs, vehicles and resource groups. In the [[Vehicles|Vehicles tab]], search out your resource, right click and choose "Manage labels" as illustrated in Figure "Adding Label to Resource". In the sub menu you can choose to either add or remove labels, the latter of which is only possible if the selected resources are associated with such. | ||
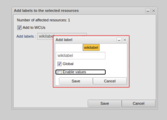
When choosing | When choosing to add labels, a new window as can be seen in Figure "Adding Label Dialog" will show up. Using the checkboxes it is possible to either add labels to the selected WCU, the connected vehicle or both. In the "Add labels"-selector, you can choose to add an already existing label from the drop down menu. If the desired label does not exist, you will get the opportunity to create it by pressing the enter key. This will open up the window as can be seen in Figure "Creating Label Dialog". When clicking "Save" the new label will be temporarily added to the resource as can be seen in Figure "Label Temporarily Added". Here you have the option to add another label by repeating the previous step. When finished, save the label(s) added to the current resource by clicking "Save". | ||
When finished, save the label(s) added to the current resource by clicking "Save". | |||
<gallery widths="250" mode="nolines"> | <gallery widths="250" mode="nolines"> | ||
File:Labels add wcu.png|Adding Label to | File:Labels add wcu.png|Adding Label to Resource | ||
File:Labels add wcu2.png|Adding Label Dialog | File:Labels add wcu2.png|Adding Label Dialog | ||
File:Labels add wcu3.png|Creating Label Dialog | File:Labels add wcu3.png|Creating Label Dialog | ||
File:Labels add wcu4.png|Label Temporarily Added | File:Labels add wcu4.png|Label Temporarily Added | ||
</gallery>Labels can currently only be | </gallery> | ||
When adding a label you also have the option to set a value if "Enable values" are enabled for the label of interest. See screenshot "Creating Label Dialog" above. | |||
If values are enabled, the new label or the selected label has a small filter icon as can be seen in the screenshot "Show value selector" below. If this icon is clicked, a new value can either be selected by typing in the selector or by using the drop down menu. For a new label, the drop down menu is always empty. | |||
If a resource already has a label with a value associated, the value can be replaced by adding the label again with a different value. The value can also be removed by adding the label without a label associated. The value can also be changed directly if you edit the labels via the [[#Manage labels on multiple resources|Manage labels on multiple resources]] in Vehicles. <gallery> | |||
File:Add value.png|Show value selector | |||
File:Add value2.png|Select or type value | |||
</gallery> | |||
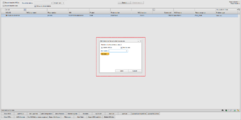
To remove a label from a resource, select the "Remove labels from resources" option in the submenu of "Manage labels on resources". Doing so, results in the dialog presented in Figure "Removing label from Resource Dialog", which shows a list of all labels associated with the selected resources. To remove a label simply click it, resulting in it being grayed out, see Figure "Label Removed from Resource". When pressing "Save" the deselected labels are removed from all selected resources. | |||
<gallery widths="250" mode="nolines"> | |||
File:Labels remove.png|Removing label from Resource Dialog | |||
File:Labels remove2.png|Label Removed from Resource | |||
</gallery> | |||
Labels can currently only be managed on resources via the [[Vehicles]] tab. See [[#Labels in Vehicles]] for more info about adding labels while modifying other resource attributes. | |||
== Global and private labels == | == Global and private labels == | ||
| Line 22: | Line 38: | ||
== System labels == | == System labels == | ||
Currently there are two types of system labels; WCU software version and MX4 firmware version. System labels are labels created by the system and can not be added to the resource by a user. These labels are typically added to a resource (WCU) when its software changes or when to describe which software (and firmware) a WCU had at a certain time. More about this in [[#Labels in Tasks]]. | Currently there are two types of system labels; WCU software version and MX4 firmware version. System labels are labels created by the system and can not be added to the resource by a user. These labels are typically added to a resource (WCU) when its software changes or when to describe which software (and firmware) a WCU had at a certain time. More about this in [[#Labels in Tasks]]. | ||
== Values for labels == | |||
From version 2.64 it is possible to add values to labels in the WICE Portal. Values for labels makes it possible to use labels as a way to dynamically add new attributes (e.g vehicle colour etc) to resources and use the values to filter resources in the [[Tasks Tab|Tasks]] or the [[Vehicles]] tab. | |||
A value for an existing label can only be added if the the "Enable values" option is turned on for the label of interest. See [[#Administer labels]] | |||
[[File:Add value.png|thumb|A label where "Enable values" is turned on]] | |||
If one wants to add a value to a new label when adding the new label to a resource, the "Enable values" options needs to be turned on when the label is created as described in [[Labels#Add labels to resources|Add labels to resources]] | |||
When a resource has a label with a value associated, the value can be used to further filter the resources in the [[Tasks Tab|Tasks]] or [[Vehicles]] tab. See [[#Search by label values|Search by label values]] | |||
== Labels in [[Vehicles]] == | == Labels in [[Vehicles]] == | ||
| Line 32: | Line 57: | ||
=== Manage labels on resource === | === Manage labels on resource === | ||
[[File:Labels add wcu7.png|thumb|150x150px|Edit WCU Dialog]] | [[File:Labels add wcu7.png|thumb|150x150px|Edit WCU Dialog]] | ||
Labels on a resource can be managed (add or remove labels) | Labels on a resource can be managed (add or remove labels) as described in [[#Add labels to resources]]. Alternatively, if only one resource is selected, the "Edit WCU" or "[[The Portal Administrator View#The Edit Car Dialog|Edit Car]]" button can be used for a WCU or Car, respectively. The Figure "Edit WCU Dialog" shows the "Edit WCU" dialog. To remove the label "wicewiki", simply click the label and it will disappear. The new state of the WCU is not saved until we click the button "Save". In this view we also have the option to add other labels exactly in the same way as we described in [[#Add labels to resources]]. | ||
=== Manage labels on multiple resources === | === Manage labels on multiple resources === | ||
From portal version 2.47 it is possible to manage labels on multiple resources at once. | From portal version 2.47 it is possible to manage labels on multiple resources at once. | ||
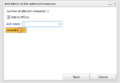
To manage labels on multiple resources, search out the resources(in the Vehicles tab), right click and choose "Manage labels | To manage labels on multiple resources, search out the resources(in the Vehicles tab), right click and choose one of the options under "Manage labels" to either add or remove labels, as described in [[#Add labels to resources]]. This will give you the window in Figure "Add Label to Multiple Resources". | ||
This can be done if the selected rows are resource groups or WCUs/Cars, not both. If one or more resource groups are selected it is possible to add the label to the WCUs and/or Cars in the group(s) and/or the resource group it self using the dialog checkboxes. | |||
=== Search by labels === | === Search by labels === | ||
| Line 62: | Line 80: | ||
Also note that in Figure "Search by Labels" there is a checkbox option: "Show all private labels". This is only available for administrators and enables the user to also retrieve private labels created by other users. | Also note that in Figure "Search by Labels" there is a checkbox option: "Show all private labels". This is only available for administrators and enables the user to also retrieve private labels created by other users. | ||
=== Search by label values === | |||
If a selected label has "Enable values" feature turned on (See [[Labels#Values for labels|Values for labels)]] the search criteria can be further narrowed by providing a value search criteria. A value search criteria is either added by simply typing the criteria or by selecting an available value via the drop down menu. When typing the criteria, regular expressions matching multiple values can also be used. See screenshot "Filter by value using regular expression". | |||
[[File:Label value expression.png|thumb|Filter by value using regular expressions]] | |||
=== Add label with values as a column === | |||
To ease filtering and use values for labels as a way to add dynamic attributes to resources (as mentioned in [[Labels#Values for labels|Values for labels)]] a label (with values enabled) can be added as resource type column to the Vehicles grid by right clicking the label. If the label has values enabled the context menu in the screenshot "Add as column" is displayed. If the label is added as a column, the column is added to the grid as seen in screenshot "Vehicle column". | |||
This column can then be treated as any column in terms of filtering and sorting. When adding a label as a column, the column will be used to filter and show values for the selected resource type. In other words, if you add the column "Colour" as a vehicle column, the column will show the values for all vehicles that have the label "Colour" associated and have values selected for that label. The column will not show the values if the only WCU connected to the vehicle has the label "Colour" associated. These values are shown only if the label is added as a WCU column. The selected resource type is displayed via an icon as can be seen in the screenshot "Vehicle column".<gallery> | |||
File:Add as column.png|Add as column | |||
File:Vehicle colour column.png|Vehicle column | |||
</gallery> | |||
== Labels in [[Tasks Tab|Tasks]] == | == Labels in [[Tasks Tab|Tasks]] == | ||
| Line 71: | Line 101: | ||
Illustration "System Label Associated with WCU" shows the labels associated with "johan1" for task 7664. In addition to the system label, we have the "wicewiki" label. This means that the WCU "johan1" had the label "wicewiki" when task 7664 was created. | Illustration "System Label Associated with WCU" shows the labels associated with "johan1" for task 7664. In addition to the system label, we have the "wicewiki" label. This means that the WCU "johan1" had the label "wicewiki" when task 7664 was created. | ||
<gallery widths=250px mode="nolines"> | <gallery widths="250px" mode="nolines"> | ||
File:Labels add wcu9.png|Label Associated with WCU | File:Labels add wcu9.png|Label Associated with WCU | ||
File:Labels add wcu10.png|System Label Associated with WCU | File:Labels add wcu10.png|System Label Associated with WCU | ||
| Line 79: | Line 109: | ||
[[File:Labels add wcu11.png|thumb|200px|right|Labels Added to Assignment]] | [[File:Labels add wcu11.png|thumb|200px|right|Labels Added to Assignment]] | ||
Labels can not be added to a assignment by a user but the system can add system labels to a assignment if the assignment is either running, pending or stopped pending. These labels are not visible for a result row in the same way as resource labels but are instead accessible if one selects a row and presses the button "View assignment". An example can be seen in | Labels can not be added to a assignment by a user but the system can add system labels to a assignment if the assignment is either running, pending or stopped pending. These labels are not visible for a result row in the same way as resource labels but are instead accessible if one selects a row and presses the button "View assignment". An example can be seen in Figure "Labels Added to Assignment". If the WCU software and/or MX4 firmware is changed while a assignment is either running, pending or stopped pending, a system label describing the change will be added to the assignment. | ||
<br clear="all"> | <br clear="all"> | ||
| Line 86: | Line 116: | ||
[[File:Labels add wcu12.png|thumb|200px|Search Tab Label Widget]] | [[File:Labels add wcu12.png|thumb|200px|Search Tab Label Widget]] | ||
The [[Search Tab|search tab]] has a new labels widget as can be seen in Figure "Search Tab Label Widge". This widget works in the same way as for the [[#Labels in Tasks|Tasks tab]]. When searching for labels in the [[Search Tab|search tab]] we are searching for labels in the same way as for the tasks tab, e.g labels that were associated with WCUs and/or cars when the tasks were created. If we include system labels in the label search criteria, we are also including assignment labels among the the resource types we are searching in. | The [[Search Tab|search tab]] has a new labels widget as can be seen in Figure "Search Tab Label Widge". This widget works in the same way as for the [[#Labels in Tasks|Tasks tab]]. When searching for labels in the [[Search Tab|search tab]] we are searching for labels in the same way as for the tasks tab, e.g labels that were associated with WCUs and/or cars when the tasks were created. If we include system labels in the label search criteria, we are also including assignment labels among the the resource types we are searching in. | ||
<br clear="all"> | |||
== Administer labels == | == Administer labels == | ||
| Line 91: | Line 122: | ||
=== Enable/disable labels === | === Enable/disable labels === | ||
[[File:Labels add wcu13.png|thumb| | [[File:Labels add wcu13.png|thumb|200px|Enable/Disable Label]] | ||
Labels can be enabled or disabled by checking/unchecking the checkbox in the "Enabled" column as can be seen in | Labels can be enabled or disabled by checking/unchecking the checkbox in the "Enabled" column as can be seen in Figure "Enable/Disable Label". The changes are instant when checking the checkbox. | ||
Disabled labels can not be added to resources and are not visible in the "Search by labels" widgets. They are however visible when when hovering a resource in the Tasks tab. | Disabled labels can not be added to resources and are not visible in the "Search by labels" widgets. They are however visible when when hovering a resource in the Tasks tab. | ||
=== Rename label === | === Rename label === | ||
[[File:Labels add wcu14.png|thumb| | [[File:Labels add wcu14.png|thumb|200px|Edit Label Dialog]] | ||
A label can be renamed by clicking the label in the labels grid. An "Edit label" window will popup as can be seen in illustration " | A label can be renamed by clicking the label in the labels grid. An "Edit label" window will popup as can be seen in illustration "Edit Label Dialog". To rename the label, simply edit the text box and click save. | ||
=== Enable Display name and Display description === | |||
A ''Display name'' can be added to the label which will be shown instead of the label name e.g. when a label is added as an attribute on a resource. In addition to this a ''Display description'' might be added too which can hold for example a clarification of the label's purpose. The description will show when hovering the label as in when hovering over a label added as an attribute on a resource. | |||
=== Administrator specific features === | === Administrator specific features === | ||
| Line 108: | Line 142: | ||
==== Turn private label global ==== | ==== Turn private label global ==== | ||
When clicking a label (as described in [[#Rename label]]) an administrator can choose to turn a private label global. This has to be done with some care since it is not possible to turn a global label private again. | When clicking a label (as described in [[#Rename label]]) an administrator can choose to turn a private label global. This has to be done with some care since it is not possible to turn a global label private again. | ||
[[File:Screenshot from 2022-04-22 10-34-09.png|alt=Editing a label|thumb|Editing a label]] | |||
==== Enable values for label ==== | |||
Values for an existing label can be added by checking "Enable values" in the "Edit Label Dialog". Note that when values has been enabled, this can not be disabled again. | |||
==== Associate vehicle using this label ==== | |||
This feature is not available for all customers. If the vehicle identification type is set to 'Chassis NO' for the [[The Portal Administrator View#Configure the Vinreader Module|VINreader module]], this label will be used for the mechanism to automatically connect a WCU with a vehicle if checked. Only one label can have this checked. If you check this, the previously checked label will be unchecked. Also, the label must have values enabled. | |||
=== Configure label announcements === | |||
If the feature is enabled at your site, it is possible to configure label announcements in the "Edit Label Dialog" as well as the "Create Label Dialog". It is also possible to search for labels via the columns "To be announced", "Only announce with values", and "Resource type". | |||
==== To be announced ==== | |||
This checkbox determines whether a label is to be included in announcements. | |||
==== Only announce with values ==== | |||
When a label has "Enable values" checked, this checkbox determines whether a label must have a value for it to be included in announcements. | |||
==== Resource type ==== | |||
Set which resource type the label is to be associated with. The options are: | |||
''Any -'' The label will to be included in the announcement if it is associated with either the WCU, the vehicle or both. | |||
''WCU -'' The label will be included in the announcement if the label is associated with the WCU that is related to the announcement. | |||
''Vehicle -'' The label will be included in the announcement if the label is associated with the vehicle that is related to the announcement. | |||
Latest revision as of 13:16, 15 June 2022
From version 2.45 the concept of labels has been introduced in the WICE portal.
Add labels to resources
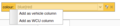
Labels can currently be added to WCUs, vehicles and resource groups. In the Vehicles tab, search out your resource, right click and choose "Manage labels" as illustrated in Figure "Adding Label to Resource". In the sub menu you can choose to either add or remove labels, the latter of which is only possible if the selected resources are associated with such.
When choosing to add labels, a new window as can be seen in Figure "Adding Label Dialog" will show up. Using the checkboxes it is possible to either add labels to the selected WCU, the connected vehicle or both. In the "Add labels"-selector, you can choose to add an already existing label from the drop down menu. If the desired label does not exist, you will get the opportunity to create it by pressing the enter key. This will open up the window as can be seen in Figure "Creating Label Dialog". When clicking "Save" the new label will be temporarily added to the resource as can be seen in Figure "Label Temporarily Added". Here you have the option to add another label by repeating the previous step. When finished, save the label(s) added to the current resource by clicking "Save".
Adding Label to Resource

Adding Label Dialog
Creating Label Dialog
Label Temporarily Added


When adding a label you also have the option to set a value if "Enable values" are enabled for the label of interest. See screenshot "Creating Label Dialog" above.
If values are enabled, the new label or the selected label has a small filter icon as can be seen in the screenshot "Show value selector" below. If this icon is clicked, a new value can either be selected by typing in the selector or by using the drop down menu. For a new label, the drop down menu is always empty.
If a resource already has a label with a value associated, the value can be replaced by adding the label again with a different value. The value can also be removed by adding the label without a label associated. The value can also be changed directly if you edit the labels via the Manage labels on multiple resources in Vehicles.
Show value selector
Select or type value


To remove a label from a resource, select the "Remove labels from resources" option in the submenu of "Manage labels on resources". Doing so, results in the dialog presented in Figure "Removing label from Resource Dialog", which shows a list of all labels associated with the selected resources. To remove a label simply click it, resulting in it being grayed out, see Figure "Label Removed from Resource". When pressing "Save" the deselected labels are removed from all selected resources.
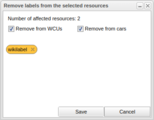
Removing label from Resource Dialog
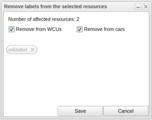
Label Removed from Resource


Labels can currently only be managed on resources via the Vehicles tab. See #Labels in Vehicles for more info about adding labels while modifying other resource attributes.
Global and private labels

By default all user created labels in the WICE portal are global meaning that they are visible for every logged in user. When creating a new label, as in Figure "Creating Label Dialog" in #Add labels to resources, you have the option make the label private by ticking the "Private" checkbox as can be seen in Figure "Private Label". A private labels renders with rounded corners as opposite to global labels which renders with sharp corners. Compare the Figure "Private Label" with any of the figures in #Add labels to resources.
Private labels are, as the name suggests, only visible for the one who created it. In #Administrate labels, there is a feature to turn private labels global.
System labels
Currently there are two types of system labels; WCU software version and MX4 firmware version. System labels are labels created by the system and can not be added to the resource by a user. These labels are typically added to a resource (WCU) when its software changes or when to describe which software (and firmware) a WCU had at a certain time. More about this in #Labels in Tasks.
Values for labels
From version 2.64 it is possible to add values to labels in the WICE Portal. Values for labels makes it possible to use labels as a way to dynamically add new attributes (e.g vehicle colour etc) to resources and use the values to filter resources in the Tasks or the Vehicles tab.
A value for an existing label can only be added if the the "Enable values" option is turned on for the label of interest. See #Administer labels
If one wants to add a value to a new label when adding the new label to a resource, the "Enable values" options needs to be turned on when the label is created as described in Add labels to resources
When a resource has a label with a value associated, the value can be used to further filter the resources in the Tasks or Vehicles tab. See Search by label values
Labels in Vehicles

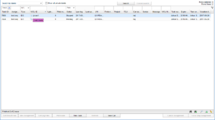
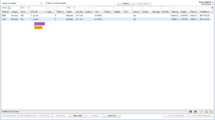
Figure "Labels in Vehicles Tab" illustrates how the Vehicles tab looks like when we have searched out a resource associated with a label. A resource associated with a label as a small label icon before the "WCU ID" if the resource is a WCU or a resource group or before the "Plate number" if the resource is a car. When hovering the label icon, all associated labels on that resource pops up. The labels can be global labels added by other users, private labels added by the currently logged in user or system labels added by the system.
Add labels
Labels are added directly to a resource as described in section #Add labels to resources.
Manage labels on resource

Labels on a resource can be managed (add or remove labels) as described in #Add labels to resources. Alternatively, if only one resource is selected, the "Edit WCU" or "Edit Car" button can be used for a WCU or Car, respectively. The Figure "Edit WCU Dialog" shows the "Edit WCU" dialog. To remove the label "wicewiki", simply click the label and it will disappear. The new state of the WCU is not saved until we click the button "Save". In this view we also have the option to add other labels exactly in the same way as we described in #Add labels to resources.
Manage labels on multiple resources
From portal version 2.47 it is possible to manage labels on multiple resources at once.
To manage labels on multiple resources, search out the resources(in the Vehicles tab), right click and choose one of the options under "Manage labels" to either add or remove labels, as described in #Add labels to resources. This will give you the window in Figure "Add Label to Multiple Resources".
This can be done if the selected rows are resource groups or WCUs/Cars, not both. If one or more resource groups are selected it is possible to add the label to the WCUs and/or Cars in the group(s) and/or the resource group it self using the dialog checkboxes.
Search by labels
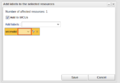
Above the regular search criteria filter editors there is a "Search by labels" widget as can be seen in Figure "Search by Labels". This widget let the user to include one or many labels in the search criteria which is further specified using the drop down menu with the three options "Match any", "Match all" and "Match none", where the foremost is the default choice.

Match any - Will show hits including resources which have any of the selected labels attached.
Match all - Will show hits including resources with all of the selected labels attached.
Match none - Will show hits including resources where the resources with the selected labels are excluded
Also note that in Figure "Search by Labels" there is a checkbox option: "Show all private labels". This is only available for administrators and enables the user to also retrieve private labels created by other users.
Search by label values
If a selected label has "Enable values" feature turned on (See Values for labels) the search criteria can be further narrowed by providing a value search criteria. A value search criteria is either added by simply typing the criteria or by selecting an available value via the drop down menu. When typing the criteria, regular expressions matching multiple values can also be used. See screenshot "Filter by value using regular expression".
Add label with values as a column
To ease filtering and use values for labels as a way to add dynamic attributes to resources (as mentioned in Values for labels) a label (with values enabled) can be added as resource type column to the Vehicles grid by right clicking the label. If the label has values enabled the context menu in the screenshot "Add as column" is displayed. If the label is added as a column, the column is added to the grid as seen in screenshot "Vehicle column".
This column can then be treated as any column in terms of filtering and sorting. When adding a label as a column, the column will be used to filter and show values for the selected resource type. In other words, if you add the column "Colour" as a vehicle column, the column will show the values for all vehicles that have the label "Colour" associated and have values selected for that label. The column will not show the values if the only WCU connected to the vehicle has the label "Colour" associated. These values are shown only if the label is added as a WCU column. The selected resource type is displayed via an icon as can be seen in the screenshot "Vehicle column".
Add as column

Vehicle column
Labels in Tasks
In the tasks tab it is possible to search for labels in the same way as described in #Search by labels. The difference for this tab compared to the Vehicles tab is that the labels associated with a resource, are the labels that were associated with the resource when the assignment was created.
Resource Labels for a Task
The Figure "Label Associated with WCU" shows the labels associated with the WCU "johan1" for task 7663. The only label is a #System label that was automatically added to the WCU when the task was created. This means that there were no other global or private labels associated with this WCU when task 7663 was created.
Illustration "System Label Associated with WCU" shows the labels associated with "johan1" for task 7664. In addition to the system label, we have the "wicewiki" label. This means that the WCU "johan1" had the label "wicewiki" when task 7664 was created.
Label Associated with WCU
System Label Associated with WCU


Assignment labels

Labels can not be added to a assignment by a user but the system can add system labels to a assignment if the assignment is either running, pending or stopped pending. These labels are not visible for a result row in the same way as resource labels but are instead accessible if one selects a row and presses the button "View assignment". An example can be seen in Figure "Labels Added to Assignment". If the WCU software and/or MX4 firmware is changed while a assignment is either running, pending or stopped pending, a system label describing the change will be added to the assignment.
Labels in Search

The search tab has a new labels widget as can be seen in Figure "Search Tab Label Widge". This widget works in the same way as for the Tasks tab. When searching for labels in the search tab we are searching for labels in the same way as for the tasks tab, e.g labels that were associated with WCUs and/or cars when the tasks were created. If we include system labels in the label search criteria, we are also including assignment labels among the the resource types we are searching in.
Administer labels
In the The Portal Administrator View#The Administration Tab there is a "Labels" tab where users can administrate their private labels and administrators can administrate all labels in the system. Here it is possible to search for labels either by label name, creator or status both in terms of global/private and enabled/disabled. The status based search is based on a checkbox which has three modes: unselected, checked or unchecked. The checked and unchecked option initiates a search matching the selected choice. However, the default setting is unselected, which is represented by a gray checkbox, and it shows hits disregarding its status.
Enable/disable labels

Labels can be enabled or disabled by checking/unchecking the checkbox in the "Enabled" column as can be seen in Figure "Enable/Disable Label". The changes are instant when checking the checkbox.
Disabled labels can not be added to resources and are not visible in the "Search by labels" widgets. They are however visible when when hovering a resource in the Tasks tab.
Rename label

A label can be renamed by clicking the label in the labels grid. An "Edit label" window will popup as can be seen in illustration "Edit Label Dialog". To rename the label, simply edit the text box and click save.
Enable Display name and Display description
A Display name can be added to the label which will be shown instead of the label name e.g. when a label is added as an attribute on a resource. In addition to this a Display description might be added too which can hold for example a clarification of the label's purpose. The description will show when hovering the label as in when hovering over a label added as an attribute on a resource.
Administrator specific features
As an administrator there are some more features in the labels administration tab.
Show all private labels
When checking the "Show all private labels" checkbox, all private labels in the system will be visible when searching. In this way, an administrator can edit other users private labels.
Turn private label global
When clicking a label (as described in #Rename label) an administrator can choose to turn a private label global. This has to be done with some care since it is not possible to turn a global label private again.

Enable values for label
Values for an existing label can be added by checking "Enable values" in the "Edit Label Dialog". Note that when values has been enabled, this can not be disabled again.
Associate vehicle using this label
This feature is not available for all customers. If the vehicle identification type is set to 'Chassis NO' for the VINreader module, this label will be used for the mechanism to automatically connect a WCU with a vehicle if checked. Only one label can have this checked. If you check this, the previously checked label will be unchecked. Also, the label must have values enabled.
Configure label announcements
If the feature is enabled at your site, it is possible to configure label announcements in the "Edit Label Dialog" as well as the "Create Label Dialog". It is also possible to search for labels via the columns "To be announced", "Only announce with values", and "Resource type".
To be announced
This checkbox determines whether a label is to be included in announcements.
Only announce with values
When a label has "Enable values" checked, this checkbox determines whether a label must have a value for it to be included in announcements.
Resource type
Set which resource type the label is to be associated with. The options are:
Any - The label will to be included in the announcement if it is associated with either the WCU, the vehicle or both.
WCU - The label will be included in the announcement if the label is associated with the WCU that is related to the announcement.
Vehicle - The label will be included in the announcement if the label is associated with the vehicle that is related to the announcement.