Difference between revisions of "New task"
Alkitjohan (talk | contribs) |
Robin.karhu (talk | contribs) m |
||
| (14 intermediate revisions by 5 users not shown) | |||
| Line 1: | Line 1: | ||
<includeonly>= New task =</includeonly> | <includeonly>= New task =</includeonly> | ||
<noinclude>The following applies to version >= 2.41 of the portal:</noinclude> | <noinclude>The following applies to version >= 2.41 of the portal:</noinclude> | ||
[[File:New Task Window.png|thumb|New Task Window]] | |||
[[File:New task 1.png|thumb|frame|Add Resources to Task]] | |||
To create a new task, first select task type in the window presented in Figure "New Task Window". Learn more about how to go about creating a new task [[Creating a Task|here]]. When a task is chosen, you can select target WCUs for the task by clicking the "Add resources"-button, presented in Figure "Add Resources to Task". As the illustration shows, the area where WCU's where added and removed to the task is a table very similar to the that in the Vehicles tab. | |||
[[ | This table shows the currently added WCUs that the chosen task will be added to. Clicking "Add resources" the window shown in Figure "Select Resources Window" will open up. | ||
This table shows the currently added WCUs that the chosen | [[File:New task 2.png|thumb|frame|Select Resources Window]] | ||
[[File:New task 2.png|thumb|frame| | |||
The select resources window contains two tables. The upper table has filter editors where one enters search criteria and performs a search by pressing enter or clicks the "Search" button. The lower table shows the selected resources (WCUs) and is connected to the table shown in | The select resources window contains two tables. The upper table has filter editors where one enters search criteria and performs a search by pressing enter or clicks the "Search" button. The lower table shows the selected resources (WCUs) and is connected to the table shown in Figure "Add Resources to Task". | ||
==Add/remove resources== | ==Add/remove resources== | ||
| Line 13: | Line 15: | ||
To remove content from the table of selected resources you can select the WCUs you want to remove and then click the "X" button next to the "arrow down" button. You can also remove a single WCU by clicking the red "Remove record" icon in the end of each line in the table. | To remove content from the table of selected resources you can select the WCUs you want to remove and then click the "X" button next to the "arrow down" button. You can also remove a single WCU by clicking the red "Remove record" icon in the end of each line in the table. | ||
When you are happy with the selected resources, click "Done" and the content will be added to the table shown in | When you are happy with the selected resources, click "Done" and the content will be added to the table shown in Figure "Add Resources to Task". If you click cancel, the content will not be added and you will have to add the WCUs again by reopen the Select resources window. | ||
==Incompatible resources== | ==Incompatible resources== | ||
[[File:New task 3.png|thumb|frame| | [[File:New task 3.png|thumb|frame|Incompatible Resources]] | ||
If you add a WCU and return to the New task window you can end up with having one or more lines, in the selected WCUs table, with red background. This means that the WCU does not have the current tool installed. An example of this can be seen in Figure "Incompatible Resources". | |||
If you add a WCU and return to the New task window you can end up with having one or more lines, in the selected WCUs table, with red background. This means that the WCU does not have the current tool installed. An example of this can be seen in | |||
==Add resources from the Search- and Vehicles tab== | |||
[[File:New task 5.png|thumb|frame|Add WCUs from Vehicles Tab]] | |||
[[File:New task 6.png|thumb|frame|Select All by CTRL+A]] | |||
Instead of adding WCUs by the method shown above, it is also possible to select one or more records in the Search/Vehicles table in the corresponding tabs and then click "New Task". Any selected WCU will then by added to the table of selected WCUs. An example can be seen in Figure "Add WCUs from Vehicles Tab". | |||
When selecting WCUs in the Search/Vehicles tab it is possible to select all visible WCUs by pressing Ctrl+A. To select even non visible WCUs (when your search criteria matches more results than the standard fetch of 50 results) you press Ctrl+A two times in a row. '''Note!''' Internet Explorer has some problems to correctly report keys down when two keys are pressed and when the result table in Vehicles has the focus. To come around this (and use the double CTRL+A feature) click outside the table and then press CTRL+A twice. | |||
A illustration showing what it looks like when CTRL+A is pressed twice and even non-fetched WCUs are selected can be seen in Figure "Select All by CTRL+A". | |||
Latest revision as of 17:12, 23 February 2023
The following applies to version >= 2.41 of the portal:
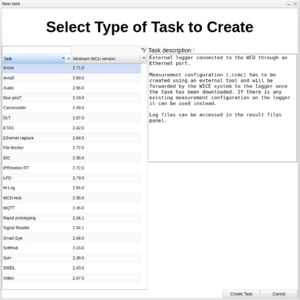
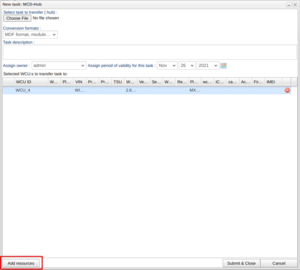
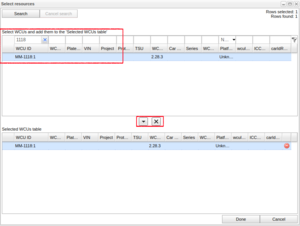
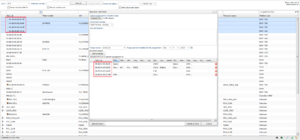
To create a new task, first select task type in the window presented in Figure "New Task Window". Learn more about how to go about creating a new task here. When a task is chosen, you can select target WCUs for the task by clicking the "Add resources"-button, presented in Figure "Add Resources to Task". As the illustration shows, the area where WCU's where added and removed to the task is a table very similar to the that in the Vehicles tab. This table shows the currently added WCUs that the chosen task will be added to. Clicking "Add resources" the window shown in Figure "Select Resources Window" will open up.
The select resources window contains two tables. The upper table has filter editors where one enters search criteria and performs a search by pressing enter or clicks the "Search" button. The lower table shows the selected resources (WCUs) and is connected to the table shown in Figure "Add Resources to Task".
Add/remove resources
To add content to the table of selected resources you can select the a WCU and then either click on the "arrow down" button located between the two tables or drag and drop the selected WCUs. It is also possible to add a single WCU by double clicking it. To remove content from the table of selected resources you can select the WCUs you want to remove and then click the "X" button next to the "arrow down" button. You can also remove a single WCU by clicking the red "Remove record" icon in the end of each line in the table.
When you are happy with the selected resources, click "Done" and the content will be added to the table shown in Figure "Add Resources to Task". If you click cancel, the content will not be added and you will have to add the WCUs again by reopen the Select resources window.
Incompatible resources
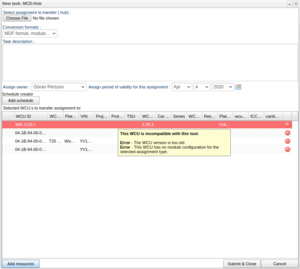
If you add a WCU and return to the New task window you can end up with having one or more lines, in the selected WCUs table, with red background. This means that the WCU does not have the current tool installed. An example of this can be seen in Figure "Incompatible Resources".
Add resources from the Search- and Vehicles tab
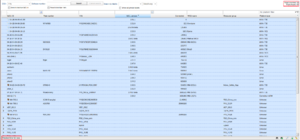
Instead of adding WCUs by the method shown above, it is also possible to select one or more records in the Search/Vehicles table in the corresponding tabs and then click "New Task". Any selected WCU will then by added to the table of selected WCUs. An example can be seen in Figure "Add WCUs from Vehicles Tab".
When selecting WCUs in the Search/Vehicles tab it is possible to select all visible WCUs by pressing Ctrl+A. To select even non visible WCUs (when your search criteria matches more results than the standard fetch of 50 results) you press Ctrl+A two times in a row. Note! Internet Explorer has some problems to correctly report keys down when two keys are pressed and when the result table in Vehicles has the focus. To come around this (and use the double CTRL+A feature) click outside the table and then press CTRL+A twice.
A illustration showing what it looks like when CTRL+A is pressed twice and even non-fetched WCUs are selected can be seen in Figure "Select All by CTRL+A".
