Difference between revisions of "Mappings"
Alkitjohan (talk | contribs) |
Alkitjohan (talk | contribs) |
||
| Line 40: | Line 40: | ||
[[File:Mappings7.png|thumb|200px|frame|Mappings 7: Review auto mapping failed]] | [[File:Mappings7.png|thumb|200px|frame|Mappings 7: Review auto mapping failed]] | ||
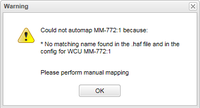
In the examples in the previous section the CAN bus names in the .haf file are found in the WCU configuration for the selected WCU. If a file is uploaded were that is not the case, the warning dialog shown in illustration "Mappings 6" will pop up. | In the examples in the previous section the CAN bus names in the .haf file are found in the WCU configuration for the selected WCU. If a file is uploaded were that is not the case, the warning dialog shown in illustration "Mappings 6" will pop up. | ||
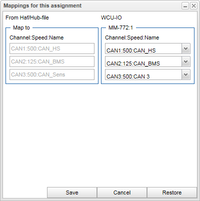
The dialog shows the reason(s) why the auto mapping failed and when one clicks "OK" the "Mappings" window will automatically be opened. This is illustrated in "Mappings 7" and here we can see that the name "CAN_Sens" was not found in the WCU configuration. By default nothing is changed so if you click "Save" here no new mapping will be created. But if you now that CAN3 should be mapped to CAN6 (like the previous example) you can | The dialog shows the reason(s) why the auto mapping failed and when one clicks "OK" the "Mappings" window will automatically be opened. This is illustrated in "Mappings 7" and here we can see that the name "CAN_Sens" was not found in the WCU configuration. By default nothing is changed so if you click "Save" here no new mapping will be created. But if you now that CAN3 should be mapped to CAN6 (like the previous example) you can create the new mapping and save it by clicking "Save". | ||
Revision as of 13:49, 6 April 2016
The following applies to version >= 2.41 of the portal:
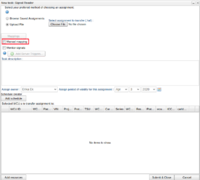
When creating a SignalReader task (New Task and then selecting the "SignalReader" tab) there is a new checkbox, "Manual mapping", as illustrated in illustration "Mappings 1". If you tick this box, the upload of the SignalReader haf-file will work as in previous versions of the portal. If you do not tick this box, then, when a .haf-file is uploaded, the portal will start a process called auto mapping.
Auto mapping
When a .haf file for a SignalReader assignment is uploaded, the portal will start to parse the file and search for references to CAN buses and try to look up the name of the CAN bus. The name of the CAN bus is found in a section named GLOBAL_CAN_API_MODULE_X, as the example below shows. If no such section exists in the .haf file, the parser is unable to look the name of the CAN bus.
[GLOBAL_CAN_API_MODULE_0]

default_period=10

description_date_time=

description_file=

direction=IN

io=CAN1

name=CAN_HS
CAN buses and names are equal
When the .haf file is parsed, the portal will try to match the extracted CAN bus references and its names with the enabled CAN buses and their names (See I/O_configurations) for each selected WCU. If the name for each referenced CAN bus matches the name in the WCU configuration the dialog shown in illustration "Mappings 2" will pop up. This dialog says that auto mapping is performed and that the mappings can be verified by clicking on the new button "Mappings", which appears above the upload file form.
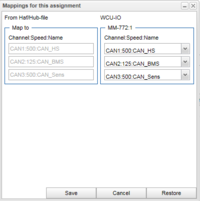
When clicking on "Mappings" the window shown in illustration "Mappings 3" will open up. The left group shows the info extracted from the .haf file. This is channel, speed (baud rate) and the channel's name. The right group shows the config(s) for the WCU(s) this assignment will be uploaded to. As you can see in the illustration, the names (and speed) in the .haf file and from the WCU matches each other. This is why the auto mapping succeeded.
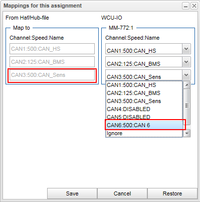
If you want to change the mappings, for example switch CAN3 in the .haf file to CAN6 in the WCU, you have the option to do it here. Select the bus you want to change to, as illustrated in "Mappings 4", and click "Save". If you change your mind, just click "Cancel" to return to the New task window.
CAN names are equal but for different buses
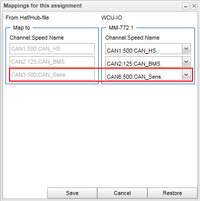
In the example in "Mappings 4" CAN1(=CAN_HS) in .haf file perfectly matches CAN1(=CAN_HS) in the WCU configuration. There exists cases though when one CAN bus is disconnected and another CAN bus is connected in its place on the WCU. In this case, the .haf file needs to be rewritten since referenced CANX is connected to CANY on the WCU. If the name of CANY on the WCU matches the name of CANX in the .haf-file, a automated mapping between X and Y will be created. The illustration "Mappings 5" shows an example when the .haf file has references to CAN1,2,3 but only CAN1,2 and 6 is enabled in the WCU configuration. The name of CAN3 in the .haf-file matches the name of CAN6 in the WCU configuration, so in this case CAN3 will be replaced by CAN6 when the .haf file is uploaded to the WCU.
Like for the previous example you can always choose to change the automated mappings if you for example now that you have made a mistake when you named the CAN buses inte .haf file or in the WCU configuration.
Auto mapping fails
In the examples in the previous section the CAN bus names in the .haf file are found in the WCU configuration for the selected WCU. If a file is uploaded were that is not the case, the warning dialog shown in illustration "Mappings 6" will pop up. The dialog shows the reason(s) why the auto mapping failed and when one clicks "OK" the "Mappings" window will automatically be opened. This is illustrated in "Mappings 7" and here we can see that the name "CAN_Sens" was not found in the WCU configuration. By default nothing is changed so if you click "Save" here no new mapping will be created. But if you now that CAN3 should be mapped to CAN6 (like the previous example) you can create the new mapping and save it by clicking "Save".
