Difference between revisions of "I/O configurations"
m (→DHCP type) |
Robin.karhu (talk | contribs) |
||
| (3 intermediate revisions by 2 users not shown) | |||
| Line 22: | Line 22: | ||
===Add WMU(s)=== | ===Add WMU(s)=== | ||
If your Portal has [[WMU | WMU's]] enabled the "Add WMU" button will show in the CAN section. You can then add/remove WMU's and configure their CAN channels in the same way as the WCU's CAN channels are configured. For each WMU that is added, a corresponding tab is added under the [[The_Portal_Administrator_View#WMU's_Power_Management | Power Management tab]] for configuring the WMU's power behaviour. | If your Portal has [[WMU | WMU's]] enabled the "Add WMU" button will show in the CAN section. You can then add/remove WMU's and configure their CAN channels in the same way as the WCU's CAN channels are configured. For each WMU that is added, a corresponding tab is added under the [[The_Portal_Administrator_View#WMU's_Power_Management | Power Management tab]] for configuring the WMU's power behaviour. | ||
=== Add CAN channels === | |||
If your Portal has Vehicle Communication Forwarder enabled, the "Add CAN channels" button will show in the CAN section. If both WMUs and Vehicle Communication Forwarder are enabled in your Portal, only "Add CAN channels" will show up. After having added a Vehicle Communication Forwarder with at least one CAN channel, pressing the button again will add more CAN channels to the Vehicle Communication Forwarder. When removing CAN channels, it is possible to either remove the entire Vehicle Communication Forwarder, or individual CAN channels from it. | |||
==Edit Ethernet Channels== | ==Edit Ethernet Channels== | ||
| Line 28: | Line 31: | ||
===Channel=== | ===Channel=== | ||
This column | This column indicates which interface or interfaces that exists. | ||
=== | ===Addressing mode=== | ||
In this column the | In this column the Addressing mode is configured. The choices are "DHCP client", "AutoIP" and "Static". | ||
===IP address=== | ===IP address=== | ||
Here you set the static IP address if you have selected "Static" as the | Here you set the static IP address if you have selected "Static" as the Addressing mode. | ||
===Netmask=== | ===Netmask=== | ||
Here you set the netmask if you have selected "Static" as the | Here you set the netmask if you have selected "Static" as the Addressing mode. | ||
===Default route=== | ===Default route=== | ||
Here you set the default route if you have selected "Static" as the | Here you set the default route if you have selected "Static" as the Addressing mode. This field only shows if the WCU software version is 2.85.0 or later. The default route is the route that takes effect when no other route is available for an IP destination address. | ||
===Name Server(DNS)=== | ===Name Server (DNS)=== | ||
Here you set the Name Server if you have selected "Static" as the | Here you set the Name Server if you have selected "Static" as the Addressing mode. This field only shows if the WCU software version is 2.85.0 or later. Here you set the name of the DNS protocol. | ||
===Name=== | ===Name=== | ||
Latest revision as of 09:08, 14 December 2023
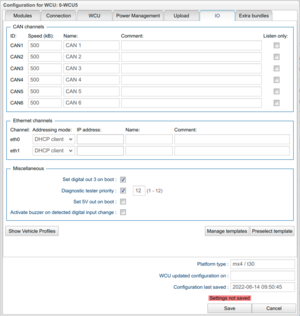
The following applies to version >= 2.41 of the portal:For WCUs with software version >= 2.41 the "Edit Configuration" window has a new tab named "IO". In this tab, it is possible to edit the settings of the CAN and Ethernet channels of a WCU. It is also possible to apply a pre defined template which is created and managed by an admin. The "Edit Configuration" window is reached by going to the Vehicles tab, select a WCU and press the button "Edit Configuration".
Edit CAN channels
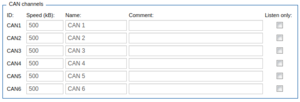
The number of available CAN channels depends on the platform type of the WCU which is configured. The group of CAN channels consists of four columns named Channel, Speed, Name and Comment. Each column is described separately below.
Channel
This column is a checkbox and if you enable CAN X, this means that X is available for mappings when creating a new task and uploading this task to his WCU. Read more about Mappings. In the same way, disabling CAN X means that X is not available for mappings. If a CAN channel for some reason is not connected to the WCU, then it could be good choice to disabling it here.
Speed (kB)
The speed column shows the baud rate of each CAN channel. This value was previously added to the WCU configuration when the WCU was connected to a CAR but from now it has to be set manually in this tab.
Name
In this column it is possible to set a nickname for the channel. This name is used when a Signalreader task or assignment is automapped (see Mappings) so choose your names carefully. The default value is CAN 1,2..6.
Comment
The last column is used to add some comments to each channel. This is typically some describing text, e.g. the reason why a channel is disabled.
Add WMU(s)
If your Portal has WMU's enabled the "Add WMU" button will show in the CAN section. You can then add/remove WMU's and configure their CAN channels in the same way as the WCU's CAN channels are configured. For each WMU that is added, a corresponding tab is added under the Power Management tab for configuring the WMU's power behaviour.
Add CAN channels
If your Portal has Vehicle Communication Forwarder enabled, the "Add CAN channels" button will show in the CAN section. If both WMUs and Vehicle Communication Forwarder are enabled in your Portal, only "Add CAN channels" will show up. After having added a Vehicle Communication Forwarder with at least one CAN channel, pressing the button again will add more CAN channels to the Vehicle Communication Forwarder. When removing CAN channels, it is possible to either remove the entire Vehicle Communication Forwarder, or individual CAN channels from it.
Edit Ethernet Channels
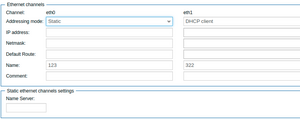
Like for CAN channels, the number of available Ethernet channels depends on the platform type of the WCU which is configured. The group of Ethernet channels contains eight columns and the individual meaning is as follows.
Channel
This column indicates which interface or interfaces that exists.
Addressing mode
In this column the Addressing mode is configured. The choices are "DHCP client", "AutoIP" and "Static".
IP address
Here you set the static IP address if you have selected "Static" as the Addressing mode.
Netmask
Here you set the netmask if you have selected "Static" as the Addressing mode.
Default route
Here you set the default route if you have selected "Static" as the Addressing mode. This field only shows if the WCU software version is 2.85.0 or later. The default route is the route that takes effect when no other route is available for an IP destination address.
Name Server (DNS)
Here you set the Name Server if you have selected "Static" as the Addressing mode. This field only shows if the WCU software version is 2.85.0 or later. Here you set the name of the DNS protocol.
Name
In this column you can set a nickname for this channel. This setting has no effect on the WCU side.
Comment
In the last column you can set a comment for this channel. Like for the name, this setting has no effect on the WCU side.
The Miscellaneous Section
This section is available for WCUs with version 2.49 or later.
Set digital out 3 on boot
Digital out 3 is one of the output pins in the dsub contact on WCUs of model MX4. This setting activates that pin on start-up of the WCU. The purpose of this is to trigger an external measurement equipment (e.g. M-Log or Arcos).
Diagnostic tester priority
For WCUs of version later than or equal to 2.60 it is possible to choose to configure the diagnostic tester priority. If enabled, a value between 1-12 can be selected. The described options are depicted in Figure "Miscellaneous".
Set 5V out on boot
Option to set one of the output pins on the WCU to supply electricity at 5V to external equipment when the WCU is starting up. The option is visible for WCUs of model MX4 (except submodel V61) and with version 2.76.0 or later.
Activate buzzer on detected digital input change
Option to enable that the WCU makes a buzzing sound when a trigger-button (or other digital input) is activated on the WCU. It is possible on all MX4 models. The option is visible for WCUs with version 2.76.0 or later.
Manage templates
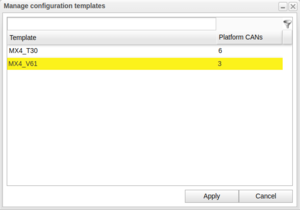
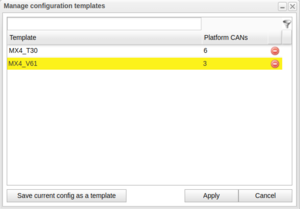
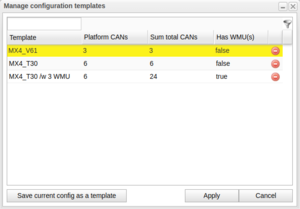
Admins can save configs as templates (see Manage templates (for admins)) and normal users can use these templates to fill all columns with the data stored in the template. Clicking "Apply" will apply the selected template. You can always change settings or add more info, the template could be anything you need or just act as a starting point.
If WMUs are enabled in the portal, a template will save the CANs from each WMU and when a template is selected the WMU CANs are applied 1:1 to each existing WMU in the configuration. If there are no WMUs in the configuration the template's WMU CANs will not be applied, only the WCU's CANs.
Manage templates (for admins)
If you are an admin you have an extra button "Save current config as template" in the Manage configuration templates window. Clicking it to save the current configuration as a template will prompt you for a name. If the name already exists (case insensitive) a confirmation dialog will popup before overwriting.
Additionally, as admin you will be able to remove existing templates, which is done by clicking the red "Remove record" icon to the right of the template name. A confirmation dialog will popup to prevent deletion by mistake.
Show Vehicle Profile
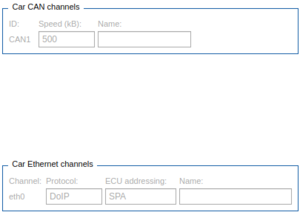
The button "Show vehicle profile" can be used to show, and hide, a panel showing the CAN and ethernet information for the connected car, see Figure "Vehicle Profile". This option is disabled if no car is connected.
