Difference between revisions of "The Portal Administrator View"
(→Configure the RFE Module: Changed to RP Module) |
|||
| Line 236: | Line 236: | ||
For this to happen you must enable the feature by checking the box “Enable monitor”. It is currently set at an update rate of once every second. | For this to happen you must enable the feature by checking the box “Enable monitor”. It is currently set at an update rate of once every second. | ||
===Configure the | ===Configure the RP Module=== | ||
From version 2.35 of the portal there is a possibility to upload up to three files to configure the | From version 2.35 of the portal there is a possibility to upload up to three files to configure the RP module. The three files are: | ||
# Configuration file | # Configuration file | ||
# Certificate file | # Certificate file | ||
# Binary file | # Binary file | ||
[[File:Illustration44.png|frame|Illustration 44: Settings for the | [[File:Illustration44.png|frame|Illustration 44: Settings for the RP module.|center]] | ||
=== Configure the Blue piraT Module === | === Configure the Blue piraT Module === | ||
Revision as of 16:32, 11 September 2017
An administrator can do everything a user can do and more. In addition to the user, an administrator can create and modify users and stop assignments for any task. These new functions will be explained in the next 3 chapters.
We will start with the search tab where two more buttons are visible. Next is the vehicles tab. Lastly is the administration tab with 5 sub tabs consisting of: the connect tab, the archives tab the GDS/SDDB files tab, the resource groups tab and the users tab.
The Search Tab


In addition to the functionality for an ordinary user, an administrator have one more button present. An administrator can send a force stop command to any WCU.
Illustration 32a shows the "Stop assigment" button. This button is the same as for the ordinary user and is used to stop a running assignment. When a running assignment is stopped, it changes state to "Stop pending". This means that the portal is waiting for a stop message from the WCU before the state is changed to "Stopped" in the portal view. The administrator view exclusive "Force Stop Assignment" button, which can be seen in illustration 32b, forces a "Stop pending" assignment into "Stopped" state without waiting for the stop signal from the WCU.
Also, the administrator can search and view any user's task.
The Vehicles Tab
An administrator can do quite a many things in this view. Illustration 33 shows an example of this view. The table header along with the buttons “Edit Description” and “Get Log Files” are explained in the page for Vehicles.
At the bottom you have a set of buttons to aid in handling the WCUs. To add a new WCU to the portal, the “New” buttons opens up a dialog for that. The “Get Log Files” button fetches log files for the selected WCU from the portal.

The New WCU Dialog

There are two ways that a WCU can enter the portal. The first is if you click the “New WCU” button and the second is the first time a WCU connects to the portal it registers itself. Ideally you will never have to add a WCU to the portal but just as a safety step you have the opportunity to add it yourself. When clicking the “New WCU” button the dialog in Illustration 34 opens up. You must enter the ID of the WCU as this is a unique identifier and you will be notified if the ID is already present on the portal. The description is optional but may be handy to remember which WCU it is.
Edit the WCU Configuration


You can edit the configuration of the WCU from the portal. Simply click on Edit Configuration to open up the window in "Illustration: WCU Configuration: Modules". The WCU configuration window is divided into five tabs where each tab is described below.
Modules
The set of check boxes for the different modules that are present is nine and are at the top. Check or uncheck these to tell the WCU if they are present or not. Doing so will speed up the boot process.
To edit "Car type", click on the field where the car type is the displayed to open the "Edit car" dialog. This dialog is described in section The_Portal_Administrator_View#The_Edit_Car_Dialog
The last three check boxes, "Run IDC at boot", "Run IDC at ignition off" and "Enable VIN reader" is self-explanatory.
Connection
This tab can be seen in "Illustration: Connection" and the tab content is described in the table below.
| Internet Service Provider (ISP) | Which ISP to use when multiple SIM cards are installed |
| WICE portal address | The server that the WCU should use for fetching new assignments etc. |
| DRO Server | The server to connect to when doing a DRO. |
WCU
This tab can be seen in "Illustration: WCU" and the tab content is described in the table below.
| Unit ID: | The ID cannot be changed from the portal. It can only be changed by logging on to the WCU. |
| Platform type: | The WCU platform type. |
| Platform subtype: | The WCU platform subtype. |
| WCU software version: | This is the currenly used WCU software version. |
| Preferred WCU software: | This is the new preferred WCU software version to be installed. |
| Perform reset on update: | Removes all data on the WCU when installing a new WCU software. |
| MX4 firmware version: | The currently used MX4 firmware version. |
| Preferred MX4 firmware: | The new preferred MX4 firmware. |
From version 2.40 of the WCU software, all WCUs report its platform type. The platform type determines, among other things, the number of available CAN buses in the IO tab. (see I/O configurations) Since a resource group is a collection of WCUs it has no platform type of its own to report. From version 2.41 of the portal the user has the option to set a fictive platform type for a resource group. This is also a prerequisite to also set the I/O configurations for a resource group. The platform type (and eventual subtype) is set in the WCU tab. If the resource group has members with other platform type(s) than the type that is about to be set, the user will get a warning.
If the platform type of the resource group differs from the platform type of its members the I/O tab will be disabled. This is also the case when the platform type of the resource group and one member is the same but another member has another platform type.
From version 2.42 it is possible to update the WCU root password. To update the password, write the new password in "Set root password" and save the configuration.
Power Management

This tab can be seen in "Illustration: Power management " and the tab content is described below.
“Power mode” has two settings, Sleep and cut-off. In cut-off the MCD-Hub is not powered up on boot, nor is the WCU woken up at regular intervals to report battery voltage, GPS position etc.
In the other mode, sleep, some more settings are visible as shown in "Illustration: Wake On Can". You can select the WCU to remain unpowered by selecting "External cut-off". In addition, you may enable the WCus wake-up functionality. This function is simply made up of a cycle time called “Periodic wake-up time” and the corresponding “Periodic run-time”. The “Periodic run-time” determines how long time the WCU should be awake before going back to sleep. The “Periodic wake-up time” indicates the time for each new wake up cycle.
From version 2.43 it is also possible to set power mode to "deep sleep" for WCUs running on platform MX4 T20/T30 and MX4 V61. The configuration is the same as for mode "sleep".
Example: A periodic run-time of 600 seconds means that the WCU will be alive for 600 seconds (10 minutes). A periodic wake-up time of 3600 seconds means that the WCU will start a new run-time (600 seconds in this case) every new hour. (3600 seconds = 60 min). The sleep time in each cycle is, for the general case, the wake-up time minus the run-time and in this example 3600 minus 600 = 3000 seconds (50 min). This example is illustrated in illustration "Perodic wake-up.
Upload
This tab can be seen in "Illustration: Upload" and the tab content is described in the table below.
| Mobile upload limit | Defines the maximum data size that should be transferred via the mobile network. If the data size is larger than that the WCU will wait until a connection to a local network can be established. The size is in Mbytes. |
| Post run grace timeout | The number of seconds to wait before communicating with the MCD-Hub and portal, if the ignition is turned off. |
| Upload timeout | The maximum number of seconds the WCU should upload data before stopping. |
| Erase error code | If turned on the error codes in the car will be reset. |
| Upload data at boot | Uploads data when the WCU boots up |
| Upload data at ignition off | Uploads data when the car is turned off |
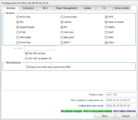
Illustration: Modules.
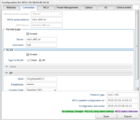
Illustration: Connection.
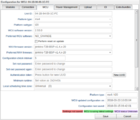
Illustration: WCU.
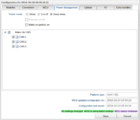
Illustration: Power Management.
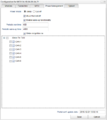
Illustration: Wake On CAN
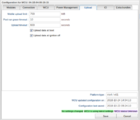
Illustration: Upload.
Version >= 2.41 of the portal has a new tab named I/O. You can read more about in I/O_configurations.
The Edit Car Dialog

To edit the information about a car, press the “Edit Car” button. The dialog in Illustration 37 opens up. The entry you can not edit is the VIN entry. If you need to edit that you must instead create a new car. In order for the portal to be able to translate error codes into a human readable format, you must choose a diagnostic DB file to be used. It is important to select the correct one as the diagnostic error codes read out might be translated incorrectly or more probable, not at all. It is also important to select the right type of car using “Car type”. This controls the number of CAN buses and speeds and the number of Ethernet networks, if any, in the car. The “Active” check box controls whether the car should show up in tables and searches in general concerning cars. A car can never be removed as it has probably been involved in measurements but to recall an inactivated car you must actively select to view inactivated cars.
It is possible to update several cars at once by selecting multiple cars and then press the “Edit Car” button. By doing this you can selectively make changes to attributes of all the selected cars at once. To do this, the dialog is extended as one can be seen in Illustration 38 below.

Upload a Car Import File
It is possible to import a file that describes a set of cars. It can consist of both new cars and cars already in the database but that might need to be updated with new information.
A car import file consists of a comma separated file where each line describes a car. The first line of the file must look as follows:
VIN,regNr,description,project,protoNumber,tsu,series
There are seven attributes currently. When uploading the file you have a choice of modifying existing cars on the portal. If you do not check this box and there are cars that already exists, the import will fail.
Show or export SIM card ID
The SIM card ID for a single WCU can be seen when right-clicking on a WCU in the Vehicles tab and selecting "Show info".
SIM card ID's for one or multiple WCUs can also be exported as a csv file. Select the WCUs you are interested in (in the Vehicles tab) and press the button "Export SIM card info" located in the bottom row below the Vehicles grid. The downloaded file will contain five columns: WCU ID, WCU Name, RegNr (Plate nr), VIN and SIM Card ID.
Upload WCU file
The WCU attributes 'WCU Name' and 'WCU Comment' can from version 2.43 of the portal be updated for multiple WCUs via a comma separated txt/xls/xlsx file. Click the "Upload WCU File" button to open up the import file to upload dialog.
The uploaded file has the following requirements:
- The file must have two mandatory columns with the names 'WCU ID' and 'WCU Name'.
- Furthermore, an optional column named 'Comments' can be added.
- The columns should be in said order.
- The amount of columns on each row must match the amount of columns in the header.
- The columns should be separated by using tab or by a comma.
If there is a 'Comment' column and a blank comment on a row then the old comment, if any, for the specific WCU will be kept.
To remove a comment from a WCU simply check the checkbox for erasing comments. Doing so will result in that empty comments in the uploaded file will erase current comments.
Resource Groups
As described above in Vehicles#Resource Groups, you can define a set of resource groups in order to easily handle large groups of resources collectively. An example is if you have 100 WCUs in such a resource group and you would like to edit the configuration for all WCUs. Instead of having to open the configuration for each individual WCU, you simply open the configuration for the resource group, do your edits and when you press save, the configuration will be saved to all WCUs in one go. The resource groups are created in another panel which will be described later.

To add resources to a resource group you start by selecting the resources you are interested to add to a resource group. Resources already added to a resource group will render the corresponding add button disabled.
When you are satisfied with your selection you press either the button “Add WCU(s) to resource group” or “Add car(s) to resource group”. Pressing any of those buttons will show the dialog to the left. The group box will list the available groups. If you know the name of the resource group you can type the name and as you type the box will show names that fit what you type.
The three check boxes requires a deeper discussion of what the mean. Assume you have a resource group that has been used for some time. A new WCU enters the portal and you would like to add that WCU to your group. A common situation is that you would like that WCU to be configured that same way as the rest of the WCUs in the resource group. This is accomplished by checking “Update WCU configuration”. If this requires an update of the WCUs software it will automatically be taken care of. Also, a WCU comes configured with a set of modules. Usually you will probably want to update the module configurations as well but in case you wish not to, simply uncheck that check box. There are also situations where there are no module configurations for some modules and if you press “Add” you will be prompted about that. If you for some reason do care about that you can check the “Ignore non existent tools and configurations” check box.
Modules for the WCU
A WCU can have a number of modules attached. This makes it possible to add new peripherals to the WCU for handling various tasks in acquiring measured data from a car. The nine types of modules are:
- MCD-Hub
- Canrecorder
- GPS
- IDC (Internal Diagnostic Client)
- Uptime
- State of Health
- Signal Reader
- RFE (Road Friction Estimation)
- Blue piraT
To deal with each tool's configuration a new view is presented below. To open this view, press the button “Modules” as shown in Illustration 33 on #The Vehicles Tab. In the illustration above there are a set of tools present. Each type is grouped on the left side using a stack panel. Select the connected MCD-Hubs by selecting the MCD-Hub stack and select (click) the Canrecorder stack to see the canrecorders connected a so fourth.

Each tool has its own entry in each of the stacks. In Illustration 40 above there is only one MCD-Hub present and it is “0”. Each tool is recognized with a tool ID which is set by the WCU. This ID is usually not descriptive and therefore you have the possibility to set a name of your likings. Change the name by pressing the button “Edit name”. You can also add a description to the tool that shows up as a “tool tip” when hovering over the name of the selected tool. Analogously, change the description by pressing the button “Edit tool description”. To reload the set of available tools for both MCD-Hub and Canrecorder, press the “Reload tools” button.
Configure the MCD-Hub Module
The configuration for the MCD-Hub has only two settings. The first is the MCD-Hubs IP address and the second is the preferred firmware version. The other two configuration settings shown in Illustration 40 is “MCD-Hub firmware version” which shows the current version used by the hub and the second is “Last configuration update date” which states when the MCD-Hubs current configuration was brought into action. When you are done with your configuration you save it by pressing the “Save” button. If you for any reason need to reload the configuration, press the “Reload” button.
Configure the Canrecorder Module
The configuration for the Canrecorder is shown in Illustration 41 below. There are four fields of which two are editable. In order for the canrecorder to work you need to set the high- and low speed CAN bus. The update date says when the last configuration was enabled and the canrecorder version says which version of the canrecorder software is used.

Configure the GPS Module
There are four settings involved:
- Enable GPS. Sets whether the GPS should be enabled or not. If you disable the GPS all the other settings will also be disabled.
- GPS sampling interval. Sets the position sampling interval in seconds.
- GPS monitor enabled. If this setting is enabled the WCU will continuously send its GPS position to the portal enabling real-time monitoring of the whereabouts of the WCU.
- GPS monitor interval. Set how often the position will be updated. The interval is in seconds.
Configure the IDC Module

The IDC can be configured with which bus to communicate on given its assignment. You can actually even choose both where it will first try the Ethernet network (ETH), if it exists, and the CAN bus. If the car type in question does not have an Ethernet network, only the CAN option will appear.
Configure the Up-time Module

The module is used to report how much and how long the WCU is running. First of all you can enable/disable the functionality all together with the “Enabled” check box. Next is how often the up-time should be logged in seconds. The second check box, “Monitor enabled” is used when you would like the module to report its up-time in real-time and the interval for that, also in seconds.
Configure the State of Health Module
The state of health model has the same settings as the IDC module above.
Configure the Signal Reader Module
As of version 2.33 of the WCU software it is possible to monitor signals in real time. For this to happen you must enable the feature by checking the box “Enable monitor”. It is currently set at an update rate of once every second.
Configure the RP Module
From version 2.35 of the portal there is a possibility to upload up to three files to configure the RP module. The three files are:
- Configuration file
- Certificate file
- Binary file
Configure the Blue piraT Module
As of version 2.44 of the WICE portal it is possible to create blue piraT assignments. The blue piraT tool only has one configuration, the debug level, which determines the level of logging during the execution of the blue piraT assignments.
The Administration Tab
This tab is a collection of the administrative tasks available in the portal. These are “Connect car to WCU”, “Archives”, “GDS/SDDB file”, “Resource Groups” and “Users”.
Connect Car to WCU tab
To archive which car a specific WCU was in at the time an assignment was run can be done by connecting a car to a WCU in this tab. This is usually done automatically but in some situations it is necessary to do this manually
The area is divided into two tables, one for searching WCUs, the left one, and one for searching cars, the right one. When you start typing the name of the WCU you are looking for in the upper left corner just above the table, matching WCUs appear in the left table. To find the car you are looking for, you do the same in the right table but here you have the option of using either the VIN or plate number.
To connect a WCU with a car you drag the WCU you would like to connect onto the car in the right table. When you drop it onto a car a small icon will show signifying that the WCU and car are connected.
From version 2.42 it is also possible to select a WCU and a Car and then click on the new "Connect" button located between the two grids.
To disconnect a WCU and car you simply press the icon for wither of the WCU or car. See Illustration 45 below for an example.
The connection is a sort of instantaneous carbon copy of the situation at the time that a task was created. If you later change the connection, already running/run tasks will not be affected.
The User Administration Tab
The basic layout of the areas is just the same here as before. At the top you have a search area, in the middle is a result are and at the bottom are a set of buttons. The tab with a set of example users is in Illustration 46 below. The eight columns are:

- User ID. The unique ID that the user must enter when logging in.
- Name. The name of the user.
- Roles. Depending on which roles the user has to, he/she have different privileges. The roles are non-overlapping, i.e. being an “Admin” does not necessarily mean that you can do everything a “User” can do.
- Enabled. Tells whether the account is enabled or not.
- Email Address. By registering an email address a user can receive notifications via email from a WCU when certain event occurs.
- Last login date. The date when the user last logged in.
- Two factor auth. Whether the two-factor authentication is turned on for a particular user.
- Logged in. You can see if the user is currently logged in.
At the bottom there are eight buttons. They are:
- The “New” button brings up the “New User” dialog which adds a new user to the portal
- The “Edit” button brings up the “Edit User” dialog
- The “Change Password” button brings up a dialog to change a user's password.
- The “Create new secret” button. Pressing this generates a new cryptographic salt to be used when generating one-time passwords. If you do this for a user without enabling the possibility to see the secret on the next login, renders the user unable to login to the portal. No dialog is opened, simply a message saying that a new one has been generated is shown.
- The “Show secret” button. Shows a dialog with the cryptographic salt shown in clear text as well as the QR-code, more on this later.
- Edit roles and permissions
- The “Save headers” button. Saves the headers and their order to be used as default on later logins.
- Video. Start a video conversations with another user of the portal. You must have the software “Confero” installed for this to work.
The New User Dialog

By pressing the “New User” button the dialog in Illustration 47 below appears. Mandatory fields are User ID and the two password fields. Remember that the User ID must be unique and you will be notified if it is not. Click the “Add” button to add the user or change you mind by clicking “Cancel”.
The Edit User Dialog
You can at any time modify a user by pressing the “Modify” button to bring up the dialog in Illustration 48 below. The User ID cannot be changed. A disabled account can not be used for logging onto the portal even if the correct user name and password are given. To modify the user roles, select or deselect a role by using the check boxes. To turn on two-factor authentication for a user, check the appropriate box. When you are satisfied with your modifications, press the “Save” button to make them permanent on the portal or press the “Cancel” button if you change your mind.

To enable two factor authentication, tick the check box “Enable two factor authentication”. This will force the user to add another special one time password in addition to the account password when logging into the portal. The one time password is generated by a program on either your computer or if you want to you can install it on your smart phone which is probably the best solution. The program that generates one time password is based on a cryptographic salt and the current time. The cryptographic salt is randomly generated by the portal and is individual for each user. A secret can at any time be regenerated for a user which will render the user unable to login if you do not tick the check box “Show the secret to the user on their next login”.
The Change Password Dialog

To change a user's password, press the “Change Password” button and the dialog in X Y will appear. It is pretty straight forward as you type in the new password in the “New password” entry and you need to confirm it by typing it again in the entry below it. If you are satisfied, click the “Change” button or the “Cancel” button if you decide not to change the password.
The Show Secret Window

A QR-code is shown that can be transferred to a smart phone by simply starting the authenticator app, point it at the screen and let the phone read the QR-code. An example of such a QR-code can be seen in Illustration 50. If the application that is to be used as a password generator do not support QR codes, the secret is shown in clear text at the top.
Roles and permissions
In order to restrict access to resources and functions in the portal, there is a framework using roles and permissions. Permissions are given on a set of resources. These permissions are grouped into roles, and roles are then attached to one or several users to be granted specific permissions.
The “Edit roles and permission” dialog can be seen in Figure "Edit Roles and Permissions Dialog". It consists of three tables. The top left table holds a list of the roles, the top right holds the user(s) for the selected role and the bottom one hold the selected role's permissions. Their size is adjustable and you can minimize them by clicking on the line between them.

You add a new role by pressing the button “Add role” and delete a role along with its permissions by pressing the red button next to it. When making a role you add a description and unique name. To edit an already existing role, double click the entry you wish to edit.
When you select a role in the top left table, the lower table shows that specific role's permissions and the upper right table shows which users have that role. The permissions table consists of two columns, a string that is the actual permission and the set of resources that apply to that permission.
Creating and editing roles and permissions

To create a new permission press the “Add permission” button. It opens the following interaction depicted in Figure "Creating New Permission".

- Select what kind of permission you want. There are a number of different permissions, ten for WCUs and one to give permission to all tasks (the task permission can not be modified). The permissions are:
- Task. Controls if a user is permitted to create/see tasks of a specific type on a WCU. More what this means is discussed below in "Permission to specific tasks"
- Assignment Creator. This permission handles access to creating/editing/viewing assignments in the tab Assignment (see signal reader and Area5). Having a read-permission means that you can see a list of assignments but you cannot go ahead and edit or create them. A write-permission on the other hand makes you eligible to edit and create assignments. Currently, the permission is only relevant for signal reader and Area5.
- Configuration. This permission controls whether you are allowed to work with a WCU's configuration.
- Module. The permission controls the access to individual module configurations on a WCU. An example of a module is Signal reader.
- Monitor. A task can have a monitor function to report data in real time. In order to see the real time data the user must have this permission.
- Plot route. To see a historic GPS track of a WCU a user must have this permission.
- Position. Allows a user to see a WCU's current position.
- Shelving. Allows a user to handle any shelving, unshelving and refurbishing of a WCU.
- View. This permission applies to the Vehicles tab. It has to do with whether you are allowed to list a WCU in the table. Selecting this subtype makes the subtype type part unnecessary and therefore, it is removed if you choose this resource type.
- Connect. Allows a user to connect a WCU to a vehicle.
- Choosing if the permission should be a read and/or write permission. One of these have to be selected or you will not be able to save changes.
- Selecting which resources that apply to the permission. The selection is made using the two tables you see in Figure "Editing Task Permissions". To select a resource, which can be a resource group, you enter the name of the resource in the left table filter area. As you type, the table is automatically filled with resources matching the criteria. If a resource is part of a resource group the icon to the left is shown. If you hold the mouse over the resource name you will see which resource group it is part of. If you instead see the icon shown to the left, the resource is a resource group. Holding the mouse over the entry will show you which resources are part of the resource group. To select a resource, drag it over to the right table or select the resource and then press the right-arrow. To deselect a resource, drag it to the left table or press the left-arrow. There is a “Select all” option. It selects all current and future resources to which this permission should be applied.
- Set what type of tasks the permission applies to. It is automatically set to have all selected but you can unselect all and selecting other tasks. This option is only available on the WCU task, assignment creator, monitor and module permissions. It corresponds to the set of available modules for a WCU.
When you are done press "Save changes" or "Reset changes" if you want to revert the changes. You can always edit the permission by selecting it in the table. The dialog described above will show and you can make your changes, except that you can not change what type of task it is.
Assignment Creator permission
This permission concerns the signal reader assignment editor. If you give the user a read permission they can look at already created assignments. If you give a user the write permission they will also be able to create and delete assignments.
Vehicle Profile permission
With this permission you can delegate to individual users the possibility to view vehicle profiles if given the read permission. This makes the tab visible in the GUI but all buttons concerning editing/adding/removing are disabled. If a user has the write permission as well, the user will be able to edit/add and remove vehicle profiles.
Vehicle Create permission
This permission enables a user to do Add Vehicle. This will also let a user view any disconnected vehicles in the vehicles tab.
Resource Group Manage permission
This permission enables a user to manage resource groups. Managing resource groups entails adding and removing WCUs from groups, editing groups, and removing groups. It will also enable access to the Resource groups panel.
Resource Group Create permission
This permission enables a user to create resource groups by pressing Add New in the Resource groups panel of the Administration tab. It will also enable access to the Resource groups panel. Any permissions that may be needed to initially manage or edit the created resource group will be added to a role specific to the creator upon creating the group.
Selecting resources using uploaded file
As described above, you can select resources in the select resources widget. In addition to this, you can upload a file containing the vehicles or WCUs that you would like to apply to a permission or a set of permissions. By pressing the button called 'Import vehicle file' you will be presented with a dialog where you can upload a file containing multiple vehicles or WCUs. You can either upload an excel file or a CSV type of text file. What is important is that there is a header column saying what type of identifiers can be found in the file. Identifiers currently supported are: vin, plate or wcu. An example content of file (CSV):
wcu
04-1B-35-98
90-80-AA

Just by changing the heading to plate or vin you should reference such identifiers in the file. The dialog also presents the option to ignore resources not found and apply the changes for those found. The default is however to do nothing if any of the resources are not found. The checkbox 'Ignore unconnected vehicles' is only applicable if you have plate or vin identifiers.
If you have selected a permission in the permission table, the resources in the file will be applied to only the selected permission. If you have selected a role in the top leftmost table, the resources in the file will be applied to all permissions of the role.
Changing a users roles and permissions
You can change a user's roles under in the edit user dialog if you press the button "Edit user roles". The edit user dialog then gets extended as two boxes appear, a left one with available roles and a right one with current roles. In the left one you can search the role(s) you want and drag them to the right box or press the button pointing right. With the two buttons at the bottom corner(the paper and clipboard ones) you can copy the names of the roles and also insert the names of roles to add them.
You can also change a users permission to view tasks in the tasks tab: By right-clicking the task(s) you want to change permissions for and hovering over "Permission" you will get the options "Show who can see task" and "Add who can see task". "Show who can see task" will open a window with a left and a right box where the left contains users without permission to view the task and the right contains users who have permission. By moving users from the left to right and vice versa you can give or remove someones permission. You can also press the clipboard the the right bottom to copy the users who have permissions or add users by writing their name within parentheses. Users in the right box can be unselectable and that is if they have a role giving them the permission to view that task the only way to remove that is to remove that role from them. "Add who can see task" works the same way as "Show who can see task" except that the right box does not show users with permission so you can not remove permissions, this is so that with add you can add permissions for many tasks at the same time as the show can not show users from many tasks.

You can also edit a users role by searching for user(s) and right clicking on them to get a window with different options. There are five different options where the three first can be used on multiple users at the same time while the bottom two can not.
- "Add user task permissions to this user" will open the dialog shown in Figure "Copy User Task Permissions Dialog". With this button you take a user's task permissions and add them to the selected user(s). You do this by searching and selecting a user and then pressing "OK".
- "Replace user task permissions with user" will open a similar dialog to the one in Figure "Copy User task Permissions Dialog". This button is much like the one before except that instead of adding permissions to the current user this replaces the permissions that the selected user(s) have. Here you also search the user whose permissions you want to replace the select them and press "OK".
- "Copy user roles to this user" will open a similar dialog to Figure "Copy User Task Permissions Dialog". Instead of replacing permissions, this dialog replaces selected user(s) roles with the roles of a user who you chose. Search the user whose roles you want to copy for replacement and press "OK".

- "Give this user permission to all tasks on vehicle" gives task permission on one or many cars. The dialog will look like the dialog in Figure "Give Permission on Vehicle Dialog". In the left box you select cars and move them to the right to give permission on them, you can also as you see below the left box select a file with cars to easily select a set of cars. Then you select which types of tasks it should give permission to (leaving this empty will not give any permissions). You can also check the checkbox "Reset user permission" to replace the roles of the selected user instead of adding new to the current ones.
- "Give this user permission to all tasks on WCU" is identical to the previous button except that it applies to WCUs instead of Cars.
User specific roles
A role may also be set to be specific to just one user. Doing this will remove the role from any other users that currently have it as well as prevent adding the role to any other users but the specified user.
Permission for specific tasks
The above text discuss permissions as they are found from the User panel. There are also a set of "implicit" permissions created when a new task is created, based on the task type permission discussed above. Let us elaborate a bit on this to make it clear what it means. The use case is as follows; a user has a read task permission on a WCU ("wcu:assignment:soh:read:awcu"). (Observe that a task permission might contain the word "assignment" even if it is referring to a task. Look at the menu names instead to confirm that you are working with a task.) Let us say that a new state-of-health task is created on the WCU ("awcu") while the user has the above permission. Regardless of who created the task, the user will now be able to list this task in the Tasks panel and download any data produced. Later, as time goes by, the WCU is no longer used in the particular project and an administrator removes the permission "wcu:assignment:soh:read:awcu" from the user. When new tasks are created on this WCU our user above will not be able to see the new tasks created in the Tasks panel. However, the user will be able to see the previous task, i.e. when the user had the correct permission. Thus, this solution enables users to retain the permission to see historical tasks, let us call this a historical task permission. This type of permission cannot be seen in the permission panel. To see who has access to which historical task you must turn to the Task panel.

As an administrator you have the possibility to both see and modify who has access to individual tasks. There are two options presented if you right-click an task in the Tasks panel. To the right you see the two choices available. The top choice is only available if you have selected a single row in the table. The bottom one is always available, also if electing multiple rows.
Top selection "Show who can see task"
By selecting the top selection you will be presented with a dialog where on the left hand side you have all available users that do not have the permission to see the task. On the right hand side you have the users that have the permission to do so. On the right hand side you might see that some users are grayed. Those users have the task permission, not to be confused with the WCU task permission, described above. Also, the users visible are enabled, disabled users will not be displayed.

To give a user the permission to see the task, simply move the user from the left side to the right side. This is accomplished by selecting one or more users and then click the right-arrow. Conversely, to remove a user from the permission select the users from the right side and click the left-arrow. At the top of the left side you can search for users by typing and as you go the users will be filtered to match what you type.
In the picture "Users with Permission on a Specific Task" to the right you see the user 'serverTriggerUser' which is an enabled user which do not yet have the permission to see the task.
Bottom selection "Add who can see task"
The bottom selection from above 'Add who can see task' will not list who already has access to the task, but rather just list all users available regardless whether they already have permission or not to the task.
You can also give a user permission to all running tasks on WCUs whose task types that user has access to. See The new user dialog (the portal administrator view).
The GDS/SDDB File Tab
In order for the portal to be able to translate error codes into a human readable format, a GDS or SDDB file must be selected for a vehicle. The set of GDS/SDDB files to choose from is administered in this tab, see Illustration 56 below.

To upload a new GDS/SDDB file, press upload new file and you will be presented with dialog where you select the file, sets an optional name (if no name is entered, the file name is used) and an optional comment. To upload a new file for an existing entry, press the edit file button and you will be presented with a dialog where you can upload a new file. To edit the comment or the name that should show up when select which GDS/SDDB file to use for a vehicle, simply double click the cell and edit directly in the table.
The Resource Groups Tab
This tab is used to administer some parts of the creation and destruction of resource groups and more. The panel for administering the resource groups is depicted in Illustration 57, below.

At the top is a search field to search for resource groups. Next are two tables, side by side. The left table lists the resource groups found depending on your search criteria. When a resource group is selected, the resources that are part of the resource group are shown in the right table. Next, the functionality of the buttons will be covered.
Add and Remove Resource Groups

To add a resource group you simply press the “New resource group” button and the following window will show. Type the name for the new resource and press “Create”. If you change your mind, press the “Cancel” button. Resource groups are global and writable and that means that names must be unique. The reason for this is that a resource group name takes on the form as both the resources car and WCU and those must be unique and therefore the resource groups must also be unique. One can, however, imagine situations where this must not be enforced but at the moment this is the case.
To remove a resource group, press the “Remove resource group” button. Be aware that no warning is given if there are resources in the group when removing it.
Manipulating Resources in a Resource Group
In the right hand table in Illustration 59 below, you see a set of resources for a resource group.

Here are both WCUs and cars part of the group. In addition to the type there is a column named “Synchronized”. That column only applies to WCUs. The use of this column is as follows. Assume you have a resource group consisting of 50 WCUs. Further, lets make a configuration change to that resource group. Depending on where the WCUs geographically are and how they are used the WCUs will be updated at different times. How do you you know when all WCUs are up to date in the resource group? You could check them individually in the “Vehicles” panel but that is not very elegant and time saving. Instead, just watch the “Synchronized” column for the WCUs. When a WCU is up to date with respect to the group configuration the column will read “true”. The value is updated each 30 seconds.
You can remove individual resources from a group by selecting the resource and then press the “Remove resource” button.
Yet another button remains and it is the button “Base Group on Resource”. When you add a WCU to a resource group in the “Vehicles” panel you have the option of not updating the WCU configuration to match the one of the resource group's, see Illustration 39 in #Resource Groups. Using this function it is possible to base the whole group on a WCU's configuration rather than the group's configuration.
The WCU Status Tab
This view is supposed to be used as for supervising a set of vehicles. The supervision done in real time and the values for the set of vehicles are updated as soon as they arrive on the server from the different vehicles.
The set of status information collected comprises three parts:
General information:
- Alive, a heart beat signal
- Connectivity, what data rates are currently available to the vehicle.
- 3G
- 2G
- none
- Cell Signal Quality (CSQ). Indicates the signal strength of the mobile modem. The values are between 0 – 31, the higher the value the better. The special value of 99 is designated an unknown or not even detectable signal.
- GPS, simply a binary indicator of fix or no fix for the GPS.
Data Storage Usage:
This set of data informs how much collected data resides in the WCU for each type of data collector (module). Total data indicates how much of the total amount of data storage available is used. After that, each type of data collector is lined up.
Data Collection Status:
When modules collect data they go through a set of states when triggers starts, stops and other events occur. Currently, only such events for the signal reader module is available. An optional message accompanying the current state is shown in parenthesis.
The screen is divided in two parts, on the left hand side is a table with search functionality for finding the vehicles of interest and on the right hand side is the monitored vehicles. To monitor a vehicles you search for it in the table and then drag and drop the vehicle on the right hand panel.
A view of the panel is depicted in Illustration 60 below.
