Preview data
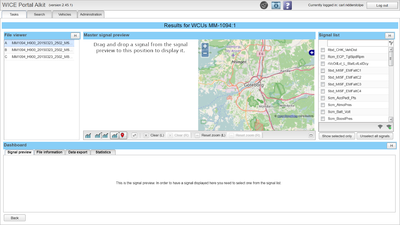
The window "Preview data" has many functions to preview data but here we will explain a simple scenario and normal use and then one by one go through the different functions.
One of the main functions is to view signals as grafs and se their route. To do so you need to select signal(s) from the file(s) you want. You select signals to the right where you see the list of signals. That list of signals is specifik for the selected file. You can change which file you want signals from in the box "file viewer" on the left. Note that the files to the left are the files you had selected when clicking "Preview data". The selected signals can then be seen in the bottom under the tab "Signal preview" where you will see a quick preview of how their graph looks. By dragging the previewed signal(s) to the "Master signal preview" in the middle you can see a more extended version of the signal graph.
- "Master signal preview" has 3 preview modes that you can select in the bottom left corner of the "Master signal preview" area. The preselected view is with one graph on the left and a map on the right where the signals' routes will be shown. You can also select so that instead of a map it will show a second plot or so it only shows one plot.
- If you want to have a bigger "Master signal preview" you can press its fullscreen button on the left or you can manually hide other areas you do not want to see by pressing the "H" on them. To show the areas again you can press the "S" (where "H" used to be).
- There are always two plots even though there might only be one shown. This means you can always use the button "Switch" to make the plots switch places. When there is two plots shown they just switch positions but when there is only one plot shown the shown plot (the left one) will switch with the hidden plot (the right one).
- To zoom in on grafs you drag between two points(not necessarily data points) on the graf and it will zoom in between those two points.To zoom out you press "Reset zoom" for L or R depening on which plot you want to zoom out. Notice that "Zoom out (R)" is only clickable when you show two plots and that is because even if there always are two plots you can only zoom out and clear shown plots.
- When clicking on a point in the graph you will se where the car was for that given time value on the map.
- You can see statistics for the plots and their signal(s) at the bottom under the tab "Statistics". To the left you have a buttom for if you want to show the left or right plot. What being showed is the plots signal and x/y min/max, mean value, standard devation, total amount of data samples and shown amount of data samples for each signal. Note that the plot can only show 500 samples for each signal and therefore need to hide samples for bigger signals. The plot will always try to have an as even as possible space between the samples and if its showing a signal with 502 signals it will show 251 as it will give the smoothest and most accurate view even if its not showing as many samples as it could.
- At the bottom you can also download a plot as a text file. Under the tab "Data export" you select which plot you want to download, select between which time values it should download data points, set a download description(optional) and then press text file to make the file ready for download. The text file you download is supported in excel which is worth to note.
- You can save the selected signals by pressing the Wi-Fi symbol with a plus on it. This function work much like the binoculars except that you can not set a standard view. Note that its not the signal that is saved but the signal name so when loading saved signals it will search for signal names that are exactly identical and not signals that measure the same thing.
