WICE RP Manual
Introduction
New automotive functions and services, including Autonomous Driving (AD) and Advance Driver Assistance Systems (ADAS), will increasingly rely on connectivity. When developing these new services, there is a need for a powerful platform where prototype implementations can be tested and validated before necessary hardware is available in the target vehicle platform and before the production cloud infrastructure software is deployed. This can be achieved using the WICE system, through a dedicated rapid prototyping (RP) service in the in-vehicle WICE units, and by WICE back-end services with open interfaces for accessing and processing streaming (and bulk) data from connected vehicles.
The in-vehicle RP module
The WICE units (WCUs) can execute custom software components developed for rapid prototyping purposes. The RP components are either dynamically linked libraries (executed as plug-ins by Signal Reader based on configurable trigger conditions) or stand-alone executables that are executed when the WICE units has booted and performed initial processing. For the Signal Reader plug-ins, callback functions can be set up to be invoked based on closed form trigger expressions, such as a CAN signal changing value or exceeding a threshold or a DTC being set. This interface, whereby the RP modules can subscribe to events based on trigger conditions makes rapid prototyping of new in-vehicle functions easier, since it relieves the developer of the peculiarities of the in-vehicle communication protocols, signal databases and execution platform details. The RP module also handles output data in the shape of files to be transmitted by the WICE telematics service to the back-end infrastructure. The API between the plug-in and the WICE system thus supports two-way data exchange. A sandboxing mechanism is also implemented, to prevent uncontrolled access to WICE-platform resources by the plug-ins.
The back-end infrastructure RP framework
The WICE back-end manages data uploaded from RP modules in connected vehicles and gives users structured access to the data and meta-information. A REST API has been developed for machine-to-machine access to uploaded data and streaming data. This makes it possible to use the WICE back-end infrastructure as an access point for vehicle data.
Documentation of the REST API is available here.
Developing WICE RP software components
Development of WICE RP software components is typically carried out by automotive software engineers, with technical support regarding the WICE platform and WICE RP services provided by Alkit.
This How-To describes how to get started developing WICE RP software.
Downloading an RP software component to a WCU
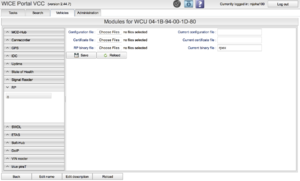
When an RP component has been developed, it the executable binary is is sent to one or more WCUs installed in test vehicles, together with a configuration file. This is done by uploading the binary and configuration file to the WICE Portal, and configuring the RP module of the target WCU(s), as shown in Figure 1.
The RP Module configuration view is accessed by pressing the "Modules" button in the "Vehicles" tab. When the "Save" button has been pressed, the RP software components and settings file (and optionally also a X.509 certificate file) are ready to be downloaded to the selected WCUs.
Accessing log files and result data from RP modules
Log files produced by an RP software component are accessed through the WICE Portal by pressing the "Get Log Files" button in the "Tasks" or "Vehicles" tab, with the WCUs running the RP software selected.
To access result data file, press the "Get result file" button in the "Task" tab.
