The Portal User View
This section will explain all panels and dialog in depth. Both regarding how you use it but also the limitations and some reasons to why it looks like it does. Section 3.1 will describe the meaning of the top level panels. In section 3.2 through 3.5 each top level panel will be described in detail.
Login
To enter the WICE portal you need to log in with your WICE login. If you have not yet received a user name and password, contact your local WICE portal administrator or responsible contact to get a user name and password.
If turned on, you may have to enter a one time password when logging in. This enhances the security by providing something called two-factor authentication. The one time password is typically generated from an app in your smart phone. There is also a program for a desktop computer to generate the one time password. For Android, iPhone and Blackberry you can download an app called “Google Authenticator” to generate these one time passwords for you. An internet connection is not needed in order to generate the passwords. To log in to an account you need to enter your login, ordinary password and the current 6 digits generated by the app. A new 6 digit number is generated each 30 seconds.
To simplify logins from the same computer, typically the one at work, you can tick the check box “Remember me”. If you tick this before you hit the login button when using the one time password, you will be remembered by the portal for the next 30 days. The next time you login from the computer you only have to enter your password. When the 30 days have passed you will once again have to enter a one time password to login.
Creating a Task
MCD-Hub
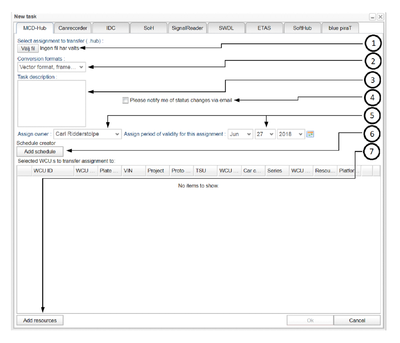
MCD-Hub assignments are used to collect data using the MCD-Hub flight recorder. This assignment tab has seven areas (as shown in figure 7) with one funktion each that is used accordingly:
1. Selecting which MCD-Hub assignment file to use. Press "Bläddra"/"Browse" to bring up the file selection where you select the .hub file to use.
2. Choose which formats to convert to when result files are uploaded to the portal from a WCU.
3. Write a descriptive text for the assignment. (optional)
4. Choose if you want to be notified by email if the assignment fails to start. if you havnt filled in an email adress you will get oppurtunity when pressing ok. (optional)
5. Assign owner and the period of validity to the assignment. This is filled automatically and is optionally changed.
6. This option is under construction, do not use except for special cases
7. Start searching and selecting a WCU by pressing add resources at the bottom left of the screen. There you will get a pop up with 2 boxes, the upper one for searching cars and the bottom one for selected cars. In the top one you can search WCU units with ten different parameters by writing a value and pressing search or ENTER. to select a WCU you drag it from the top to the bottom box so that it appears in the bottom one.
After you press Ok and make the transfer there will be a pop-up telling you "Transfer ok!" if the transfer and checks went well, otherwise there will be a pop-up showing you an error cause.
CAN-recorder
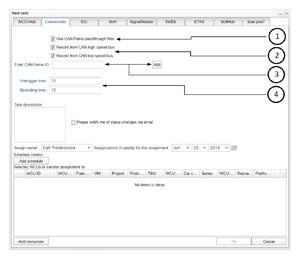
Canrecorder is a measurement module that allows CAN frames to be captured and logged. This assignment has 4 functions described in figure 6 and below:
1. Turning on or off CAN frame pass through filter. If you choose to have the filter on you must specify which CAN bus or CAN buses you wish to record. If you do not have the filter on you should not specify a CAN bus.
2. Choose if you want to record with the high speed CAN bus and/or the low speed can bus.
3. Specify which CAN buses you want to record by entering their ID and then pressing enter. This should only be done if the CAN frame passthrough filter is turned on.
4. Select how much time to record before and after the trigger.
IDC
Internal Diagnostic Client (IDC) is a measurement module that allows a sequence of diagnostic requests to be sent and responses recorded. The sequence of diagnostic requests are uploaded to the portal as a text file (usually ending with ".seq").
When assigning an IDC assignment its identical to a MCD-Hub assignment except the file you select must be a .seq file and you can not choose conversion format.
SoH
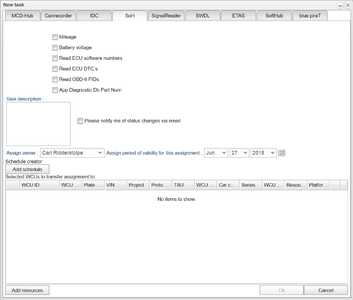
The State of Health (SoH) assignment collects specific status information from vechiles. You select which information you want the assignment to collect by filling in one or more of the six boxes shown in figre 7. In order for SoH data to be correctly interpreted, relevant description files (SDDB/GDS) for the vehicles executing the SoH assignment must have been defined. To add a SDDB/GDS file to a vehicle, see The_Portal_Administrator_View#The_Edit_Car_Dialog.The six different options are:
- Mileage
- Voltage
- Read ECU software numbers
- Read ECU DTC:s
- Read OBD-II PIDs
- App Diagnotstic Db Part Num
Signal Reader
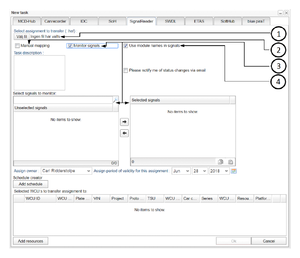
Signal Reader is a measurement module that allows monitoring and logging of CAN-bus signals, as well as diagnostics data. Signal Reader performs more or less the same kind of measurements as the MCD-Hub but it has other functions at its disposal. Those other functions are described below and shown in figure 8:
1. You select the file you want. It must be a .haf file which is a text version of .hub a file.
2. When you have selected a file and WCU units the buses defined in the file and the WCU will be mapped but if they can not it will come a pop-up. In the pop-up window you will have to map the different buses to eachother manually. You can always map the buses manually by selecting to and then pressing mappings at the top. Read more about this in I/O configurations and Mappings.
3. With a Signal Reader assignment you can follow WCU signals live by selecting monitor signals. When selected it will come up two boxes under the task description. In the left one you search for signals and drag them over to the right one where the monitored signals are. You can later se the monitored signals through the vehicles tab. It is also possible to copy the signals text in the bottom right corner of the right box. Next to the copy text button you can also paste signals as text where the pasted signal names will be matched against the list of unselected signals
4. You can choose if you want the signals to have their source modules names as a prefix.
SWDL
A Software Download (SWDL) task updates the ECU software in one or more ECUs in one or more vehicles. A number of Versatile Binary Format (VBF) files containing the ECU software need to be supplied, along with PIN codes to allow security access to re-program the ECUs.
ETAS
Through an ETAS task, an ETAS ES720 Drive Recorder system can be configured, and measurement data offloaded, and accessed through the WICE Portal.
When assigning an ETAS assignment its identical to a MCD-Hub assignment except the file you select must be a .exp file and you can not choose conversion format.
SoftHub
The SoftHub is a more recent version of the MCD-Hub measurement system, and a SoftHub task is created much in the same way an MCD-Hub task is.
When assigning an SoftHub assignment its identical to a MCD-Hub assignment except the file you select must be a .shub file.
Blue piraT
The blue PiraT is a measurement system from Telemotive AG that can be configured with measurement set-ups, and data accessed through the WICE Portal. Note that to use the blue PiraT module, the WCUs to be used need to be preconfigured with a special software package. Contact Alkit Communications in order to set this up.
Top level tabs
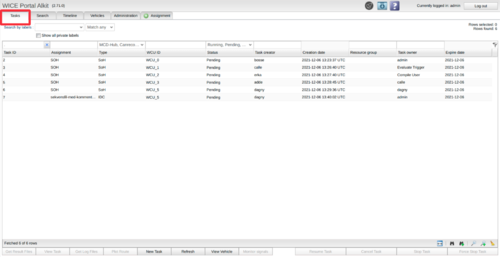
On the top level there are four different tabs to choose from. From left to right they are:
- Tasks Manages your tasks, search among tasks and create new tasks.
- Search In this tab you search and download result files.
- Vehicles Manages your vehicles. As vehicles belong to users of the system, you need to assign a vehicle to yourself before you initiate tasks running on it. You can also deassign vehicles when you are finished with them.
- Administration In this tab you can administer your name, email-address, password and a few other things.
With these three tabs you can do all the work that is needed to start, stop and handle data to and from vehicles. A figure of the tabs is presented in Illustration 11 below.
Tasks Tab
In the Tasks tab you can search for tasks, view and manage the tasks, see the log files, access result data files, and much more.
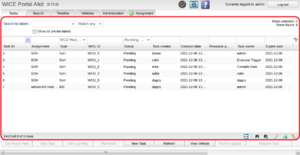
The Search Fields Section
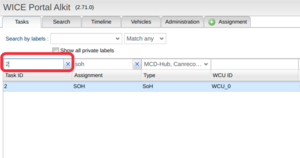
The search field section consists of different columns where most have a field where you can insert search criteria to find active tasks. As an example you have the label “Task ID:” which searches the field for task IDs matching your
search criteria. When searching for tasks you can fill in one or more columns where the different search criteria will be treated with a logical AND between each other.
There are many different columns: in some you can fill in a search criteria and some you can not. Below is a table with all the columns followed by a short description. Note that the columns with a star are the ones where you can enter a search criteria to filter results.
Columns
| Task ID* | The nummeric Task ID. |
|---|---|
| Assignment name* | The assignment name. |
| Type* | Different options for task types where one or more can be selected. |
| WCU ID* | The WCU's ID and also the column where you see the WCU's label. |
| Upload size | The upload size of all the task's uploads given in Kbytes. |
| Plate number* | The vehicle's plate number. |
| Status* | Different options for task statuses where one or more can be selected. |
| Last log | When the last log file was transferred to the portal. |
| Last upload | Date of the task's last upload. |
| VIN* | The vehicle's Vehicle Identification Number. |
| Proto number* | The proto number. |
| Project* | The project ID. |
| TSU* | The TSU ID. |
| Car comment* | The vehicle's comment/description. |
| Series* | The series attribute. |
| Message* | The task's status message. |
| WCU name* | The name of the WCU. |
| Task creator* | The original creator of the task. |
| Task owner* | The current owner of the task. |
| Expire Search date | The date the task will expire. |
| Creation date | The creation date of the task. |
| Resource group* | The resource group the WCU was part of when the task was created. |
| *Searchable column. | |
Search columns with regular expressions
In each searchable column you can use regular expressions for your searches. To designate an "all" search you enter a period (".") for that particular field or leave it empty if another field is already filled in. All searches are treated with the letters as wild-cards. An example is if you intend to search for tasks containing the word “bear” simply enter “bear” in the text field. Now, if there are tasks with the names “bear”, “polar bear”and “unbearable” all of these will match as they contain the word “bear” somewhere.
To search for a range of WCUs, let's say the WCUs MM-810:1 – MM-823:1, you can enter the query 81[0-9]|82[0-3]. This is a regular expression where the first expression, 81[0-9], means that we want our search to start with an '8' followed by a '1' and then any digit in range 0-9. The second part, 82[0-3], means an '8' followed by a '2' and then any digit in range 0-3. The two expressions are combined with a pipe characater ("|") which means logical OR. In other words we are looking for range 810-819 OR 820-823.
Note! If your WCU/resource group you are searching for has special characters (like '(' or '/') in its name you may need to escape these characters in order to get the desired result. Escape means putting a '\' before the special character. For example if you want to enter (and search for) the resource group name 'ABC(Alpha_Bravo_Charlie)' you need to write 'ABC\(Alpha\_Bravo\_Charlie\)'. Another example is when you want to list a WCU that contains "07-51" in its name. In this case you need to type "07\-51", otherwise the "-" character will make the searcher to search for a range of numbers.
For more info how to use regular expressions, see Regular Expressions
In the "Type" column a search is performed based on a checklist drop down menu with the default choice of all types being selected. If there is a need to solely select one type, it is possible to simply double-click on its corresponding field, given that it is already checked, and all other types will be deselected.
When you are filling in search criteria you can see in the top right corner how WICE says "Rows found:". That tell you how many tasks your search will find so you know if you need to narrow or broaden your search.
In the bottom right corner you have two binoculars. With these you can save and load your search criterias and shown columns for future uses. You can also set a view of criteria and columns as your default by hovering over the view you want and then pressing the pin button. There is also two magnifying glasses that can save and load your search results so even if their information change and can not be found with the same search criteria you can still find them. You can also pair a search with a view by going to your searches and then on the search click the binocular button and select which view you want to pair it with. You can also pair them going to your searches and press "Select search views" where you get a window with the option to pair your searches with views. To read more about this, click here.
At the top is a field for 'Search by labels'. Any labels selected here will be appended to the search criteria assembled from the columns. It is also possible to search only by labels.
It is important to know that labels on resources in the Tasks tab are the labels associated with the WCUs and vehicles when the tasks was submitted. Labels added after the task was submitted will not be visible here or yield any search results.
The Button Section
At the bottom of the table is an assortment of buttons available for you. From left to right are:
- Get Result Files, handles result files generated by the various tasks, is described below
- View Task, some aspects of a task can be changed while the task is running, see .. for a description per task type
- Get Log Files, shows a panel where the internal log files generated by the WCU can be viewed.
- Plot Route, a set a routes defined by the drive cycles can be viewed on a map. See plot route for further information.
- New Task, creates a new task for the selected WCUs. See creating tasks for further explanation.
- Refresh, updates the table with information regarding uptime, status and more.
- View Vehicle, opens a dialog showing the vehicle as it looked like when the task was created.
- Monitor signals, if for the selected task a set of signals are monitored, these can be viewed in real time by pressing the button.
The Result Section
Tasks are continuously fetched are you type the search criteria into the fields. Here we will go through the bottom part of the Tasks tab and the options for your previous search.
Task Options
You can right-click one or many tasks to get a menu with a range of options described below:
- "Show task description" will show you the description of the task that you right-clicked.
- "Go to Vehicles Panel" will take you to the Vehicles tab. When you are in the Vehicles tab the vehicles you selected will be shown in the Vehicles tab.
- "Go to Search Panel" will take you to the search tab. When you are in the search tab the WCU(s) you selected will be selected in the search tab.
- "View task" will give you a small pop-up dialog with some task information and a "Download assignment" button if the task has an assignment that can be downloaded. If you choose to press "Download assignment" the assignment file will be downloaded to your computer in its original format.
- "Edit task" will give you the option to edit ownership and expiration date of the task. It will also show you the WCU(s) the task is running on. Additionally,from version 2.87.0 it is possible to modify the values of the labels. However, it's important to note that system labels cannot be edited.
- "Show car info" and "Show WCU info" will give you a pop-up showing you available info of the task vehicle and WCU. Depending on which vehicle/WCU you choose there will be different information available since vehicles/WCUs can lack information.
- "Show message" will show you the task's status message.
- "Plot route" will open a map in your current window. In that map you can see up to 100 of the vehicles registered positions during the last 24 hours or the last 100 registered positions. For more information about this read Plot Route Dialog.
- "Event subscription" is an option where you choose to subscribe to a vehicle, a WCU or a task. When hovering above "Event subscription" you will see three options, "Connect", "Task status" and "Result upload". With the option "Connect " you can subscribe to the selected car(s) or WCU(s) and get notified when their connection status changes. "Task status" and "Result upload" subscribes you to selected task(s) and gets you notified about status changes and when results are uploaded. You will se events when clicking on the bell symbol at the top which gets a red dot when theres new events from your subscriptions.
Column Options
The result section has many ways to sort, view and handle the result with the columns. When right-clicking a column you will get a window with different options for the column.
- "Sort Ascending" and "Sort Descending" will sort the tasks in ascending or descending order after the column's attribute.
- "Configure Sort" where you can add more levels of sorting so that it sorts for more than one thing in different priority. You can for example sort on task ID ascending and then sort on WCU ID descending. When a column has a sorting priority the option "Clear Sort" will appear which clears your sorting preferences for that column.
- "Columns" opens a window where you can select which columns you want shown and which you want hidden by checking or unchecking their corresponding checkboxes. If you remove a column with a filled search criteria that criteria will still matter when you make a new search. Also when you make the new search the column will reappear.
- "Group by" groups together the tasks that share the column's attribute value. When they are grouped there will be the option "Ungroup" that ungroups them.
- "Freeze" moves the column to the left corner and freezes it in position so it can be rearranged. If there is already a frozen column till will move next to it as they go from left to right in chronological order. The "freeze" then becomes "Unfreeze" which reverts the freeze.
- "Export to excel" will export the columns and results into an excel file that will get downloaded.
- "Clear all fields" will clear all columns of their criteria.
- "Get help for this column" should take you here.
Get result files
When selecting a file you can view the result files by pressing "Get Result Files" if there are available result files. That will show a panel where you can search, view and download result files, see Figure "Get Result File Window". It is also possible to view result files from multiple tasks at the same time by selecting many tasks of the same type (Only possible for Signal Reader tasks). To remove one or several files, simply select them in the grid, right click and then select the corresponding option.
Searching result files
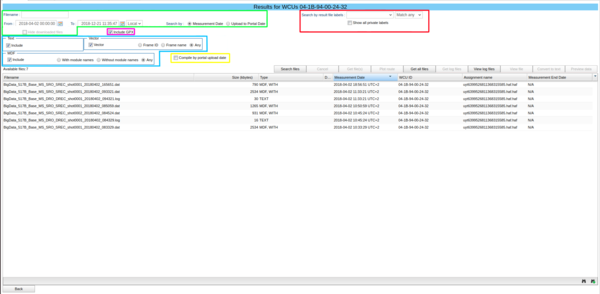
The window will look differently depending on what kind of task you selected to view. The different panels all share a lot of tools and have the same concept: to search and filter files. In Figure "Get Result File Window" you can see how a Signal Reader results window looks. Below is a description of all tools followed by which task window that has them:
General search functions
At the top there are two boxes, labeled "Description" and "Filename", whereby you can search for files based on their description and filename. The "Description" box is disabled so that you can not type in it. When searching by filename it will search for actual result files, the not compiled (i.e. zip) files. Below there are two other sections with two checkboxes. The sections are labeled "From" and "To" and contain dates that can be changed by using the calendar next to the box. The files are filtered so only files between those two dates are shown. The checkboxes are labeled "Measurement Date" and "Upload to Portal" and only one of them can be checked. The checkboxes tell if the files will be filtered by measurement or upload date. There is also a checkbox labeled "Hide downloaded files" which will filter out already downloaded files but this button is disabled if the checkbox "Compile by portal update date" is checked. These tools are the same for all type of tasks and can be seen as marked green in Figure "Get Result File Window".
GPX inclusion
The checkbox "Include GPX" enables GPX files containing positioning data to be included when downloading result files. That means each downloaded result file will have a corresponding gpx file containing the route of the vehicle when the task was executed. Signal Reader, ETAN and SoftHub tasks have this tool and its marked magenta in Figure "Get Result File Window".
File type filters
There are three sections of checkboxes that are framed by a blue line which filter the shown file types. The framed sections represent one file type with their own sub-groups and they are labeled according to what file type they filter. When the outline checkbox in the framed section is checked, it will show you that section's file type. When the respective outline checkbox is not checked, the other checkboxes are disabled as they represent the sub-groups for that file type. As with the other search functions in the WICE portal, leaving all filters empty will result in everything being shown. The section labeled "Text" has three other checkboxes which will show you "Common", "Separate" and "All" text files. Note that not all text files have the subtype "Common" or "Seprate" and can only be shown in "All". The section labeled "MDF" has two other checkboxes which will show you MDF files "With module names" or "Without module names" (i.e. either with or without prefixes in the signal names). The section labeled "Vector" has two other checkboxes which will show you files referring to frames by "Frame ID" or "Frame name". Typically, the Signal Reader measurement tool generates these file types. These tools are marked blue in Figure "Get Result File Window".
Compile by upload date
The checkbox "Compile by portal upload date" will compile result files into a zip file if they were uploaded at the same time. When the files are compiled some functions that usually work on result files work differently, or do not work at all. As mentioned before, you cannot search for the compiled file since it does not really exist, but is rather created on demand. But when searching with this option turned on, the compiled file will show up if one or more of the files it contains match the search criteria. This search feature is automatically turned on since you are often looking for a specific uploaded file. Signal Reader and SoftHub have this option and it is marked yellow in Figure "Get Result File Window".
Label Search
It is also possible search by result file labels using the section marked in red in Figure "Get Result File Window". It is, however, only possible to add labels by the use of server triggers on Signal Reader and Softhub tasks. If there are no tasks of either of these type for the selected WCUs this search option is hidden.
Handling result files
When you have selected the result file(s) you want different buttons will be active depending on the file. The buttons are above the column bar and it is where you download, view and convert result files.
"Get file(s)", "Get all files" and "Get log files" will open a dialog to download selected files, all files or that dates log files. In the dialog you will get the option to add a description, when downloading result files you can also add plate number and/or VIN to the file name. Note that downloading log files from multiple result files will download only log files 24 after the oldest result files so download log files from result files one result file at a time.
"Save Headers" saves your current view of columns and files and saves it as default. This button has since been replaced by the two binoculars that are further described here. We therefore advice you to use the new and improved binoculars as save headers will be removed.
"Plot route" will open a map in your current window. In that map you can see up to 100 vehicles' registered positions during the last 24 hours or the last 100 registered positions. For more information about this read Plot Route Dialog.
"View log files" will view log files from the selected file´s date. When viewing log files from multiple result files at the same time it will show you log files 24 hours after the oldest result file and not from both dates. you can always change the dates when viewing log files to narrow or widen the amount of files. When viewing log files you can read them by selecting a file and pressing "View file". There is also the option to "Get file(s)", "Save Headers", "Plot route" and "View file" who are all except "View file" described above. "View file" will open the log file in readable format in your current window. You can also filter log files like you filter result files by date, name and if they are downloaded or not. Note that when selecting to view log files from many files it will show log files from the oldest file's date and 24 hours forward.
"View file" will open the file in a readable format in you current window. If the file is compiled by upload date or not readable this button will not be enabled.
"Convert to text" will convert and download selected MDF file(s) to your computer. When doing this you will get a pop-up with the ability to add a description to your download. This is only availible for MDF files and this button can therefore only be found on tasks with MDF files.
Preview data
"Preview data" will give you a data preview window where you can preview the selected file(s) data. To read more about how to use this window and all its functions read Preview data.
Removing result files
To remove one or several files, simply select them in the grid, right click and then select the corresponding option.
Search Tab
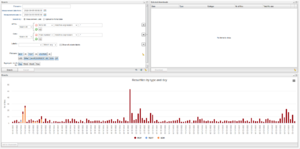
The 'Search' tab makes it possible to search for and download result files and log files without first searching for a specific task. The tab is split into three portlets where each portlet can be expanded or minimized to make more space for the other windows.
The portlets are Search, Results and Selected downloads where each one has its own section on this page.
Search
The search portlet is where constraints are added to the search query.
Filename:
Filename can be full filename like "ABC_123.dat" or some regular expression that matches a part of a filename.
Measurement date:
By default to is set to today's date and the time when the page last was refreshed and from is set to (to - 7 days).
WCUs:
This widget allows the user to filter WCUs on various search criteria. The default search criteria is 'WCU ID matches expression .*' which means that we will search on every WCU the current logged in user has access to. If the current user is an admin, we will search for all WCUs in the system. If the current user is a restricted user with access to only 10 WCUs, we will search for only those 10 WCUs.
The currently available WCU attributes to filter on is: WCU ID, Software version, Description and WCU Name
Operators:
Each search criteria has at least two operators; 'matches expression' and 'equals'.
Matches expression:
'Matches expression' means that the inserted value will be treated as a regular expression.
Equals:
'Equals means that the chosen attribute has to exactly match the inserted value.
Is one of:
For the attributes 'WCU ID' and 'WCU Name' there is an additional operator 'is one of'. When choosing this operator, the value text field is replaced by a combined search and drop down list which is populated be either all WCU IDs or WCU Names the currently logged in user has access to. One can use this operator to conveniently filter out a few WCUs where it's a non trivial task to write a regular expression that only matches the wanted wcus.
Advanced filter:
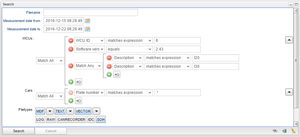
The WCUs widget allows the user build advanced nestled filters which is illustrated in the Figure "Advanced Filter".
In this example we filter "all wcus that matches expression '8' " AND "software version equals '2.43.0' " AND "description matches expression 'T20' or 'T30' ".
Cars:
This widget is very similar to the WCUs widget. Default search criteria is "Plate number matches expression .*" which basically means that we don't put any constraints on cars.
The currently available Car attributes to filter on is: Description, Plate number, Project, Proto number, Series, TSU and VIN.
Labels:
The labels section allows the user to search for result files from tasks matching the selected labels. Labels on tasks means labels that was associated with the resource (WCU or car) when the task was created. Any labels added to the resource after the task was created can not be used here. In other words, no result files for label X will be found if label X was not associated with the resource before an task was started.
File types:
The file types widget decides which file types we want to include in the search result. A file type is included in the result if the file type button in the window is toggled.
The file types 'MDF', 'TEXT' and 'VECTOR' has sub types. When toggling a button with sub types, this will enable/disable all sub types for that file type. If one only want to include a subset of the sub types, one can expand the file type and only choose the wanted sub type. If only a subset of the file sub types are selected, the file type button will be in the disabled state. If all file sub types for a file type is enabled, the file type will change to enabled state. An example can be seen in "Enable file types".
Aggregate results by:
This widget allows the user how the search results will be aggregated. Available choices are 'Day', 'Week'. 'Month' or 'Year', where 'Day' is the default option.
Results
If the search query yielded any results these results are presented as a chart in the Results portlet, an example of which can be seen in the "Search Tab" illustration above.
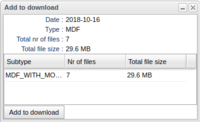
The X-axis depends on the chosen "Aggregate results by" in the Search portlet and the Y-axis shows the number of result files for each aggregation. The result files types that were found in the query are displayed in the legend below the chart. In the example we can see that we searched for 8 result file types but result contains 5 of them. If one clicks on any result bar in the chart a new window, "Add to download" will popup which can be seen in Figure "Add to Download". This window shows the date for the aggregation, which can be a day, a week, a month or a year, the file type (MDF in this case), the total number of files and the total size of all the files in the aggregation. The window also has a grid that shows if the aggregation consists of subsets of file sub types. In this example we only have the sub type "MDF_WITHOUT_MODULE_NAMES". When clicking the button "Add to download", this aggregation will be added to the "Selected downloads" portlet.
It is also possible to click the label of the X-axis to add all the file types for this date to "Selected downloads". In the same way it's doable to click the legend to add all found results of a particular file type to the "Selected downloads".
Selected downloads
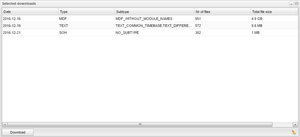
Selected downloads shows the all aggregations added from the Results chart. An example can be seen in Figure "Selected Downloads". The columns shows basically the same information as the "Add to download" window displays before the aggregations are added for download.
Clicking "Download" starts the compilation and the user is notified when the compilation is ready for download. The compilation can take quite some time if the total file size is > 100 mb.
Save, apply and reset search criteria
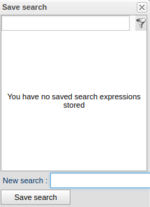
In the same way as for the 'Tasks' tab and the 'Vehicles' tab, search criteria can be saved as templates. To save the current search criteria as a template, use the middle of the three buttons to the right of the Search and Cancel buttons in the Search portlets. An example of this dialogue can be seen in Figure "Save Current Search Criteria".
The leftmost button applies previously saved criteria and the rightmost buttons resets the search criteria to default.
Vehicles Tab
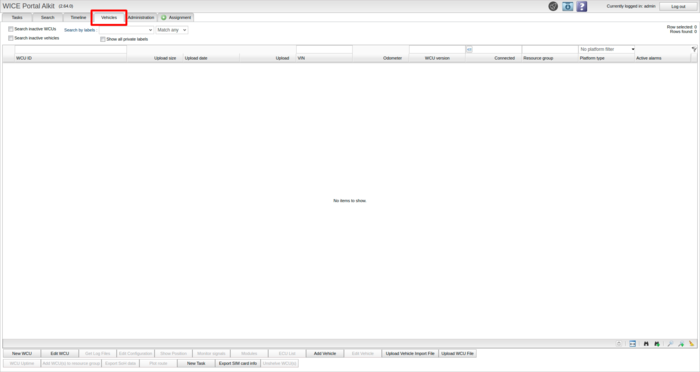
This view is used to handle the various vehicles that are assigned to you. A figure of this view is presented below in the Figure "Vehicles Tab". At the top, the red section, is a search area where you type in the criteria to be used for fetching the vehicles you are interested in. As you enter your criteria a row count is presented in the upper right area to show how many potential matches there are. The entries are also fetched as you type but only as many rows as fit your current view are fetched. As you scroll down more results will be fetched.
The number of possible columns to show is quite large. You can elect which columns you wish to see by right clicking on the column header and select "Columns..". A small window will pop-up, in which you can select which columns should be visible in the table. These are the available columns:
| Active alarms | Presents a numeric summary of alarms. It displays the amount of errors and warnings. |
| Connected | Shows how many minutes have passed since the WCU made a connection to the WICE portal. |
| Distance | Shows the distance the car has been driven the last week. (SoH task specific) |
| Last DRO | Says when the DRO log file was last transferred to the portal. |
| Last log | Shows when the last log file was transferred to the portal. |
| Mileage | The column shows the mileage of the car. |
| Plate number | The plate number of the car where the WCU is mounted. |
| Platform type | Search WCU by platform type. |
| Project Id | Shows the project identification number. |
| Proto number | Shows the proto number. |
| Resource group | The resource group (if any) the WCU is part of. |
| Series | Shows the series attribute. |
| TSU | Shows the TSU identifier. |
| Upload | This column says how much data has been transferred from the WCU to the portal the last week. |
| Upload date | Contains which date the last upload was done |
| Upload size | Says what the size, in kilobytes, of the last data upload was. |
| Uptime | Shows how many hours the WCU been running the last week. |
| VIN | Shows the Vehicle Identification Number of the car where the WCU is mounted. |
| Voltage | The column shows the latest known battery voltage as reported by the CEM. |
| WCU ID | The MAC ID of the WCU. For example: AA-01-AA-01-AA-01. |
| WCU Description | A textual comment attached to the WCU. |
| WCU Firmware | Shows which firmware the WCU uses. |
| WCU voltage | Shows the voltage as measured by the WCU. |
| WCU Version | Shows which version the current WCU software has. |
| WCU storage usage | Shows the amount of storage available to store data on the WCU. |
| WCU name | Shows the name of the WCU |
Now, as there are so many columns present you have the option of selecting which ones you would like to see by right-clicking on the table header. If you would like your selection to be remembered between sessions, use the binocular icon with an add sign in bottom right corner in the Figure "Vehicles Tab". To save the currently entered search expression, similarly use the magnifying glass icon with an add sign. To read more about the view and search functionality, click here.
There is a concept called “resource groups” you should be aware of in this panel. A resource group is simply a way to refer to a group of resources (WCU, Car) collectively. An example is when creating tasks you can select a resource group instead of the individual WCU:s to start a new task. Also, when showing the positions on a map, you select a resource group and press “Show position”, all WCU:s in that resource group will show. To see which resources are in a resource group you press the triangle to the left of the row and the row opens up to show the individual members. To show the members in the view you can rightclick the entry and select the option “find members” from the menu.
When selecting a row in the table the selected row changes to a blue shade. You can modify the description of the WCU by clicking in the “Edit Description” button and entering a new description. You can search among the vehicles log files by clicking the “Get log files” button.
If you select one or more rows in the table, you can right click on the selected rows. This will display a context menu with several options, some of which are described here.
Go to Tasks Panel
This allows you to instantly jump to the tasks panel, which will automatically perform a search based on either the WCU or the car which the selected row represents.
Go to Search Panel
This allows you to instantly jump to the search panel. The search panel will automatically perform a search based on either the WCU or the car.
Go to Timeline
This allows you to jump to the Timeline-view, which will adjust itself to the WCU you have selected.
Go to alarms
Selecting this will take you to the alarms panel, where a search is conducted for all selected WCUs. This allows you to quickly see all alarms for a specific set of WCU resources. This works well together with the Active Alarms column (which you can read about further up this page), which tells you if a WCU has any active alarms. If a WCU has any active alarms, then using "go to alarms" will allow you to review those alarms in detail.
Remove WCU(s) from Resource Group
If WCUs which are included in a resource group are selected, the menu option "Remove WCU(s) from Resource Group" will appear. They do not have to be in the same resource group as each other. If a resource which do not fulfill this requirement is selected in addition, this option will not be visible.
Show WCU history
Selecting this shows a window with the history of the selected WCU. In the window it can be seen when a change has been made, if there is a change in the description, if the WCU is active or not, the WCU ID, labels on the WCU, WCU Name and which user made the change. If the WCU has a modem id it will also be shown in the window. For the Show WCU history option to be available only a single WCU can be selected.
Trigger upload now
Momentarily stop the WCU, offload it and upload any data as soon as possible. This trigger button is only visible if the WCU state is in-operation and the WCU version is later then 2.39
Trigger reboot now
Reboots the trigger and WCU. This trigger button is only visible if the WCU state is in-operation and the WCU version is later then 2.39
Trigger collect and upload
This action will cause the task to momentarily stop and upload any data as soon as possible. This trigger button is only visible if the WCU state is in-operation and the WCU version is later then 2.45.
Trigger VIN readout
Trigger VIN readout, this action will cause the task to momentarily stop .This trigger button is only visible if the WCU state is in-operation and the WCU version is later then 2.65.
New task
To create a new task for all selected WCUs, click the button New Task. To learn more about creating each specific task see Creating a Task.
Show the Vehicle Position
To see the last reported position of a vehicle, click the “Show Position” button which opens up a map view of where the vehicle was last known to be. You can view several vehicles simultaneously by ctrl- or shift-clicking the vehicles you are interested in.
If you want to know more about the "Show position"-tool you can read more about it here.
View Diagnostic Trouble Codes
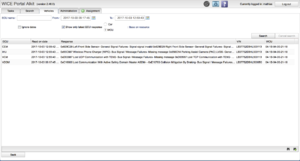
If an SoH task has been enabled to do Diagnostic Trouble Code (DTC) read-outs, you can view the trouble codes by selecting the vehicle you are interested in and push the button “View DTCs”. In Figure "Viewing Diagnostic Trouble Codes" you can see an example presentation of DTCs. There are five columns in the table. The leftmost is the name of the ECU issuing the DTC, next is the date and time when the trouble code was read-out, the actual DTC with clear text description, and thereafter the VIN and WCU id of the vehicle. If you click in the column for the actual trouble code, a dialog opens with that particular trouble codes. You can extend the size of the dialog in order to examine the trouble codes in more detail. You can also search the trouble codes as you can see at the top of Figure "Viewing Diagnostic Trouble Codes".
View ECU software
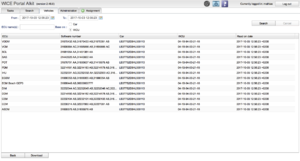
It is possible to see the ECU software number for each ECU in a vehicle. Press the button “ECU SW” after you have selected one vehicle. The following view will be shown. As you can see in Figure "ECU Software Versions", each ECU's software number is shown along with when it was read. You can download the list as a tab-separated text file if you press “Download”.
Get WCU Up-time
This function is used to get a compilation of the up-time of a set of vehicles during a particular time span. Select the WCUs you are interested in and the click the “Get WCU uptime” button. This brings up the dialog to the right.
Choose the dates you are interested by choosing a start and end date. Next you have the option of downloading a CSV file, or excel file. The up-time in that file is listed as hours up-time per day per WCU. The other option is to compile the up-time in a chart shown on screen. The up-time is averaged over the WCUs selected for each day. WCUs having no up-time at all are excluded from the compilation.
From version 2.42 there is a new feature to display the WCUs uptime based on the data sent from statusd. More info in WCU Uptime.
Export SoH Data
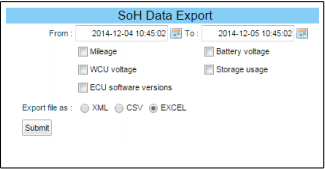
You can export data from SoH tasks to your local computer by using the function “Export SoH data”. Select the cars you are interested in as you can export for more than one car in one export. You select the dates you are interested in getting the data from. Check each item you are interested in. Currently you can select mileage, WCU voltage, ECU software versions, battery voltage, storage usage and diagnostic trouble codes. The file can be exported in CSV format (suitable for Excel and other spreadsheet applications) and in XML format.
Resource Groups
WCUs and cars can collectively be referred to as "resources". As such they can be grouped together and be handled collectively in order to ease the administration of a set of similar individuals. A resource group can consist of both cars and WCUs but usually only one type of resource is in a resource group.
You identify a resource group by a gray arrow like icon to the left in the table row. If you click the icon the entry opens up and makes room for showing which resources are part of the resource group.
From version 2.42 the showing of the resource group's resources has been improved. More info can be found in Resource group's resources.
When a new task is created any resource groups assigned to you will show up in addition to individual WCUs. There is, however, no indication as to the particular entry is a resource group or not. If you select a resource group, the new task will be downloaded to all the WCUs that are part of the resource group. As a regular user you can not create and remove resource groups, only an administrator of the portal can do this.
From version 2.42 of the portal it is easier to search out members of resource groups using the "Resource group" column. When searching in this column one will get results that either matches the name of a resource group WCU or WCUs that are part of a resource group that matches the search criteria. In other words, if we search for "ABCD" we will get the resource group "ABCD" together with all WCUs that are part of the "ABCD" group.
This column can also be used to list all WCUs that are not part of any resource group. To perform this search, put "^$" in the "Resource group" column.
Alternatively, you can find the resource group that a WCU belongs to, by right-clicking the WCU and select "Search resource group".
Modules
If you have the right permission you will be able to view a WCU:s modules, and configure them. A module is a specific functionality of the WCU, such as a measurement tool. The available modules are:
