New features in v2.42
This page lists new and changed features in version 2.42 of the WICE Portal.
New "Resource group" column in Vehicles
A new column "Resource group" is added to the Vehicles tab. This column shows the resource group (if any) the WCU is member of. This column also makes it possible to search out WCUs that are not member of a resource group.
More info in Resource Groups.
Include gpx files when downloading result files
An option to include GPX files when downloading result files is introduced. More info in Search Tab#The Result Files and Logs Dialog.
Update WCU root password
The WCU root password can be set via the WCU configuration. More info in The Portal Administrator View#WCU.
Show SIM card info
The SIM card ID for WCUs can be seen in the Vehicles tab. More info in The Portal Administrator View#Show or export SIM card ID== Resource group's resources ==

From version 2.78.0 the showing of a resource group's resources has been moved to the information panel.
When clicking on the first black symbol (from the left) down in the right corner in the Vehicles tab, the information panel grid pops up. This can be seen in Figure "Information Panel". The information panel consists of 7 tabs. One of them are called resource group. It's important that the selected row in the vehicles panel is a resource group or else the information will not be shown. To find more information about what the Resource group contains click here.

WCU Uptime
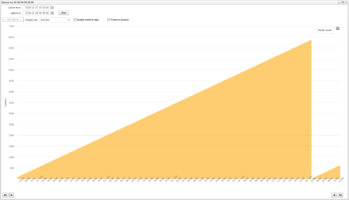
The uptime of a WCU can now be tracked in minute resolution. To show the uptime for a WCU, you can either right click on the WCU in the Vehicles tab and select "WCU status" or select the WCU and then click on the "WCU status" button located in the bottom line of the Vehicles tab. The window in Figure "WCU Uptime Window" will then be visible.
When the "WCU Status" window opens it will by default show the uptime for the last seven days. If the WCU did not record any uptime during this period, the "WCU status" will look an additional seven days backwards in time until it finds an uptime sequence.
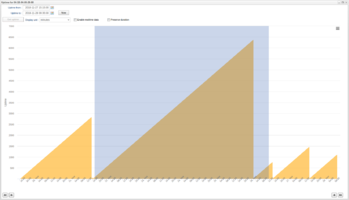
To view uptime sequences prior to the last uptime sequence, the user can step to the left on the time axis using the "left" arrow button and "fast rewind" button located in the bottom left corner of the window. Clicking the "left" button will result in stepping one uptime sequence backwards. Clicking the "fast rewind" button results in stepping 10 sequences backwards. By default when stepping backwards the number of visible uptime sequences will always be the same. In other words, if you have only one sequence visible as in Figure "WCU Uptime Window" and then clicks the "left" button this results in only showing the uptime sequence prior to current one. This can be changed by unchecking the "Preserve duration" checkbox located above the uptime chart. When having this checkbox unchecked, the result of a backward step on the time axis will result in the new uptime sequences being appended to the currently visible sequences.
Example: If only one uptime sequence is visible and we click the "left" button while having "Preserve duration" unchecked, this results in two uptime sequences after the result has been fetched from the server.
The "right" button and the "fast forward" button work the opposite way unless we are on the last uptime sequence as in Figure "WCU Uptime Window".

Get uptime for a period of time
Instead of stepping backwards on the time axis it is possible to display all uptime sequences for a period of time. In the Figure "WCU Uptime Interval Search" we have searched for uptime between 2018-11-01 and 2018-11-28. This search will be inclusive, i.e. if the from or to date is in the middle of an uptime sequence it will include the entire uptime sequence. This is for instance the case in the forementioned figure, where the entered from date is in the middle of the marked uptime sequence and the search is therefore extended to include its alive date; 2018-10-31.
Zoom in and zoom out
To zoom in the chart you can simply mark the area of interest by drag-and-drop, as illustrated in Figure "WCU Uptime Zoom". This can be done several times and to completely reset the zoom, press the "Reset zoom"-button in the upper right corner in the graph, see Figure "WCU Uptime Reset Zoom". It is also possible to use the stepping arrows based on the zoomed interval. However, after doing so a new search is performed and it is no longer possible to reset the zoom.
WCU Uptime Zoom
WCU Uptime Reset Zoom


Real-time monitoring
The WCU status window can also be used to monitor if the WCU is currently up and running. To enable this, check "Enable realtime data" located above the main chart. When enabled, any uptime for the last 24h will be fetched and displayed. Additionally, the server will be asked for new uptime data every minute and any new data will be added to the current result. Since the WCU uploads its uptime data every 5 minutes, it can take up to 5 minutes before any results are visible in the WCU status window.
Additional features
- The display unit can be changed from minutes (default) to hours or days. If changing to hours, 160 minutes will be displayed as 02:40 (hh:mm).
- When real-time monitoring, the WCU status window can be sent to a new browser window using the little arrow located to left of the minimize-maximize buttons in the upper right corner of the window.