Roles and permissions
In order to restrict access to resources and functions in the portal, there is a framework for controlling this using roles and permissions. Permissions are given on a set of resources. These permissions are grouped into roles, and roles are then attached to one or several users to be granted specific permissions.
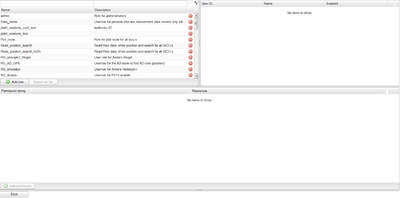
The “Edit roles and permission” dialog can be seen in Illustration 51. It consists of three tables. The top left table holds a list of the roles, the top right holds the user(s) for the selected role and the bottom one hold the selected role's permissions. Their size is adjustable and you can minimize them by clicking on the line between them.
You add a new role by pressing the button “Add role” and delete a role along with its permissions by pressing the red button next to it. When making a role you add a description and unique name. To edit an already existing role, double click the entry you wish to edit.
When you select a role in the top left table, the lower table shows that specific role's permissions and the upper right table shows which users have that role. The permissions table consists of two columns, a string that is the actual permission and the set of resources that apply to that permission. In the illustration above there is only one resource but there can be a list of resources and resource groups that the permission applies to.
Creating and editing permissions
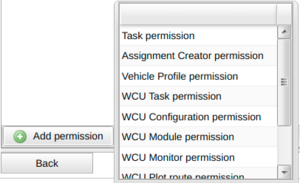
To create a new permission press the “Add permission” button. It opens the following interaction depicted in illustration 52.
- Selecting Which kind of permission you want. there are 8 different permissions 7 to give permissions to WCUs and one to give permission to all assignments(the assignment permission can not be modified).The different assignments for WCUs are:
- Assignment. Controls if a user is permitted to create/see assignments of a specific kind on a WCU.
- Configuration. The permission says if you are allowed to work with a WCU's configuration.
- Module. The permission controls the access to individual module configurations. An example of a module is MCD-Hub.
- Monitor. An assignment can have a monitor function to report data in real time. In order to see the real time data the user must have this permission.
- Plot route. To see a historic GPS track of a WCU a user must have this permission.
- Position. Allows a user to see a WCU's current position.
- View. This permission applies to the Vehicles tab. It has to do with whether you are allowed to list any WCUs in the table. Selecting this subtype makes the subtype type part unnecessary and therefore, it is removed if you choose this resource type. Now the permission is actually created but it can be changed to your likings. Illustration 53 shows the dialog Where you edit the permission.
- Choosing if the permission should be a read and/or write permission. One of these have to be selected or you will not be able to save changes.
- Selecting which resources that apply to the permission. The selection is made using the two tables you see in Illustration 53. To select a resource, which can be a resource group, you enter the name of the resource in the left table filter area. As you type, the table is automatically filled with resources matching the criteria. If a resource is part of a resource group the icon to the left is shown. If you hold the mouse over the resource name you will see which resource group it is part of. If you instead see the icon shown to the left, the resource is a resource group. Holding the mouse over the entry will show you which resources are part of the resource group. To select a resource, drag it over to the right table or select the resource and then press the right-arrow. To deselect a resource, drag it to the left table or press the left-arrow. There is a “Select all” option. It selects all current and future resources to which this permission should be applied.
- Set which kind of assignments the permission applies to. It is automatically set to have all selected but you can unselect all and selecting other assignments. This option is only availible on the assignment, monitor and module permission.
When you are done press "Save changes" or "Reset changes" if you want to revert the changes. You can always edit the permission by selecting it getting the same dialog and change it except that you can not change what type of assignment it is.
Changing a users roles
You can change a users roles under in the edit user dialog if you press the button "Edit user roles". The edit user dialog then gets extended as two boxes appear, a left one with available roles and a right one with current roles. In the left one you can search the role(s) you want and drag them to the right box or press the button pointing right. With the two buttons at the bottom corner(the paper and clipboard ones) you can copy the names of the roles and also insert the names of roles to add them.
You can also edit a users role by searching for user(s) and right clicking on them to get a window with different options. There are five different options where the three first can be used on multiple users at the same time while the bottom two can not.
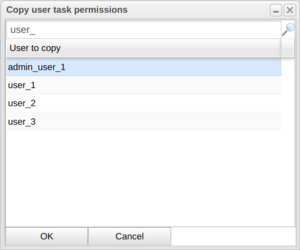
- "Add user assignment permissions to this user" will open the dialog shown in illustration 54. With this button you take a users assignment permissions and add them to the selected user(s). You do this by searching and selecting a user and then pressing "OK".
- "Replace user assignment permissions with user" will open a similar dialog to illustration 54. This button i much like the one before except that instead of adding permissions to the current this replaces the permissions that the selected user(s) have. Here you also search the user whose permissions you want to replace the select them and press "OK".
- "Copy user roles to this user" will open a similar dialog to illustration 54. This button instead of replacing permissions replace selected user(s) roles with the roles of a user who you chose. Search the user whose roles you want to copy for replacement and press "OK".
- "Give this user permission to all assignments on Car" is quite self explanatory and is to give assignment permission on one or many cars. The dialog will look like illustration 55. In the left box you select cars and move them to the right to give permission on them, you can also as you see below the left box select a file with cars to easily select a set of cars. Then you select which types of assignments it should give permission to (leaving this empty will not give any permissions). You can also check the checkbox "Reset user permission" to replace the roles of the selected user instead of adding new to the current ones.
- "Give this user permission to all assignments on WCU" is identical to the previous button except that it applies to WCUs instead of Cars.


