Creating a Task
You create a new task by pressing the "New Task" button on the bottom of the "Tasks" tab. This will open a window where you choose the type of assignment you want to create. Here we will go through how to create tasks of each of the nine different kinds of assignments available (MCD-Hub, Canrecorder, IDC, SoH, Signal Reader, SWDL, ETAS, SoftHub and blue piraT). Note that step 3-6 on MCD-Hub is identical on all assignments so it will not be described to avoid this being repetitive.
MCD-Hub
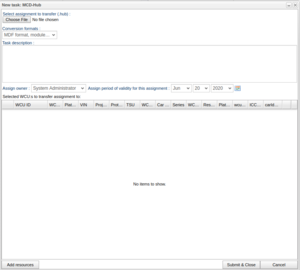
MCD-Hub assignments are used to collect data using the MCD-Hub flight recorder. This assignment tab has seven parts (as shown in Figure "MCD-Hub") with one function each that is used as follows:
1. Selecting which MCD-Hub assignment file to use. Press "Bläddra"/"Browse" to bring up the file selection where you select the .hub file to use. The assignment file is typically created using the MCD Tool software.
2. Choose which formats the MCD-Hub result files should be converted to when result files are uploaded to the portal from a WCU.
3. Write a descriptive text for the assignment (optional).
4. Assign owner and the period of validity to the assignment. This is filled automatically and is optionally changed.
5. Start searching and selecting target WCUs by pressing add resources at the bottom left of the screen. There you will get a pop up with two boxes, the upper one for searching cars and the bottom one for selected cars. In the top one you can search for WCUs using ten different parameters by writing a value and pressing search or ENTER. To select a WCU you drag it from the top to the bottom box so that it appears in the bottom one.
After you press OK there will be a pop-up telling you "Transfer ok!" if everything went well, otherwise there will be a pop-up dialog showing you an error message.
CAN-recorder
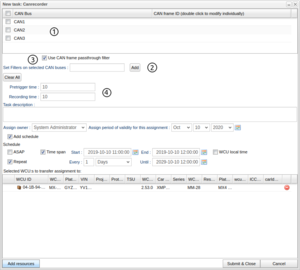
Canrecorder is a measurement module that allows CAN frames to be captured and logged. This assignment has four options described in Figure "Canrecorder" and below:
1. In the grid, select which bus (or buses) to record from. By clicking the check box in the top left corner, you can select all buses at once.
2. Specify which CAN frames you want to record by entering their CAN IDs in the CAN frame ID column in the grid, on the same row as the bus you have selected, or by entering the IDs in the text box labeled “Set filters on selected CAN buses”. If you use the latter option, the filters will be set on all of the buses you have selected. To enter a filter on a specific bus use the method of entering the filter on the same row as the selected bus, on the grid. This can only be done if the CAN frame passthrough filter is turned on. Turning off the CAN frame passthrough filter option will disable the CAN frame ID column in the grid. Press the “Clear All” button to remove all the entered filters from all buses.
3. Turning on or off a CAN frame pass-through filter. If you choose to have the filter on you must specify which CAN bus or CAN buses you wish to record.
4. Select how long time to record before and after the trigger.
IDC
The Internal Diagnostic Client (IDC) is a measurement module that allows a sequence of diagnostic requests to be sent and responses recorded. The sequence of diagnostic requests are uploaded to the portal as a text file (usually ending with ".seq").
SoH
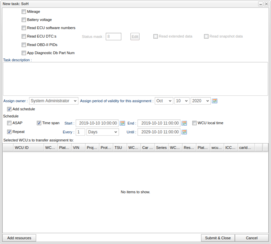
A State of Health (SoH) assignment collects specific status information from vechiles. You select which information you want the assignment to collect by filling in one or more of the six boxes shown in Figure "SoH tab". In order for SoH data to be correctly interpreted, relevant description files (SDDB/GDS) for the vehicles executing the SoH assignment must have been defined. To add a SDDB/GDS file to a vehicle, see The Edit Car Dialog.The six different options are:
- Mileage
- Voltage
- Read ECU software numbers
- Read ECU DTC:s
- Read OBD-II PIDs
- App Diagnotstic Db Part Num
Signal Reader
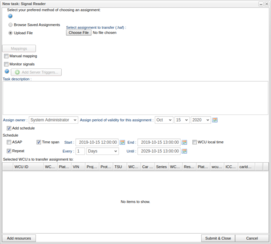
Signal Reader is a measurement module that allows monitoring and logging of CAN and FlexRay signals, as well as diagnostics data. Signal Reader performs more or less the same kind of measurements as the MCD-Hub but it has other functions as well. Those other functions are described below and shown in Figure "Signal reader assignment":
1. You either select an assignment file of .haf format, or choose an assignment blueprint created in the blueprint creator. Your current choice will be displayed in the "Chosen file" field.
2. When you have selected a file and WCU unit(s), the buses defined in the file and on the WCU will be mapped. If they can be automatically mapped a green check will be displayed, otherwise a red cross will be displayed. Clicking the mapping button will open the mapper. In the pop-up window you will have to map the different buses to each other manually and then save. Once this is done correctly, the red cross will become a green check, indicating that the mappings are ready to be automatically applied upon submit. Read more about this in I/O configurations and Mappings.
3. With a Signal Reader assignment you can follow WCU signals live by selecting "Monitor signals". When selected it will come up two boxes under the task description. In the left one you search for signals and drag them over to the right one where the monitored signals are. You can later se the monitored signals through the vehicles tab. It is also possible to copy the signals text in the bottom right corner of the right box. Next to the copy text button you can also paste signals as text where the pasted signal names will be matched against the list of unselected signals
4. You can choose if you want the signals to have their data source names as a prefix (e.g. ECM.EngineSpeed instead of EngineSpeed).
5. The signal reader assignment will generate result files. It may be interesting to know if certain signals reach certain values in these result files, therefore it is possible to add server triggers to the assignment that will trigger and add a suitable label to the corresponding result file. Read more about this here.
Signal Reader can also act as a signal broker for other software components. Read more about this in WICE Signal Broker API.
Files containing references to sequence files
If the measurement file contains references to sequence files, you are also required to select these in order to run the assignment. The portal scans the .haf file for such entries and presents this to you, see illustration 4.2. Click the button for each sequence file reference to upload each sequence file needed. Some queries in the sequence file are of functional type, i.e. posed to all ECUs, and in such cases you can select the option of using Snapshots or Extended data. An example of this can found in illustration 4.2.
Here, the .haf file contained two references to sequence files. As no sequence files have yet been uploaded, the selection for reading snapshot or extended data is grayed out. In illustration 4.3 we have selected one such sequence file containing functional queries. Here we have checked that we would like to read Extended data. It is also possible to select both Snapshots and Extended data.
WICE internal signals
In addition to CAN and FlexRay signals, a number of internal signals are also available. The following WICE-internal signals are supported:
| Signal name | Description |
|---|---|
| Busload_CAN_<n> | The bus load on CAN bus <n> |
| CSQ | The built-in modem's CSQ value (Signal Quality) |
| Date Year | The year of the current date. |
| Date Month | The month (1-12) of the current date. |
| Date Day | The day of the month (1-31) of the current date. |
| Date Weekday | The day of the week (1-7, where 1 is Sunday). |
| Date Hour | The hour of the day (0-23). |
| Date Minute | The minute of the hour (0-59). |
| Date Second | The second of the minute (0-59). |
| Dynamic_<n> | Special signals with values assignable from external software components (typically used for Rapid Prototyping). |
| IO__AI_<n> | Analog input number <n> |
| IO__DI_<n> | Digital input number <n> |
| IO__DO_<n> | Digital output number <n> |
| Log_All_Frames_CAN_<n> | Log all CAN frames on CAN bus <n> |
| Latitude | The GPS latitude |
| Longitude | The GPS longitude |
| Power_Mode | The power mode of the WCU |
| Random | A random number generator |
| Random_Start | A random number generator updated once, at program start |
| Random_Setup_Switch | A random number generator updated at each measurement set-up switch |
| Start_Signal | The start signal of the WCU |
| Speed | The GPS speed |
| Start_Switch | The start switch of the WCU |
| Time Since Epoch | The time elapsed since the epoch (Jan 1, 1970, 00:00) |
| Time Since Start | The time elapsed since the start of the assignment |
| Time Since Setup Switch | The time elapsed since the activation of the current measurement set-up |
| Trigger_Button | The trigger button connected to the WCU |
| Usage_CPU | The WCU CPU usage in percent |
| Usage_Memory | The WCU memory usage in percent |
| WCU_Battery | The WCU battery voltage in millivolts |
| WCU_Temp | The WCU internal temperature in degrees Celsius |
| WCU_Voltage | The WCU WCU voltage in millivolts |
SWDL
A Software Download (SWDL) task updates the ECU software in one or more ECUs in one or more vehicles. A number of Versatile Binary Format (VBF) files containing the ECU software need to be supplied, along with PIN codes to allow security access to re-program the ECUs. The PIN codes should be in the format of five hexadecimal numbers, e.g. ff:00:1a:2c:77 (or alternatively , omitting the colon separator, ff001a2c77). When a SWDL task has been created and downloaded to one or more WCUs, it will case all vbf files to be downloaded to the WCUs, and then the actual re-programming can be triggered by the vehicle user through the WCU status GUI web interface.
The SWDL module can be configured to perform SWDL either over CAN or over Ethernet (DoIP).
ETAS
Through an ETAS task, an ETAS ES720 Drive Recorder system can be configured, and measurement data offloaded and accessed through the WICE Portal.
When creating an ETAS task, the assignment description file you select must be a .exp file.
SoftHub
The SoftHub is a more recent version of the MCD-Hub measurement system, and a SoftHub task is created much in the same way an MCD-Hub task is.
When creating a SoftHub task, it is identical to a MCD-Hub task except that the file you select must be a .shub file.
The softhub assignment will generate result files. It may be interesting to know if certain signals reach certain values in these result files, therefore it is possible to add server triggers to the assignment that will trigger and add a suitable label to the corresponding result file. Read more about this here.
Blue piraT
The blue PiraT is a measurement system from Telemotive AG that can be configured with measurement set-ups, and data accessed through the WICE Portal. Note that to use the blue PiraT module, the WCUs to be used need to be preconfigured with a special software package (i.e. an "extra bundle"). Contact Alkit Communications in order to set this up.
Video
A video task makes it possible to record and monitor live video from one or two cameras attached to a WCU. You can trigger recording of video using either a trigger button or a recorder start event from Signal Reader. You can also let the video recording start as soon as the WCUs has started. If monitoring of video from a WCU is enabled, a live video stream will be transmitted which can be viewed using a RTP-based video tool, for instance Alkit Confero.
Read more about the video support in WICE here.
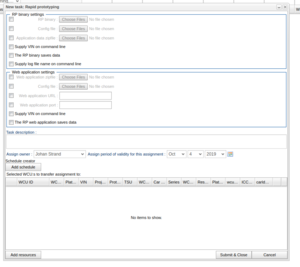
Rapid prototyping
A Rapid prototyping (RP) task makes it possible to download RP binaries to multiple WCUs and keep track of the result files the RP assignment might produce. For more information about RP, see WICE RP How-To and WICE RP Manual.
The rapid prototyping tab can be seen in Figure "Rapid prototyping task".
A RP task must consist of at least a 'RP binary' or a 'Webb application zip file'.
