New features in v2.41
This page aims to list all new features that is implemented i version 2.41 of the WICE Portal.
New task
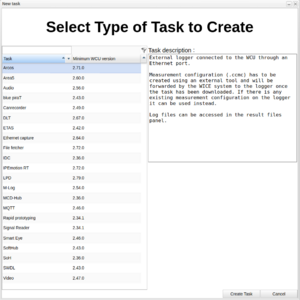
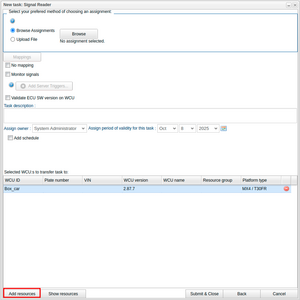
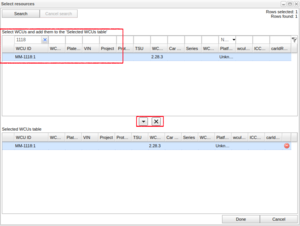
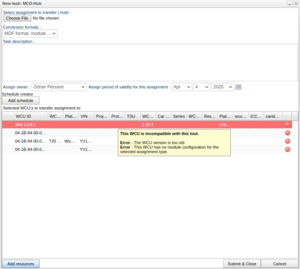
To create a new task, first select task type in the window presented in Figure "New Task Window". Learn more about how to go about creating a new task here. When a task is chosen, you can select target WCUs for the task by clicking the "Add resources"-button, presented in Figure "Add Resources to Task". As the illustration shows, the area where WCU's where added and removed to the task is a table very similar to the that in the Vehicles tab. This table shows the currently added WCUs that the chosen task will be added to. Clicking "Add resources" the window shown in Figure "Select Resources Window" will open up.
The select resources window contains two tables. The upper table has filter editors where one enters search criteria and performs a search by pressing enter or clicks the "Search" button. The lower table shows the selected resources (WCUs) and is connected to the table shown in Figure "Add Resources to Task".
Add/remove resources
To add content to the table of selected resources you can select the a WCU and then either click on the "arrow down" button located between the two tables or drag and drop the selected WCUs. It is also possible to add a single WCU by double clicking it. To remove content from the table of selected resources you can select the WCUs you want to remove and then click the "X" button next to the "arrow down" button. You can also remove a single WCU by clicking the red "Remove record" icon in the end of each line in the table.
When you are happy with the selected resources, click "Done" and the content will be added to the table shown in Figure "Add Resources to Task". If you click cancel, the content will not be added and you will have to add the WCUs again by reopen the Select resources window.
Incompatible resources
If you add a WCU and return to the New task window you can end up with having one or more lines, in the selected WCUs table, with red background. This means that the WCU does not have the current tool installed. An example of this can be seen in Figure "Incompatible Resources".
Add resources from the Search- and Vehicles tab
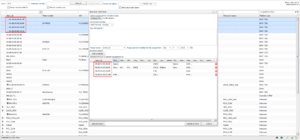
Instead of adding WCUs by the method shown above, it is also possible to select one or more records in the Search/Vehicles table in the corresponding tabs and then click "New Task". Any selected WCU will then by added to the table of selected WCUs. An example can be seen in Figure "Add WCUs from Vehicles Tab".
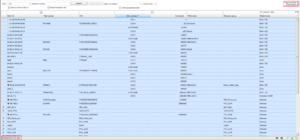
When selecting WCUs in the Search/Vehicles tab it is possible to select all visible WCUs by pressing Ctrl+A. To select even non visible WCUs (when your search criteria matches more results than the standard fetch of 50 results) you press Ctrl+A two times in a row. Note! Internet Explorer has some problems to correctly report keys down when two keys are pressed and when the result table in Vehicles has the focus. To come around this (and use the double CTRL+A feature) click outside the table and then press CTRL+A twice.
A illustration showing what it looks like when CTRL+A is pressed twice and even non-fetched WCUs are selected can be seen in Figure "Select All by CTRL+A".
View the validation reasons for each WCU within a resource group when creating a task
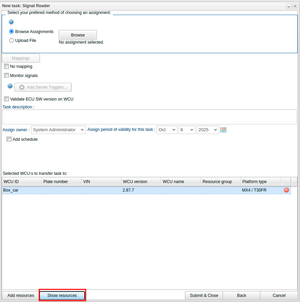
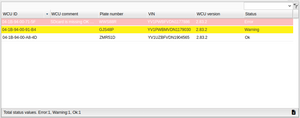
Starting with version 2.91.0, users can now view the validation status of each WCU within a resource group when creating a task. To access this feature, simply click the 'Show Resources' button or double-click the row (Figure "Add Resources to Task"). This will open a new validation window displaying the status of each individual WCU (Figure "Validation Resource Window"). If any WCU's status is not 'Ok,' users can hover over the WCU to see a detailed description of the issue. In the bottom left corner, you'll also find statistics indicating how many WCUs have the statuses of 'OK,' 'Warning,' and 'Error. In the bottom right corner, you'll find a copy button. When pressed, this button opens a new window displaying the table in text format, making it easier for users to copy any data.
I/O configurations
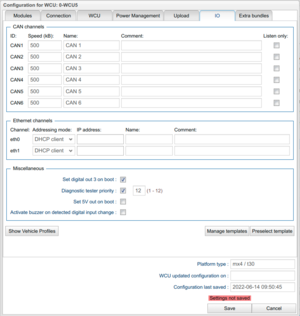
For WCUs with software version >= 2.41 the "Edit Configuration" window has a new tab named "IO". In this tab, it is possible to edit the settings of the CAN and Ethernet channels of a WCU. It is also possible to apply a pre defined template which is created and managed by an admin. The "Edit Configuration" window is reached by going to the Vehicles tab, select a WCU and press the button "Edit Configuration".
Edit CAN channels
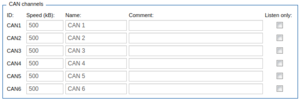
The number of available CAN channels depends on the platform type of the WCU which is configured. The group of CAN channels consists of four columns named Channel, Speed, Name and Comment. Each column is described separately below.
Channel
This column is a checkbox and if you enable CAN X, this means that X is available for mappings when creating a new task and uploading this task to his WCU. Read more about Mappings. In the same way, disabling CAN X means that X is not available for mappings. If a CAN channel for some reason is not connected to the WCU, then it could be good choice to disabling it here.
Speed (kB)
The speed column shows the baud rate of each CAN channel. This value was previously added to the WCU configuration when the WCU was connected to a CAR but from now it has to be set manually in this tab.
FD Speed (kB)
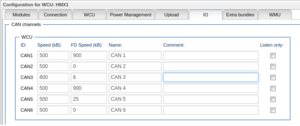
If the platform is HMX and the WCU version is 2.91.0 or later, a column will appear for the CAN channel.
Name
In this column it is possible to set a nickname for the channel. This name is used when a Signalreader task or assignment is automapped (see Mappings) so choose your names carefully. The default value is CAN 1,2..6.
Comment
The last column is used to add some comments to each channel. This is typically some describing text, e.g. the reason why a channel is disabled.
Add WMU(s)
If your Portal has WMU's enabled the "Add WMU" button will show in the CAN section. You can then add/remove WMU's and configure their CAN channels in the same way as the WCU's CAN channels are configured. For each WMU that is added, a corresponding tab is added under the Power Management tab for configuring the WMU's power behaviour.
Add CAN channels
If your Portal has Vehicle Communication Forwarder enabled, the "Add CAN channels" button will show in the CAN section. If both WMUs and Vehicle Communication Forwarder are enabled in your Portal, only "Add CAN channels" will show up. After having added a Vehicle Communication Forwarder with at least one CAN channel, pressing the button again will add more CAN channels to the Vehicle Communication Forwarder. When removing CAN channels, it is possible to either remove the entire Vehicle Communication Forwarder, or individual CAN channels from it.
Edit Ethernet Channels
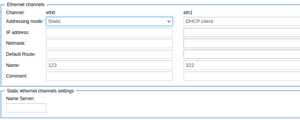
Like for CAN channels, the number of available Ethernet channels depends on the platform type of the WCU which is configured. The group of Ethernet channels contains eight columns and the individual meaning is as follows.
Channel
This column indicates which interface or interfaces that exists.
Addressing mode
In this column the Addressing mode is configured. The choices are "DHCP client", "AutoIP" and "Static".
IP address
Here you set the static IP address if you have selected "Static" as the Addressing mode.
Netmask
Here you set the netmask if you have selected "Static" as the Addressing mode.
Default route
Here you set the default route if you have selected "Static" as the Addressing mode. This field only shows if the WCU software version is 2.85.0 or later. The default route is the route that takes effect when no other route is available for an IP destination address.
Name Server (DNS)
Here you set the Name Server if you have selected "Static" as the Addressing mode. This field only shows if the WCU software version is 2.85.0 or later. Here you set the name of the DNS protocol.
Name
In this column you can set a nickname for this channel. This setting has no effect on the WCU side.
Comment
In the last column you can set a comment for this channel. Like for the name, this setting has no effect on the WCU side.
The Miscellaneous Section
This section is available for WCUs with version 2.49 or later.
Set digital out 3 on boot
Digital out 3 is one of the output pins in the dsub contact on WCUs of model MX4. This setting activates that pin on start-up of the WCU. The purpose of this is to trigger an external measurement equipment (e.g. M-Log or Arcos).
Diagnostic tester priority
For WCUs of version later than or equal to 2.60 it is possible to choose to configure the diagnostic tester priority. If enabled, a value between 1-12 can be selected. The described options are depicted in Figure "Miscellaneous".
Allow ethernet activation on WCU
For WCUs of version 2.90.4 or later it is possible to choose whether or not to allow the WCU to use ethernet activation. Not allowing this might disturb some of the WCUs features.
Set 5V out on boot
Option to set one of the output pins on the WCU to supply electricity at 5V to external equipment when the WCU is starting up. The option is visible for WCUs of model MX4 (except submodel V61) and with version 2.76.0 or later.
Activate buzzer on detected digital input change
Option to enable that the WCU makes a buzzing sound when a trigger-button (or other digital input) is activated on the WCU. It is possible on all MX4 models. The option is visible for WCUs with version 2.76.0 or later.
Diagnostic firewall disable and PIN
Option to disable diagnostic firewall. Requires PIN. Visible for WCUs with version 2.89.0 or later.
Fetch uploaded PINs
Option to fetch uploaded PINs for HIA, HIB, and Diagnostic firewall disable. Resets back to unchecked after saving the configuration. Visible for WCUs with version 2.89.0 or later.
PINs must first have been be uploaded via either the 'Upload Vehicle PINs' button in the vehicles tab (for multiple vehicles), or by right-clicking a WCU and selecting 'Upload Vehicle PINs' (for a single vehicle).
Manage templates
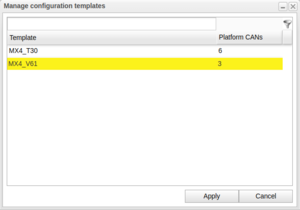
Admins can save configs as templates (see Manage templates (for admins)) and normal users can use these templates to fill all columns with the data stored in the template. Clicking "Apply" will apply the selected template. You can always change settings or add more info, the template could be anything you need or just act as a starting point.
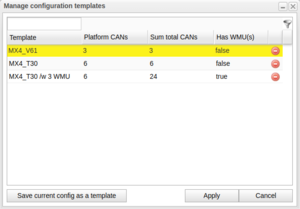
If WMUs are enabled in the portal, a template will save the CANs from each WMU and when a template is selected the WMU CANs are applied 1:1 to each existing WMU in the configuration. If there are no WMUs in the configuration the template's WMU CANs will not be applied, only the WCU's CANs.
Manage templates (for admins)
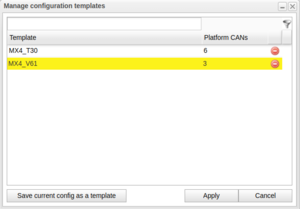
If you are an admin you have an extra button "Save current config as template" in the Manage configuration templates window. Clicking it to save the current configuration as a template will prompt you for a name. If the name already exists (case insensitive) a confirmation dialog will popup before overwriting.
Additionally, as admin you will be able to remove existing templates, which is done by clicking the red "Remove record" icon to the right of the template name. A confirmation dialog will popup to prevent deletion by mistake.
Show Vehicle Profile
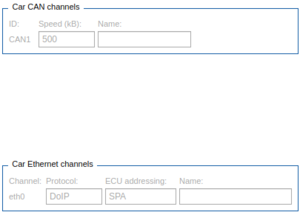
The button "Show vehicle profile" can be used to show, and hide, a panel showing the CAN and ethernet information for the connected car, see Figure "Vehicle Profile". This option is disabled if no car is connected.
Get PINs or Check PINs
The button will show as "Get PINs" for individual WCUs or as "Check PINs" for resource groups. Requires version 2.89.0 or later. Pressing "Get PINs" for a WCU will lookup existing PINs for HIA, HIB, and Diagnostic firewall disable. If available the PINs will be applied to their corresponding fields. If not all PINs are available there will be a pop-up specifying which PINs and for which reason: either missing entirely or there exists a PIN for the ECU but for the wrong service area.
For resource groups the button "Check PINs" will not apply any found PINs, instead if there are any resources with missing PINs it will specify, like for individual WCUs, which PINs are missing and for which WCUs.
PINs must first have been be uploaded via either the 'Upload Vehicle PINs' button in the vehicles tab (for multiple vehicles), or by right-clicking a WCU and selecting 'Upload Vehicle PINs' (for a single vehicle).
Mappings
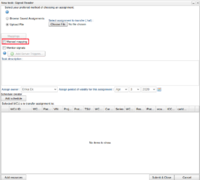
When creating a SignalReader task (New Task and then selecting the "SignalReader" tab) there is a new checkbox, "Manual mapping", as illustrated in Figure "Manual Mapping Checkbox". If you tick this box, the upload of the SignalReader haf-file will work as in previous versions of the portal. If you do not tick this box, then, when a .haf-file is uploaded, the portal will start a process called auto mapping.
Auto mapping
When a .haf file for a SignalReader task is uploaded, the portal will start to parse the file and search for references to CAN buses and try to look up the name of the bus. The name of the CAN bus is found in a section named GLOBAL_CAN_API_MODULE_X, as the example below shows. If no such section exists in the .haf file, the parser is unable to look up the name of a CAN bus.
[GLOBAL_CAN_API_MODULE_0]

default_period=10

description_date_time=

description_file=

direction=IN

io=CAN1

name=CAN_HS
CAN buses and names are equal
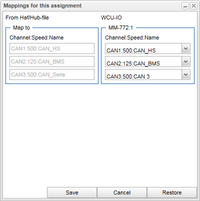
When the .haf file is parsed, the portal will try to match the extracted CAN bus references and its names with the enabled CAN buses and their names (See I/O_configurations) for each selected WCU. If the name for each referenced CAN bus matches the name in the WCU configuration the dialog shown in Figure "Auto Mapping Performed" will pop up. This dialog says that auto mapping is performed and that the mappings can be verified by clicking on the new button "Mappings", which appears above the upload file form.
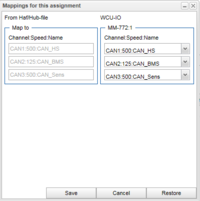
When clicking on "Mappings" the window shown in Figure "Verify Mappings" will open up. The left group shows the info extracted from the .haf file. This is channel, speed (baud rate) and the channel's name. The right group shows the config(s) for the WCU(s) this task will be uploaded to. As you can see in the illustration, the names (and speed) in the .haf file and from the WCU matches each other. This is why the auto mapping succeeded.
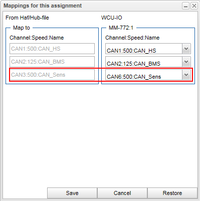
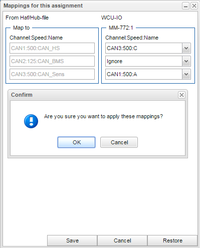
If you want to change the mappings, for example switch CAN3 in the .haf file to CAN6 in the WCU, you have the option to do it here. Select the bus you want to change to, as illustrated in Figure "Change Mappings", and click "Save". If you change your mind, just click "Cancel" to return to the New task window.
CAN names are equal but for different buses
In the example in Figure "Change Mappings" CAN1(=CAN_HS) in .haf file perfectly matches CAN1(=CAN_HS) in the WCU configuration. There exists cases though when one CAN bus is disconnected and another CAN bus is connected in its place on the WCU. In this case, the .haf file needs to be rewritten since referenced CANX is connected to CANY on the WCU. If the name of CANY on the WCU matches the name of CANX in the .haf-file, a automated mapping between X and Y will be created. The Figure "CAN6 to CAN3" shows an example when the .haf file has references to CAN1,2,3 but only CAN1,2 and 6 is enabled in the WCU configuration. The name of CAN3 in the .haf-file matches the name of CAN6 in the WCU configuration, so in this case CAN3 will be replaced by CAN6 when the .haf file is uploaded to the WCU.
Like for the previous example you can always choose to change the automated mappings if you for example now that you have made a mistake when you named the CAN buses inte .haf file or in the WCU configuration.
Auto mapping fails
This section describes cases when the auto mapping fails.
CAN name not found
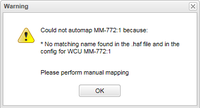
In the examples in the previous section the CAN bus names in the .haf file are found in the WCU configuration for the selected WCU. If a file is uploaded were that is not the case, the warning dialog shown in Figure "Auto Mapping Failed" will pop up. The dialog shows the reason(s) why the auto mapping failed and when one clicks "OK" the "Mappings" window will automatically be opened. This is illustrated in Figure "Review Auto Mapping Failed" and here we can see that the name "CAN_Sens" was not found in the WCU configuration. By default nothing is changed so if you click "Save" here no new mapping will be created. But if you now that CAN3 should be mapped to CAN6 (like the previous example) you can create the new mapping and save it by clicking "Save".
Name matches but speed differs
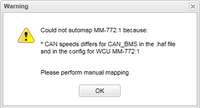
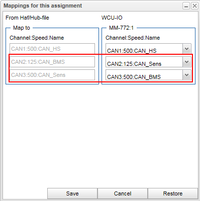
Since the speed of the CAN buses can differ the auto mapping can end up in the case when it founds a matching name in the .haf file and in the WCU configuration but the CAN speed differs. If this is the case, the warning shown in Figure "CAN Speed Differs Warning" will popup. When clicking "OK" the "Mappings" window will be visible and make it possible to either leave the file as it is (no mappings created) or create new mappings. The Figure "CAN Speed Differs" shows the configuration which lead to the warning in Figure "CAN Speed Differs Warning". In this case we have probably mixed up the names in the WCU configuration or when creating the .haf file.
Ignore
In addition to the available CAN buses for a WCU, you also have an option "Ignore" as you can see Figure "Change Mappings". When selecting this option, nothing is changed in the .haf file but the choice is stored in the database and listed in the mappings for each WCU and task when clicking "View Assignment" for a SignalReader assignment in SearchPanel.
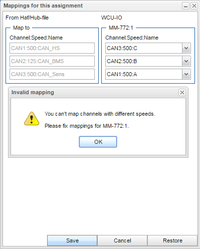
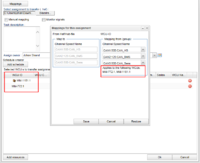
A use case for ignore is when you have set the wrong bus speed in the I/O configurations for CAN bus X and also need to remap another can bus Y. In this case, the Mappings window will not let you store the new mappings for Y, since the speed of X differs in the haf file and inte WCU configuration. Setting X to "Ignore" will act as a workaround for this. Figure "Ignore Different Speed" shows an example of where have, by mistake, set the speed of CAN2 to 500 but the CAN2 in the .haf file has the speed 125. We also need to remap CAN1 to CAN3 and CAN3 to CAN1. In this case we can't save the new mappings since CAN2's speed differs. Setting CAN2 to "Ignore" as in Figure "CAN2 Ignored" fixes this case.
Grouping of WCUs
The examples above only consists of tasks for one single WCU. Normally tasks are uploaded to multiple WCUs or resource groups consisting of multiple WCUs. Since WCUs have their individual configuration (especially when they not belong to a resource group) each single WCU configuration is compared to the CAN references extracted from the uploaded .haf file. If a WCU's IO configuration is equal to another WCU's configuration these two WCU's are grouped together in the "Mappings" window. Any new mappings made for this group will be applied to all WCUs which are included in the group. An example of this can be seen in Figure "Grouping of WCUs" where two WCUs are selected but they are grouped in to one group in the "Mappings" window.
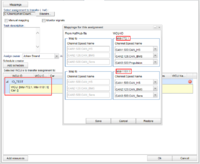
In the case when a resource group consisting of two or more WCUs are selected but the I/O configurations of the WCUs differs, these WCUs will show up in single groups in the "Mappings" window. An example of this is shown in Figure "Map Single WCU in Resource Group" where the resource group "IO_TEST" is selected consisting of two WCUs with different I/O configurations.
The .haf file uploaded to the WCU
Even if it is only possible to upload one .haf file to the portal when creating a new SignalReader task, the file uploaded to the WCUs may differ if individual mappings for the selected WCUs are applied. In the example we had in #CAN names are equal but for different buses where CAN3 is mapped to CAN6 the .haf file for this WCU will have all occurrences of CAN3 replaced by CAN6.
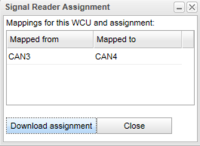
The portal has a feature to view the assignment after the assignment was uploaded to the WCU (Search tab and then click "View Assignment"). In this window it is possible to download the assignment by clicking "Download assignment". What is important here is that the file which is downloaded is the original .haf file which was uploaded by the task creator. It is not a copy of the file that was uploaded to the specific WCU. Therefore any new mappings are not visible in the downloaded haf file (e.g. CAN3 is not replaced by CAN6), instead any potential mappings for the actual WCU and assignment are displayed in a table in the "View Assignment" window. Figure "Mappings for a Submitted Assignment" shows an example of this (where CAN3 is replaced by CAN4).
My downloads
My Downloads Dialog
Whether it's zipped result files or converted text files, downloading them to your local computer is done via this dialog. Each row in the table corresponds to a file to download.
When you have decided to download some result files, a zipping process starts at the server. This process can take quite some time if the result files are large. If you change your mind and decide that you are not interested in the files currently getting zipped, you can choose to interrupt the file zipping process. This is done via the "cancel" icon that appears to the right in the "My downloads" dialog. See Figure "Cancel Download Process" for an example.
You can also choose to cancel an ongoing download this way. If the file zipping process was cancelled, the background colour of this row till change to red. This means that the file can not be downloaded and the column "Status" will display the reason. An example of this can be seen in Figure "Download Cancelled".
When you have downloaded or cancelled a download, the record for this download will stay in "My downloads" for three days until they are automatically removed. If you want to clean remove them earlier, click the red "remove record" icon that appears to the right of each downloaded/cancelled download.
